October Vlog with Jacey and Jillian

Jillian starts by sharing the businesses who contributed tools and fiber to the Consistency issue (listed on Independent Spinner page and below) and then explores her favorite parts of this issue. Jacey shared several videos illustrating some of the techniques used in the issue. Jillian explains and shows her favorite spinning tools from HipStrings—WPI tools and twist angle gauges. Jacey asserts the importance of measuring yarn (such as twist angle) before it is finished so it is easier to re-create that yarn. Jacey gives a preview of the upcoming Winter issue—Head and Hands—and discusses plans for PLYAway 2022. Finally, Jillian and Jacey encourage everyone to submit ideas for writing for PLY, especially for experiment-type articles where you don’t have to know any answers beforehand and just take the readers through your experiment and conclusions. 

Specific information about PLYAway!  

PLY Away 2022 
April 19th-23rd, 2022 
Plyaway.com 

It’s happening, it’s really happening! After much stressing and debating, PA22 is on! For everyone’s safety, health, and feeling of security, we will be requiring all teachers, attendees, and vendors to be fully vaccinated. If there are changes in the Covid-19 situation, we will adapt and change as well. 

Because of all of this, there has been some juggling and shuffling. On October 18th, the full list of teachers was posted on the website. All the fiber-rific classes were revealed on October 20th. Registration will open Oct. 30th at 11am Central for everyone who was registered for PA20 (you’ll get an email and registration code) and on Oct. 31st at 11am Central, registration will be open to all. 

If you were set to vend at PA20, we’ll be reaching out about PA22. 

Finally, we’re always looking for fibery goodies for the PA goodie bags (we are thrilled to exchange bazaar ads for goodie bag items). Silent auction items and door prizes are also welcome! Everyone gets mentioned in the PA program too! Get in touch with Jess.cook@plymagazine.com for more details. 

Links mentioned in this quarter’s video:

Camaj Fiber Arts 

Akerworks  

Nancy’s Knit Knacks  

Cynthia Wood Spinner 

HipStrings  

Mielke’s Fiber Arts 

Brookmoore Creations  

Middle Brook Fiberworks 

Essential Fiber 

Jenkins Yarn Tools 

Wheels 

Daedalus Sparrow and Magpie 

HansenCrafts miniSpinner 

Majacraft Rose 

Louet S10 and S10C 

Ashford Wee Peggy 

Did you know we also have a monthly PLY newsletter? Sign up here!

PLY Magazine believes that Black lives matter, as well as LBGTQI+ lives. Those most vulnerable and persecuted in our communities deserve our love and support. Please be good to each other.

Did you know we also have a monthly PLY newsletter? Sign up here!

Book Review: Pastoral Song: A Farmer’s Journey

book by James Rebanks

reviewed by Jillian Moreno

I’ve read this book twice, first when it was released in England last year, and just recently I listened to the audiobook. My first read told me it was important information, but I let myself be carried along, entranced by the storytelling.

The deeper information about farming and how farming has changed hooked me, subtly but deeply. I started reading more about farming and sustainability as articles came across my various feeds.

When I listened to the book for my second read, the importance of sustainably growing food and raising animals is all I heard.

James Rebanks is an excellent writer; he can put you squarely in a moment or a place. He currently farms and raises sheep and cows with his family. This land in the Lake District in the north of England has been in his family for 600 years, and he gives it the respect it deserves.

The book is divided into three sections.

Nostalgia presents the type of farming he remembers from his youth, how his grandparents farmed. It is rotational farming, working with and preserving the land.

Progress is the farming he saw in his teens and twenties, his father’s farm. The farming focused on increased production at the cost of everything else; the health of the land, the animals, the farmers, and the consumers can be damned as long as inexpensive food is on the shelves. This is the era of giant tractors, pesticides, growth hormones, and single crop farms. Much of the world still farms this way.

Utopia closes the book. This is the farming Rebanks and his family currently practice. It’s mostly back to the ways of his grandfather, with modern “progress” only where it makes sense to the bigger environmental picture.

He doesn’t sugarcoat how hard this type of farming is. He works with environmental agencies and receives subsidies to farm in favor of the land and animals, to restore and maintain the biodiversity of his land, but he still has to do work away from the farm to make ends meet.

This is the type of farming we should be striving toward, and this book gives me hope it can happen if we respect and focus on the well-being of the land, animals, the farmers, and our own health.

James Rebanks gives me hope for the future of farming and our environment.

Did you know we also have a monthly PLY newsletter? Sign up here!

PLY Magazine believes that Black lives matter, as well as LBGTQI+ lives. Those most vulnerable and persecuted in our communities deserve our love and support. Please be good to each other.

Scales and Arpeggios Spinning Exercises to Help Make Your Spinning More Consistent

Michelle Boyd

If you’re faithful to your daily practicing,

You will find your progress is encouraging

Do mi so mi do mi fa la, so it goes

Practicing your scales and your arpeggios.

              -The Aristocats          

When I was a student in Olds College’s Master Spinner Program, I struggled with making consistent singles, just like everyone else who has ever taken that course. I just couldn’t get a good rhythm going and keep my drafting even. Then one day, I had a conversation with my daughter’s piano teacher that gave me an idea.

She said practice makes perfect, but practice works best when it is focussed. She had assigned my daughter a set of specific exercises that seemed simple and repetitive but were intended to teach muscle memory to make her playing easier, almost unconscious. I realized I could do the same with my spinning, and I came up with some simple exercises to focus on my drafting. Just like piano practice, I did these little drills every day for 15 or 20 minutes and before long, I found that my singles were smooth and consistent. Because I was inspired by piano practice, I called it “doing my scales.” And since I’ve always loved the song from Disney’s Aristocats, I came to think of them as my scales and arpeggios.

These exercises are designed to focus your spinning practice on one area at a time to help you build muscle memory and gain consistency in spinning your singles. You may want to try practicing one of these exercises each day for 15 minutes, or you can sit down and run through all of the exercises once a week. These exercises are intended as basic guides to the drafting styles, and with practice and observation, you may find that small adjustments in the rhythm or procedures work better for you and your body mechanics. In time, you will find that you can spin smooth singles with ease.

When you practice spinning, make sure that you are seated in a comfortable chair that supports your back and shoulders. Sit back from the orifice of your spinning wheel, leaving at least 10 cm (4 inches) between your front hand and the orifice.

Exercise 1: Short Forward Draw

This exercise is intended to improve the coordination of your draft and your treadling to help you achieve a more consistent distribution of twist for each draft. With practice, you will learn to make a smoother single and reduce the number of slubs and thin spots.

Using a top or sliver preparation and the largest whorl on your flyer, attach your fibre to a leader. As you treadle downward, draft your fibre forward from the fibre source. As your foot comes back up, draw your drafting hand back to smooth the twist into the attenuated fibre. With the next treadle, use your drafting hand to simultaneously feed your spun singles forward and draft the next length of fibre forward. As your foot comes back up, smooth the twist in. Practice keeping your back hand stationary and only moving your front hand as you draft and smooth to ensure a regular drafting length.

Your rhythm will be foot down/draft forward, foot up/smooth back.

(Note: If you are spinning on a wheel with double treadles, choose one foot as your treadling foot to coordinate the draft with and count only that foot. You can adjust your rhythm to R foot down/draft forward, L foot down/smooth back, or vice versa if you are more comfortable starting with your left foot. This applies to Exercise 2 as well.)

Exercise 2: Short Backward Draw

This exercise it the companion to the Short Forward Draw above, using the same treadling and drafting rhythm, but drafting with your back hand and smoothing with your front hand.

Using a top of sliver preparation and the largest whorl on your flyer, attach your fibre to a leader. As you treadle downward, pinch the fibre at the leader with your front hand and draft a short distance back with your back hand, allowing the fibres between your two hands to thin and straighten. As your foot comes back up, smooth the twist back with your front hand until it meets your back hand. With your next treadle, repeat the process with your back hand moving as you treadle down, front hand moving as your foot comes up. After 3 or 4 drafts backward, you will find that your back hand is a distance from the orifice of your wheel and it is time to feed forward. Pinching the fibre source at the tip of your drafting zone with your back hand, allow the take-up of your wheel to pull the single forward onto the bobbin, smoothing the single with your front hand.

Your rhythm will be foot down/draft back, foot up/smooth back (3-4 times), treadle down/feed forward/treadle up.

Exercise 3: Supported Long Draw

This exercise is designed to make you more comfortable with a long draw drafting style. This is by no means the only way to achieve a long draw but will provide a foundation for the skills that are needed for all long draw drafting styles.

Using a roving or rolag preparation and the largest whorl on your wheel, attach your fibre to the leader. With your front hand, pinch the fibre at the leader. This hand will remain stationary and pinch and open to control the twist as it enters the fibre, so ensure it is in a comfortable position that does not strain your wrist, elbow, or shoulder. Treadle a few times to build up the twist ahead of your front hand. Continue to treadle steadily as you begin to draft – if you are a haphazard treadler, you might want to use a metronome app to help you find a steady rhythm, too.

Starting with your fibre held in your back hand close to your front hand, draw the fibre source back with your back hand to thin and straighten the fibres. Open the fingers of your front hand, allowing the twist to catch and twist the attenuated fibres. When you feel the pull of the twist opposing your draft, use the finger and thumb of your back hand to clamp down near the tip of your drafting triangle and allow the twist to come up to that point. Move your back hand forward to allow the single to be pulled onto the bobbin. Pinch the twisted single with your front hand again, leaving 2–3 inches (2.5–4 cm) of twisted single behind your front hand. Draft the fibre source backward again, and repeat.

Your rhythm will be pinch front, pull back, pinch back, feed forward.

When you feel confident with this drafting method, try removing the front hand (pinch front) from the process. Without that front hand pinching to control the twist as you draft, this becomes an unsupported long draw.

Though at first it seems as though it doesn’t show,

Like a tree, ability will bloom and grow

If you’re smart you’ll learn by heart what every artist knows

You must sing your scales

And your ar-pe-eee-ggios.

~The Aristocats

(Music and lyrics by Richard M. and Robert B. Sherman)

Did you know we also have a monthly PLY newsletter? Sign up here!

PLY Magazine believes that Black lives matter, as well as LBGTQI+ lives. Those most vulnerable and persecuted in our communities deserve our love and support. Please be good to each other.

Virtual Shetland Wool Week 2021

Shetland Wool Week is online this year so you can enjoy the offerings from the comfort of your home. (Though I’m sure we’d all much rather be able to see the sheep and feel the fiber in person!) From their website: “For nine days from 25 September – 3 October, we’ll be bringing Shetland Wool Week to you. There will be films, talks, tours and classes – some pre-recorded and others live, as well as music and a market.”

If you purchase a SWW membership, you’ll gain access to a film series with videos such as the following: Carol Christiansen on “A Guide to Rooing,” Sue Arthur on Preparing Shetland Fleece for Handspinning, and Bunchy Casey on “A Shetland Dye Garden.”

Did you know we also have a monthly PLY newsletter? Sign up here!

PLY Magazine believes that Black lives matter, as well as LBGTQI+ lives. Those most vulnerable and persecuted in our communities deserve our love and support. Please be good to each other.

Tweaking My E-Spinner for Angora

words and photos by Terry Clemo

“I’m not new at this spinning thing,” I think to myself. “Why am I having such a strange beginner experience with my new Ashford E-3 electric spinner?” After setting up my new machine, I start to play with some dyed wool. I didn’t think changing from a manual, foot-driven spinning wheel to a little electric spinner would be such a challenge. But it has been, and not for the reasons one might think. I’m not missing the treadling; in fact, I’m so happy to be able to put my legs up. I’m so much more comfortable now – hey, I can spin in bed!

“So what’s your problem,” you might ask. Well, I’m having trouble getting my spun yarn to wind on, and when I stop, the bobbin keeps turning and the single wraps around the bobbin and is going the wrong way. Ugh, now to unwind and correct the path of my spun single. I’ve not ever had the bobbin on my double treadle Lendrum do that before. “Hmmm, Lendrum bobbins are so little looking compared to the jumbo bobbins that came with the new E-3.” I’m not used to their weight turning around with the flyer either. So I slightly tighten up the Scotch tension to make a bit more resistance on the bobbin and try again. Same thing happens, so I add a tiny bit more tension, and the draw in of the single is starting to work, but just barely. Okay, now maybe I can get somewhere.

At the same time I’m playing with the speed controller of the flyer to see how it reacts with my takeup. It’s adding another variable to my dilemma. In comparison, both spinners are flyer-led and have Scotch tension, but why are they behaving so differently? Time for a cocktail. The DT Lendrum has the drive band on the flyer, and when I press the treadle I get the immediate response of the flyer turning. The E-3 has the centre spindle of the flyer resting in a keyed bushing that is the centre hub of the motor, so I have to turn up the speed dial to get it turning. As I’m playing with the speed control, I find it needs to be turned up almost to 15–20% to get the flyer to move when I have some resistance on the single and so that there is some torque force to be able to pull the single so it wants to wind on.

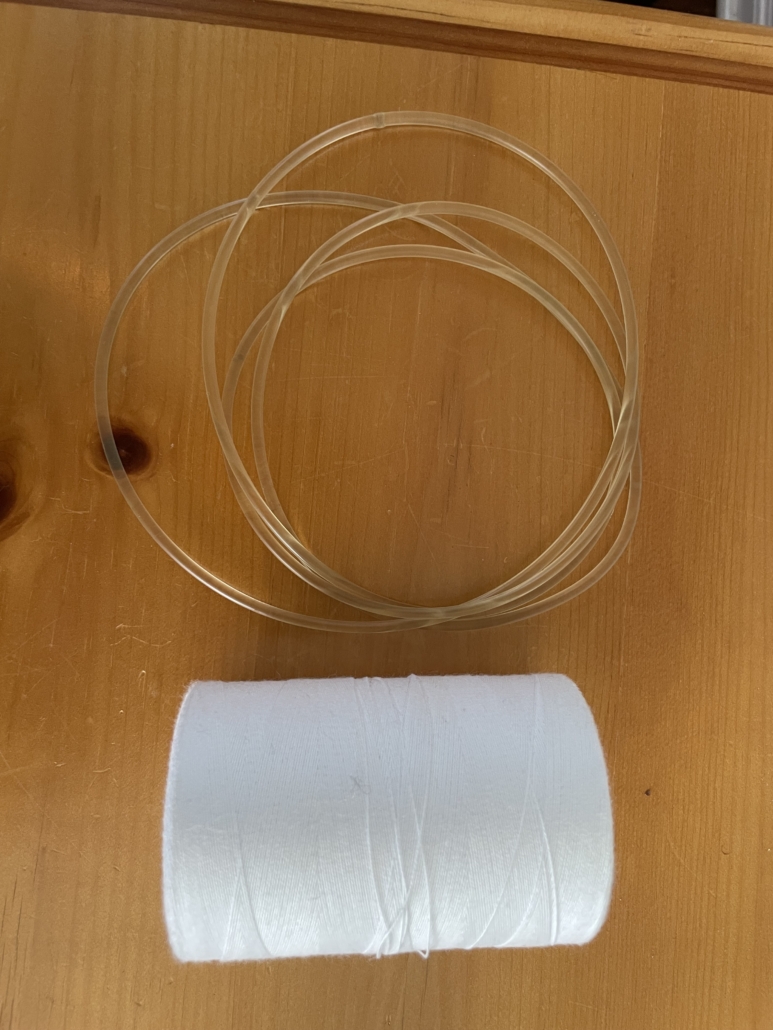
By now I’m using more flyer speed and more tension, and the bobbin stops after spinning. But now there’s too much pull for my liking and I can’t get the amount of twist into my single that I need before it wants to be swallowed by the orifice. Normally, I would back off the tension, but I can’t really; there doesn’t seem to be a sweet spot. I can’t fine tune this setup with the original heavy, stiff fishing line that came with the machine. And I’m not spinning with a grabby fibre or a short draw, which might help get this spinner working well.

Side journey through angora spinning

You see, my spinning journey flourished at the same time my love of very fuzzy rabbits was fulfilled. My first angora was an English that I named Flurry. She was “fur in a hurry”! Needless to say, pretty much all of my spinning has something to do with angora from rabbits.

My favorite thing is to spin angora from a cloud (which is basically a fluffed up, or carded, small handful of airy angora fibre, which can be organized or not); it can be so magical. I especially like how the tips of the individual fibres protrude and spiral out from the centre of the single when they are drawn out and not smoothed down. It’s exactly what blooming spun angora should look like. This texture is accentuated by the long draw.

Angora is a finicky fibre; the more you fuss with it – try to handcard it or blend it with itself or other fibres – the more likely you are to put more nepps in it than it had from off the rabbit. Since angora is so fine (in the range from 7–8 microns to mid-teens, with an average of 10–12 microns), it easily tangles. Also, the average staple length is 4–7 inches for the blanket of the rabbit, the longest fur from their back, and unless its harvested correctly, it can get new tangles in it. Angora bunnies also have some lovely textured fur on their chest, belly, and legs; it’s shorter at 2–3 inches or so and it’s not as dark as the top side colour, mostly. As you spin their fibre, there will be colour changes as you go because the colour varies on the bunny. This colour changing ability is quite beautiful and gives angora yarns their character.

Some angora spinners don’t mix the two basic types, mostly because of the length difference, but colour differences can be the main reason. For some of my spinning projects, having both can make the yarn more textured, and it will be fuzzier. My favourite way to spin is straight from the storage box, loose and fluffy whatever comes so I may end up with some shorter fibres mixed with longer silkier ones. So I try to fluff up and mix the two so I hold a couple of staple lengths at the base with my thumbs and fingers and I pull apart from so it separates into one layer in each hand. I lay it back on top of the other layer, hold the base end, pull it apart, and this time I put the new layer on the bottom. I’ll put many of these little bundles aside in a smooth container to spin later.

I like my angora spun with tiny slubs and uneven blending, and with a long draw technique that lends to loose airy preparations. So with my long draw technique, I need some tension to pull against to draft out the fibres as the twist is holding everything together just enough to be a thread.

Back to the e-spinner

So my secret is out, I’m a long draw girl. Now I get to play around with my new toy and translate this style of long draw to the e-spinner. I need to have very little take-up tension while I’m drafting so my single doesn’t prematurely feed onto the bobbin before it gets sufficient twist. The single when using short draft is basically always moving through the orifice, but not with a long draw. My long draw draft is about 14–16 inches, so there’s a lag in time before I can wind on. I don’t want the flyer to pull too hard and pull apart the newly forming single. I like to use a supported long draw. My right hand helps me control twist to the cloud of fiber and gives me something to pull (draft) against. I stop drafting to let my twist come into the single and I visually check for my chosen angle of twist and then slowly push the thread into the orifice, and the bobbin starts to wind the single and it seems to gather a bit of momentum till I stop. Leaving my leader out with extra twist building up in it and again having very little draw in, I start drafting out again.

So after all this is said, remember that I’m spinning Angora at 100 percent or about 20–25 percent in a blend with very fine wool (22 microns or less) and silk or maybe some alpaca or other fine fibres. Angora is very slippery, hence the very light takeup on the bobbin, and it lets me get more twist in my single. I usually spin from laceweight to fingering weight, so I’m spinning fine. My plies for my yarns are made of one or two singles of angora and the others are a blend of dyed wools, silks, and angora or dyed wool, all the while playing with colours. Depending on the project and how much angora I want, I can use different combinations of these, but I usually stick to 2 or 3 plies per yarn.

How do I fix my dilemma as to how to make this machine work the way I need it to?

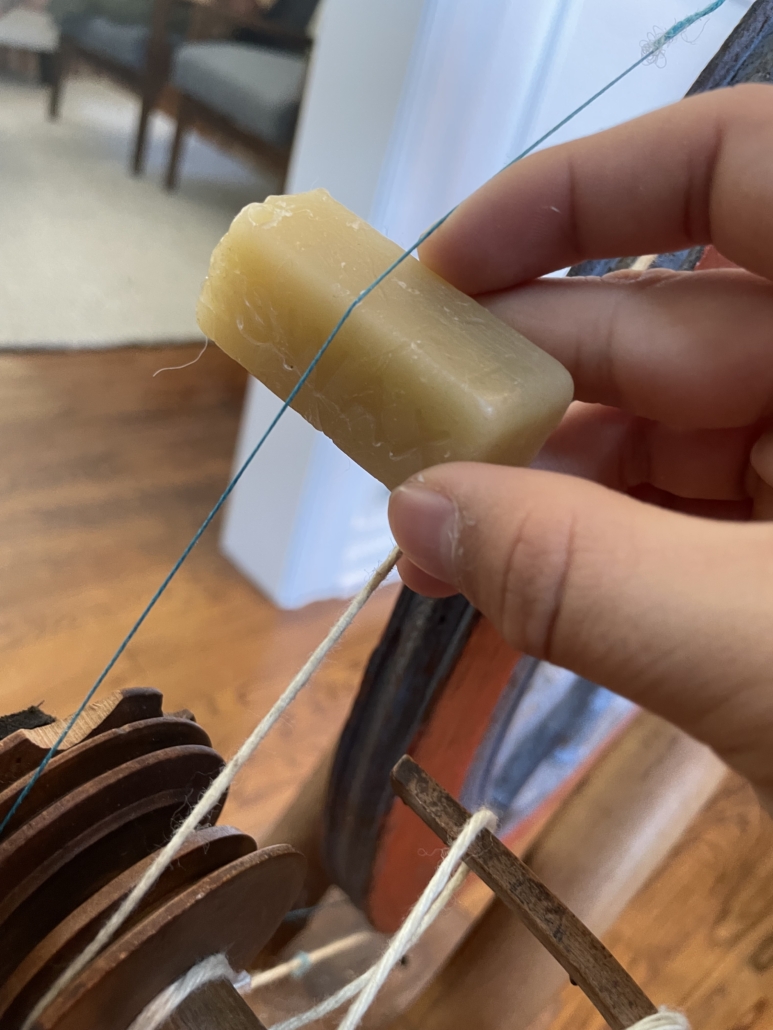
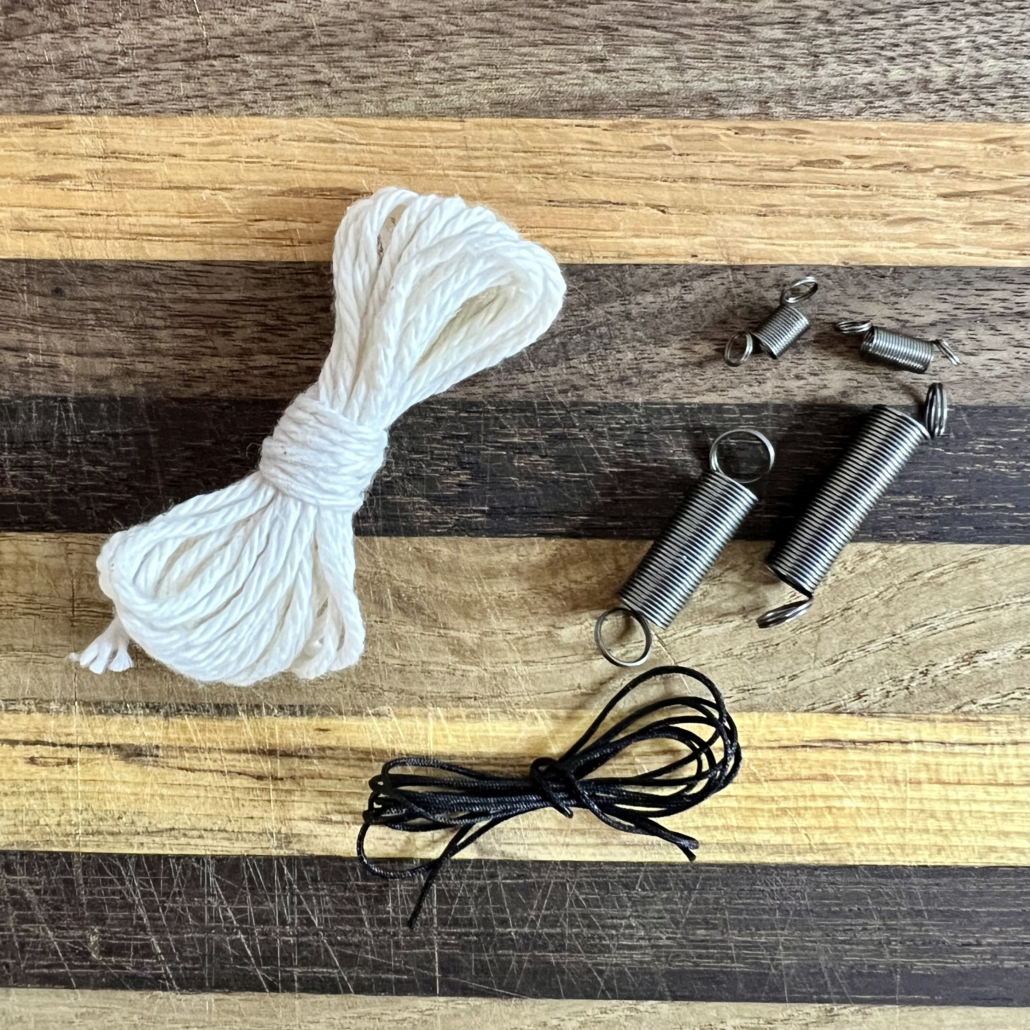
Planning my attack, depending on how and what I wanted to spin, I could use cords of different materials for the brake band to give more slipperiness. I might try a finer nylon filament or the plastic coated stainless steel jewellery wire, some nylon threads, or high end fishing lines made of plies from titanium or other advanced materials. I also wanted to try adding a bit more drag to increase tension and help with spin-on of the bobbin, so I’ve tried cords that were a bit rough like hemp (thin and thick) and whatever else I could think of. I’ve even tried something similar to the traditional cotton. I tried the string that sealed the rabbit feed bags, which seemed to be more slippery than the usual cotton. It’s probably a form of polyester, which is more durable than the cotton. The diameter of a cord also comes into play. I need to be able to quickly snap different brake bands into place to find my favourite band.

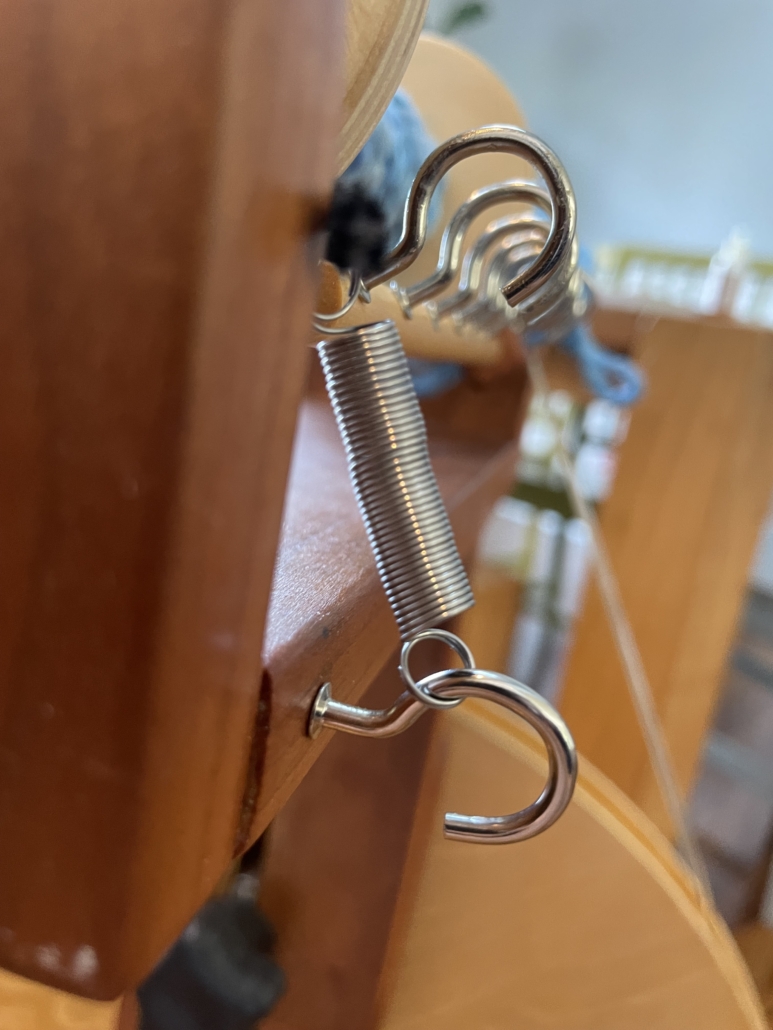
I realized that if I wanted to experiment with different bands it wasn’t going to be so easy to untie knots attached to the springs. I decided to make different quick-connect brake bands. I used small lobster clasps approximately 10mm and crimps beads or tubes, 1.5mm size. I also had foldover crimp ends (with connector eye) in various sizes, which would close better with crimpers.

So far, my favourite band over the rabbit feed bag string was the plastic coated multi-filament beading wire. It’s quite fine and seems to give me varying degrees of tension that I didn’t have before. Like any journey, I’m still playing around with different cords and different fibre blends. There’s not enough time in a day or a week for that matter to ever have enough spinning time.

Terry Clemo has had soft spot for fuzzy animals from a very young age. It seemed to follow that her interests spanned to other fibre arts like knitting and sewing and other textural crafts while still a child. Her mother was an expert machine knitter and told her she needed to hand knit before she would give her any machine knitting lessons. With the lessons came a toolbox of techniques that opened up the door to designing her own knitting patterns. Working with her luscious angora, Terry makes batts, handspun yarns, and semi-precious beaded wire knitting jewellery such as shawl pins. You can find Terry on Facebook and Instagram and at various fibre events.

Did you know we also have a monthly PLY newsletter? Sign up here!

PLY Magazine believes that Black lives matter, as well as LBGTQI+ lives. Those most vulnerable and persecuted in our communities deserve our love and support. Please be good to each other.

Spin Together is coming in October

Spin Together is a week-long spinning competition taking place online and everywhere the week of October 2, 2021. A small group of indie dyers and fiber artists got together in 2019 to create a joy-filled spinning competition with a focus on creative spinning as well as yardage. The goal was to bring spinners from all around the world together for a team-based week of fun and camaraderie and an opportunity to spend a little more time spinning.

Now in its third year, Spin Together has yardage contests for spinners using spindles, spinning wheels, and e-spinners. There are also creative contests for Most Beautiful Skein and Wildest Art Yarn. Most of the teams are led by local yarn stores, guilds, and online yarn and fiber shops. New teams are being formed through August 30th, and then individual spinners can join teams throughout September. You can learn more and sign up on the website at www.spintogether.org.

There’s also a warm and friendly Facebook group at www.facebook.com/spintogether that is active all year long with new and experienced spinners helping each other out and sharing what they make.

Did you know we also have a monthly PLY newsletter? Sign up here!

PLY Magazine believes that Black lives matter, as well as LBGTQI+ lives. Those most vulnerable and persecuted in our communities deserve our love and support. Please be good to each other.

Handspinning Touchscreen Gloves

words and photos by Christie Schulze

Alberta winters can be brutally cold, which makes having a good pair of mittens or gloves an absolute necessity. After trying several pairs of gloves claiming to be compatible with touchscreens that either did not work as advertised or were nowhere near warm enough (seriously, how am I supposed to scroll through Insta while waiting for the bus without losing a thumb to frostbite?), I decided that if I wanted touchscreen gloves, I would have to make my own.

I researched my fiber options. I found some conductive thread and purchased it with the intention of holding it double with my yarn when knitting the end of the fingers, but when it arrived it was much thicker than I realized – nearly the same size as my fingering weight yarn – and a light beige colour that was going to contrast significantly against my darker yarn. Thankfully, one of the great advantages to being a handspinner is being able to make exactly the yarn you need.

I took a closer look at the conductive thread to see how it was made. It appeared to be a metallic strand plied with cotton. I had stumbled across a listing for spinnable stainless steel fibre on Etsy some years back and bought it as a novelty. Knowing it was conductive, I started my experiments there.

A previous bad experience told me that I didn’t want to just spin the stainless steel by itself and ply it with my wool. I had previously worked with a commercial yarn made of two plies of wool and one of stainless steel. The yarn was lovely and looked amazing, but as I worked with it, the strand of stainless steel seemed like it was cutting through the wool. I had to splice that yarn with great frequency – and what was meant to be a gift for my mother-in-law to wear to my wedding ended up being finished closer to our third anniversary. I decided to try blending the stainless steel into wool.

As so often happens with my fibre arts experiments, I experimented on my partner first by making him a pair of gloves. In my defense, he had asked for a pair of gloves in orange and grey, which seemed perfect colour-wise for blending in some stainless steel. Plus, the fibre I had set aside for my own gloves was a limited edition colourway from a dyer no longer dyeing – I wasn’t about to experiment with that!

I blended the stainless steel into the grey shade of wool for the gloves. I had no idea what ratio I should start with for my blend, so I decided on an 80/20 wool/stainless steel blend, thinking anything higher than that for the stainless steel might noticeably impact the warmth. I weighed my fibres and blended the stainless steel with the wool using hand cards. I rolled my fibre so as to keep the fibres as parallel as possible to maintain consistency with the rest of the commercially prepared top. My first experiment was a success: I had a yarn that could be used with a touchscreen!

I blended enough to use for the forefinger and thumb of each glove. Next came the true experiment. I knew the grey stainless steel blend would work with a touchscreen on its own, but I wasn’t sure if it would work when combined with the orange in the colourwork pattern. I made a small swatch and … success again! When knit together in the pattern, the yarn maintained its touchscreen properties, and my partner was able to swipe through his phone in comfortable warmth.

It’s been about a year since I made those gloves, and they have held up to the Alberta winters. I also made a hat to match! As for my own gloves, they’re still in the queue. I’ll get to them right after I finish this shawl…

Fibre used:

Grey – 50/50 Merino/Corriedale commercial top from Hilltop Cloud in the Storm colourway, blended with 20% stainless steel fibre (purchased from Divinity Fibers)

Orange – 100% Corriedale commercial top from Ashford (purchased from Stash Lounge) in Orange, Pumpkin Pie, and Nutmeg colourways, blended on a hackle.

Pattern: Deep in the Forest Mittens by Tuulia Salmela, adapted to gloves by me.

Christie Schulze is a handspinner living in the foothills of the Canadian Rockies. She holds a Master Handspinner Certificate from Olds College. Wool is her fibre of choice, but she’s always open to a good experiment. She can be found around the internet as madebyxie and documents her fibre adventures at madebyxie.ca.

Did you know we also have a monthly PLY newsletter? Sign up here!

PLY Magazine believes that Black lives matter, as well as LBGTQI+ lives. Those most vulnerable and persecuted in our communities deserve our love and support. Please be good to each other.

Send us your announcements!

Do you have or know about a new product, event, fiber, or tool you think the spinning community should know about? Tell us all about it here and we’ll share it on the blog or in the newsletter.

Did you know we also have a monthly PLY newsletter? Sign up here!

PLY Magazine believes that Black lives matter, as well as LBGTQI+ lives. Those most vulnerable and persecuted in our communities deserve our love and support. Please be good to each other.

Hacking Yarn Tools: How to Twist Skeins with a Power Drill

words and photos by Carrie Sundra

Twisting skeins – it’s a deceptively tricky process which generally takes some practice to produce consistently tight and tidy results. Even so, I definitely encourage everyone who handles yarn to put the time into learning how to do this by hand. When you get it down, it can be a very quick and easy way to package your yarn into a non-tangling, easy-to-store, and easy-to-ship bundle.

That said, there are many reasons as to why a person may seek mechanical help with this task. One of the most common pieces of feedback I hear after a yarn dyer uses our production tool, the SkeinTwister, is that it has enabled them to perform this task without pain. Many people have injuries, arthritis, or other medical conditions that affect their shoulder, elbow, wrist, or finger joints, and the process of manually twisting skeins can by physically painful. Eliminating the majority of the twisting motions can reduce, if not entirely eliminate, that.

Hand-twisting skeins can also be a special kind of terrible when the weather is humid. The yarn should slide easily around your fingers (or thumbs if you’re a thumb-twister!), but in humid weather, it can stick to your skin and bind. Not only can you get blisters if you’re twisting a lot of skeins, but because of the binding and uneven tension, your twisted skeins won’t come out as nice and tidy-looking.

So I’m sharing with you a DIY method for twisting the occasional skein with some mechanical help – a power drill! You can also find these instructions on our Hackaday.io page and we’ve made a short video showing you the whole process:

Step 1: Hook the drill

You’ll need a power drill with a typical 3-jaw clamping chuck and a hook. I did a survey of the hooks available at our local hardware store, and even though it’s a little smaller than ideal, I liked the metal one best, even better if you can find one with a pointed tip. I do NOT recommend a bicycle hook – the plastic coating on these isn’t slick enough and the yarn is more difficult to remove.

Clamp the hook tightly in your power drill, threads and all.


Note: It’s possible to use an electric screwdriver instead, but only if it has clamping jaws. Most have magnetic hex chucks, which won’t hold a threaded hook.


Step 2: Rig something solid to pull against

The drill and hook is going to be in your hand, on one end of the skein. The other end will need to be firmly fixed to a table, rod, or shelf, enough that you can pull with 10–15 pounds of force against it. I settled on two different ways of doing this.

Method 1: Clamp a post/peg to a sturdy table. I used both a wide paper towel holder (without a bulb at the top) and a PVC niddy-noddy (“release” arm pointed up). It’s important that your post or peg be at least 1 inch in diameter because you want the skein to be held a bit open at this end, even after it’s twisted.
Method 2: S-hook to a very sturdy shelf or rod. This way isn’t bad either. I used the largest S-hook I could find at the hardware store and also tried a large plastic hanger S-hook. This method tends to be a little fussier because the skein isn’t held as open at this end, and the ball at the end of the plastic S-hook dragged against the yarn a little when un-hooking it. I prefer Method 1 but wanted to give you the option to use other items you might already have around the house.

I do NOT recommend having a friend hold the other end of the skein – with a power drill, it’s easy to overshoot and end up painfully squeezing their fingers. You have been warned!

Step 3: Hook the yarn

First, snap the skein between your hands a bit. This will even out some of the strands and help with consistent tension. Then hook one end of the skein around either your peg or S-hook. Hook the other end of the skein around the hook in the power drill. Take a few steps backwards so there’s a slight bit of tension on the skein.

Step 4: Twist!

First, make sure that your power drill is on the slowest speed setting. Then gently pull the trigger just for a second or two. Power drills can spin very fast, so go easy at first and don’t overdo it! As the twist builds up, you’ll have to pull against the skein more and more to keep tension on it. If you don’t, the skein will twist up on itself like a phone cord. Once this has happened, it’s almost impossible to undo, so just pull the skein off the hook, let it untwist, and start over. The right amount of twist is reasonably tight but not hard as a rock. You’ll have to practice this to get the feel for how much twist you like, and it’ll vary with fiber content and skein size.

Step 5: Fold the skein

You now have a skein that’s twisted just right, still attached to the power drill. Keeping tension on the skein, pinch it at the power drill using your free hand. Slide the hook out of the skein, and set the drill down (or hook it on your belt loop for a sweet yarnslinger look!). Still keeping tension on the skein, take your newly free hand and pinch the skein an inch or two over the middle, closer to the peg or S-hook end. Also keeping tension with that middle-holding hand, fold the skein in half. The end that’s in your other hand should be an inch or two past the peg or S-hook. Release the hand in the middle. If you’ve done a good job keeping good tension on the skein the entire time, it should perfectly twist back up on itself. You may find that releasing the tension slowly and twisting a smidge helps guide the twist and produces a more consistent result.
Step 6: Tuck tail

Everyone does this last step a little differently, and it depends on your setup, whether you’re using a peg or a hook at this end, and what feels comfortable. I like removing the skein from the peg or hook in a way that allows me to keep that end an open loop with both hands, and I push the tail through the loop with both thumbs. Others like to hold the loop open with the thumb and forefinger of one hand, grab the tail from the other hand, and pull it through. There is no right or wrong way of doing this. This step also requires motions that are totally different from hand-twisting, so expect to practice and experiment a bit before finding the way that’s right for you.
Happy twisting!

P.S. Sometimes people mix up terminology, which can be very confusing. This process is called twisting, not winding. Winding is the process of wrapping yarn around something in a circular motion, like winding yarn on a bobbin or winding a skein from a cone with a skein winder. Twisting is the process of wrapping two things around each other – like twisting fibers together to make yarn or twisting strands of yarn together to ply them, or twisting a skein back on itself to make it a tidy bundle.

Carrie Sundra is an engineer with a serious yarn addiction, who decided to leave a life of electronics and high-tech spy planes for hand-dyeing and knitting. Alpenglow Yarn started in 2009 with 3 words: Glowing Natural Color. Her most well-known products, the SkeinMinder and SkeinTwister, add automation to winding and twisting operations, make the process more efficient, and help scale up production. You can find out more at alpenglowyarn.com.

Did you know we also have a monthly PLY newsletter? Sign up here! 

PLY Magazine believes that Black lives matter, as well as LBGTQI+ lives. Those most vulnerable and persecuted in our communities deserve our love and support. Please be good to each other.