
Prepping Fiber for a Large Project
Words and Photos by Anne Schwarz
I’m making my first sweater from scratch.
This is new for me. Usually I spin a pound of this, a 4-oz braid of that, enjoying the pretty colors or trying my hands at a technique or a yarn design idea, and then I make yet another hat or scarf. In fact, I just finished another 284 yards of a pretty blue and yellow yarn from fiber that caught my eye at a vendor booth, destined to become something, someday. The joy is in the spinning, right?
Well, for a new challenge, I decided a few months ago to try my hand at spinning for a large project. The challenge was consistency – how could I make a couple thousand yards of 2-ply yarn that would look cohesive when knitted up, without disruptive shifts in color, thickness, or texture?
Consistency starts with the fiber prep.
I chose a 70% alpaca/30% Merino blend for my project because I had a lot of alpaca fleece in my stash in a few different colors. Because 100% alpaca yarn is notorious for stretching out over time, I wanted to blend it with some wool to give it some memory. Whenever I think about blending fibers, I consider what traits I’m adding and why. I chose Merino because it’s a fine wool and would not detract from the alpaca’s best quality, its softness.
Planning My Colors
As I washed and picked through about 2 pounds of alpaca fleece, I put it in 2 large piles; one was a mix of white and light beige, and the other was a mix of natural shades of brown.
There are 2 breeds of alpaca: Huacaya, which is a fluffier, crimpier fiber, and Suri, which is smooth and shiny and has a lot of drape but no crimp. I used mostly Huacaya for this project, but I had a bag of luscious dark brown Suri locks, and I couldn’t resist adding a couple of handfuls to the brown mix, as I thought it would add interest to the yarn.
I knew I was going to leave the brown alpaca its natural colors, and eventually dye the white/beige mix. I settled on a sweater pattern that could be made with either 2 or 3 colors.
The Merino I had was white combed top. This would blend in beautifully with my white alpaca blend, and I had the option of dyeing all of the fiber before blending, after blending, or after spinning. What would give me the most consistent color? Probably dyeing all of the fiber before blending because any inconsistencies in color would be blended together. But indecision got the better of me – I wasn’t ready to choose a color yet, so I decided to wait and dye the finished yarn.
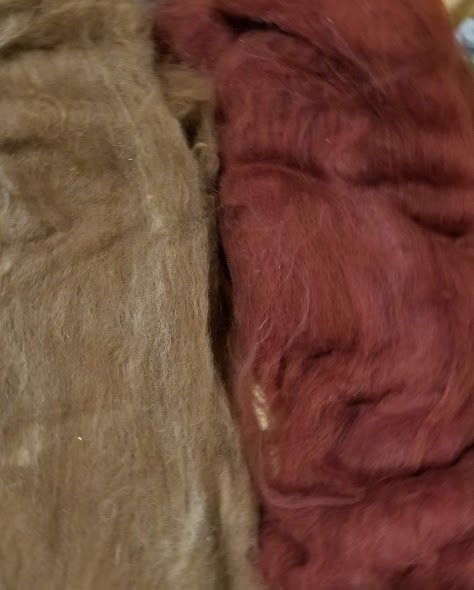
The brown alpaca mix was a different story. I didn’t want to blend white Merino with colored alpaca because it would just dull and lighten the rich natural colors. In this case, I decided to dye the Merino before blending, using colors that would complement the alpaca’s shades of brown. I handpainted a length of Merino top with acid dyes in burgundy, a basic red, a rusty red, and golden yellow, plus a bit of brown that was darker than the alpaca and would blend color with color.
Prepping the Fiber Before Blending
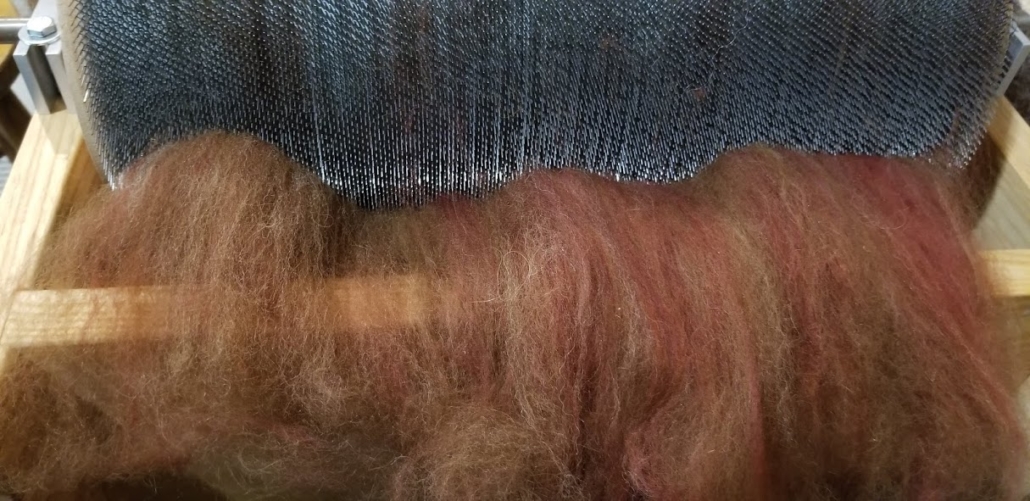
While washing and picking my alpaca fleeces, I found my fiber had some variation in staple length (up to an inch difference), and the Merino was similar in length to the longer alpaca fibers. This pointed me towards a carded prep because combs will separate shorter from longer fibers, while carding creates a web of fibers of different lengths, going in different directions. I used a drum carder for both carding and blending.
The first step was carding the alpaca and Merino separately. I’d washed the alpaca and picked out most of the VM, but it needed a couple of passes through the carder to transform the locks into a loose web of fiber that would blend easily. This step also blended the white and beige fleece into an off-white color and the various shades of brown fleece into a gorgeous variegated brown.
I also put the Merino through the carder once on its own, even though it was already processed as combed top. Commercial top can be kind of dense and compressed, and a pass through the carder loosens and opens it up beautifully. In my experience, it blends with other fibers much better that way. However, with my handpainted Merino, this pass blended the colors together more than I wanted, into a sort of reddish brown. It wasn’t bad, but if I had it to do again I would dye the Merino in small single-color batches. I would then run these through the carder separately at this stage, and I would blend in the next step with the brown alpaca.
Blending
Now I had 4 stacks of batts – off-white alpaca, white Merino, brown alpaca, and reddish-dyed Merino. Each stack had several batts. I’d weighed out my fiber ahead of time, so I still had 70% alpaca and 30% Merino in each color group. The next step was to blend them so the fiber ratio was consistent across all my batts.
I put the white batts in one big stack, alternating layers of alpaca and Merino, and then divided the stack into vertical cross-sections that were each about the amount I could comfortably fit on my carder. I put each cross section through the carder and then stacked the batts again and repeated the cross-section process. This method blended the fibers fairly well and evened out any inconsistency.
I used the same method with the colored Merino/brown alpaca. It was all nicely blended and ready to spin.
A Few Notes on Spinning and Dyeing
It took me a few weeks to spin the yarn for this project, but I must say the spinning went faster than the fiber prep!
Before spinning, I finalized my pattern choice, selecting Coiled Magenta by Carol Feller of StolenStitches.com. It’s a loose, V-neck sweater that uses 2 colors and some cool color blocking. It calls for 2 colors, but I’m going to use 3 because in the end I divided my white yarn into 2 colors.
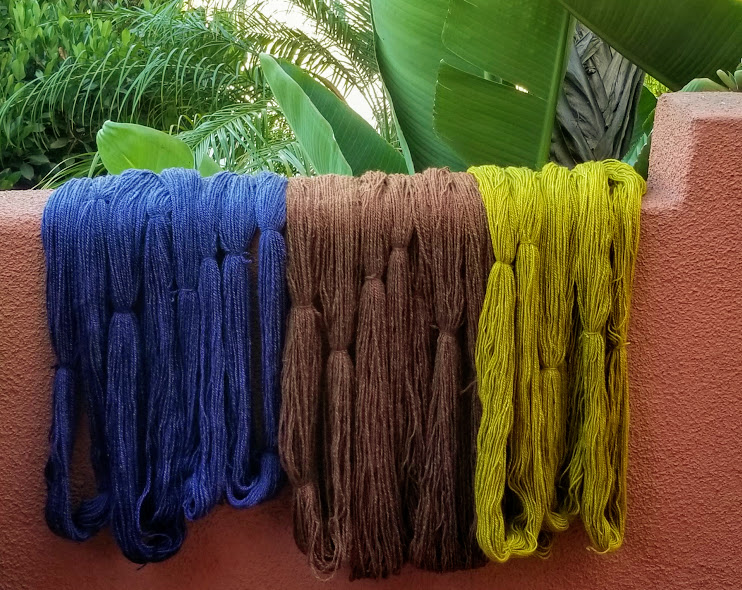
I dyed the white yarn 2 different colors for a simple reason – the limited size of my dye pot. I had to dye it in 2 batches, and rather than making 2 dye lots of the same color that might not match, I decided to do a blue and a green. The green dyed a little bit unevenly, and in retrospect it might have been better to have dyed the fiber before blending and spinning, but I think the darker areas are well distributed and will look consistently inconsistent when knitted up.
I had noted the thickness (12 WPI) and grist (approximately 1300 YPP) of the commercial yarn suggested for this pattern. I didn’t achieve the same grist; my brown yarn is the same thickness but is a little heavier, probably because I included some Suri alpaca. Suri just has no loft to it and made for a bit denser yarn. But I made a couple of swatches, and I’m happy with the gauge and the feel of the cloth so I think it will work nicely.
Conclusions
I’m very excited about how my yarn turned out, and I’m really glad I took the time to prep the fiber with quantity and consistency in mind. I also benefitted from studying the yarn suggested for my chosen sweater pattern so my handspun yarn would work as a substitute.
And I learned a few lessons.
First, the addition of Suri alpaca, even though it was probably no more than 10% of my yarn, made a real difference in the grist, producing a heavier, denser yarn than a similar blend without Suri. Second, I wish I’d dyed my Merino in small single-color batches before blending, instead of one long hand-painted piece of top – it would have prevented it from getting over-blended, and I’d have had a bit more color variation in my brown yarn. And last, I have more to learn about dyeing a large batch of yarn with even color, so it might have been wiser to dye the fiber at the beginning of the project, before blending.
Anne Schwarz started spinning 11 years ago after buying a soon-to-be mama alpaca, along with a bag of her prize-winning fleece. She found a beginner spinning class and a world opened up. She no longer owns alpacas, but their wonderful fiber is still her favorite.


Leave a Reply
Want to join the discussion?Feel free to contribute!