
Make the Best of Your First-Version Handspun Yarns
words and photos by Sarah Elizabeth
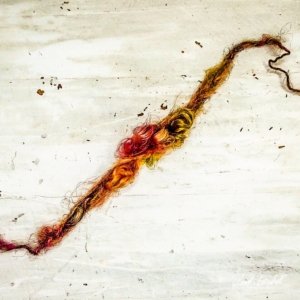
Your first textured creative yarn (art yarn) may feel like a disaster. I know mine did! Learning to draft thick and then thin, auto wrap thread, and try out other textured techniques left me with no shortage of “bad yarn”: yarn that at first glance and handle felt like it would be better if I gave up on it altogether. However, with a few simple tips and tricks you can take your first trials with textured creative yarn from bottom-of-the-barrel yarns to stash-enhancing yarns.
As a lover of both texture and colour, I consider handspun yarns to be the crown jewels of my collection, and I include my first handspun in this collection of yarn jewels. Not because I was some sort of amazing natural who spun the perfect textured yarn from the get-go, but because in its imperfections I can still find inspiration. I was not, and I am not, afraid to tweak my first version, second version, and all the versions that come after.
It is truly rare that in any learning process our first attempts are what we envisioned. Sometimes those first attempts can feel utterly hopeless; the magic happens when we keep with something and let nothing go to waste. It is true that sometimes we just need to start again from scratch, and in this case those yarn fragments, barely-spun pieces, and springy bits of fibre can have a home in your scrap bin: pull them apart, cut them up, and card them into a wild and wonderful batt to combo spin with some roving.
The issues
First yarns usually have a few common problems: they often have weak spots, are of an uneven tension (overspun/underspun), and have uneven width – unintentional thick and thin spots that lack flow.
Weak spots
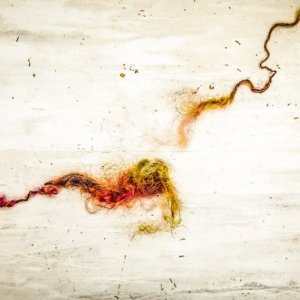
Weak spots are areas that are too thin for comfort, a yarn that broke when you took it off the bobbin, or yarn that lacks stability when you try to use it in a project.
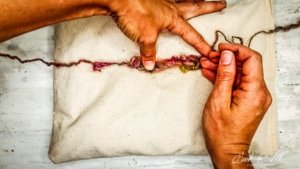
The fix: Needle felt and then add a little friction felt magic. First, take the 2 ends and twist them around each other, crossing them by approximately 1–2 inches (12–25cm). Hold the newly twisted area (it will be a loose twist around) with 2 fingers. I use my thumb and first finger to hold the 2 broken ends in place. I hold them on top of a needle felt pad and then needle felt with a 36-gauge needle starting in the middle and then moving to one end and then the other. Flip the yarn around regularly, from top to bottom and side to side, repeating the needle felt process. As you work, wrap any stray ends around the yarn and then needle felt in place.
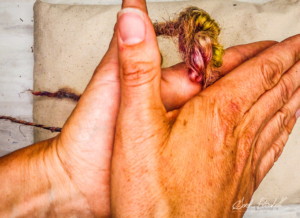
Once the 2 broken ends are joined together, roll the yarn between your hands. I don’t want to give this area a really different look, so I don’t use an actual wet felt process; rather, I use a friction felt by using the natural moisture of my hands and the friction of the rolling action to help further join (tangle) the fibres together.
At this point, I give the section of yarn a little tug to find out if my repair work is holding. If I sense any residual weakness I will continue to both needle and friction felt until the broken ends are joined to my satisfaction.
Overspun or underspun sections
Overspun yarn will be very kinky and twist back on itself tightly without effort on your part. Overspinning singles is used for yarns to be plied, so one of the most common fixes for an overspun yarn is to ply it. However, if I intended to create a singles yarn, I would put the yarn back on my wheel or spindle and work in the opposite direction to that which I spun the yarn in the first place. A slightly overspun yarn or one with sections of overspin can also sometimes be dealt with once skeined during the finishing process while the yarn is still damp. I work the skein by gently snapping small sections of the yarn, gradually working around the entire length. I will repeat this process a number of times in one session and sometimes repeat a session as the yarn dries. Lastly, my favourite way of working with an overspun yarn is to spin it again, either in the opposite direction to release the additional twist (for extremely overspun yarn) or with another yarn to experiment with coiling it onto base yarn or leaving twisty back loops!
Underspun sections in your yarn can show up as puffy areas that look more like the fibre before spinning and can leave weak spots. They can be dealt with by using the weak spot repair technique discussed above. If your entire yarn lacks twist and integrity, you can re-spin the yarn by putting it back on your spindle or wheel and spinning in the direction you spun it. When I re-spin a yarn on my wheel, I work with more brake tension to increase the uptake and reduce the likelihood of creating the opposite problem of an overspun yarn.
Thick and thin
Having uneven width along the yarn strand may be the easiest to work with: knit it or crochet it on a needle or crochet hook that is bigger than standard for the yarn weight. The uneven thick and thin will make lovely net fabric. This may require a bit of experimentation to get the correct size for the nicest look. I start with the ideal tool size for the thickest part of the yarn I am working with and tweak sizing from there. If your thick and thin yarn also has other issues, such as those mentioned above, or you want to knit it into a project where the look or style you would like requires a more even yarn, I would move to plying the yarn as a way to smooth out the worst of the uneven areas. Plying 2 uneven yarns together often works in an uncanny way, creating an unexpected level of evenness. Of course if your yarn has significant width differences, your yarn, plied or not, will still have an uneven texture. If the yarn you would like to ply does not have enough twist after a plyback test, you can re-spin the yarn in the same direction you spun it to begin with, creating enough overspin that the yarn will not be underspun when you ply it. You can also chain ply yarn made of an uneven thickness to create a very interesting rope-like yarn. Another method is to ply your thick and thin yarn with a thread or cord for a bubble or bobble look.
Use them as they are
One of my favourite ways to enjoy my first handspun yarns both of the more traditional vein and those first creative textured yarn attempts has been to embrace them for what they are and to find uses that suit their unique nature. Find some examples below and then use your creativity and curiosity to experiment!
Use yarn that is overspun, thick and thin, or from a scratchy fibre (or all of the above) to crochet or knit into a small cloth, either alone or with another suitable yarn. Use it as an exfoliator or for your dishes. This yarn in finer or softer fibres can make a delightful springy and interesting fabric. Arm knit or use large needles to create a cowl, scarf, or shawl with this living yarn.
Small samples that twist and turn and that are uneven and unique can be used in simple projects without a pattern. Projects that use single or double crochets or stocking or garter knit stitches will be the most straight forward to work shorter lengths of handspun yarn into. Hats, fingerless mitts, and leg warmer patterns, along with shawls, cowls, and sweater edgings are all places you can use small amounts of not quite perfect handspun yarn. By using wraps per inch (WPI) to match the weight of a base yarn, it is straightforward and easy to insert rows of handspun yarn next to a base yarn. A bonus to this approach is that an even millspun or handspun yarn juxtaposed with a textured creative yarn is the perfect way to show off the beauty of both yarns.
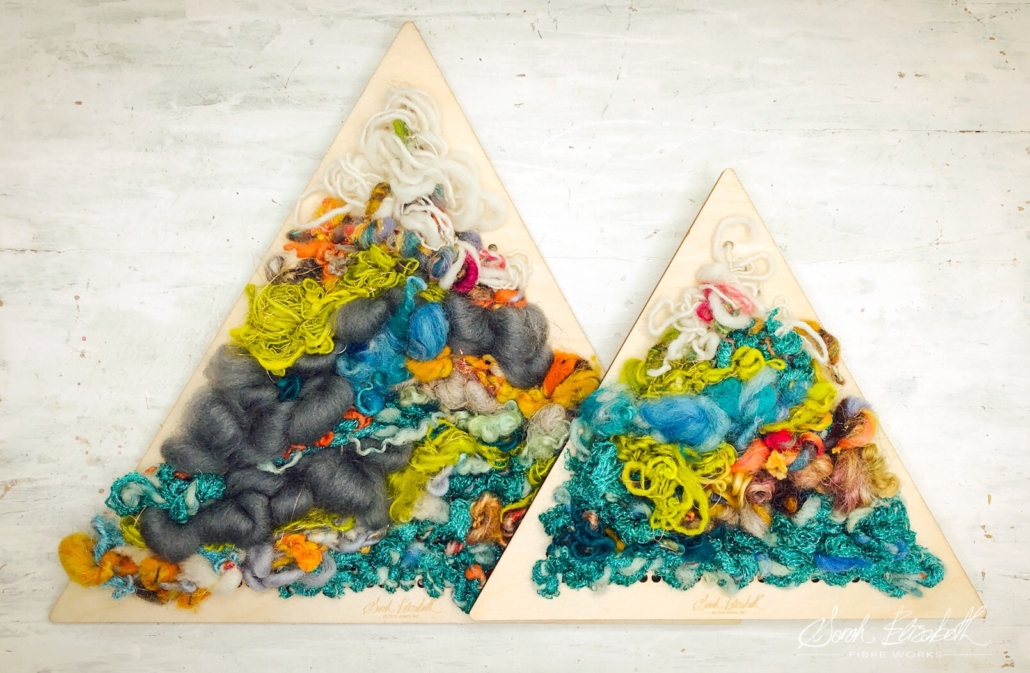
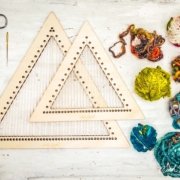
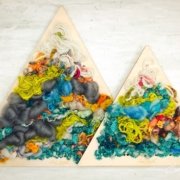
Project Looms are a wonderful way to play creatively and to make it up as you go! Project looms are a style of loom in which your project is left in the frame after completion, which means no finishing, easy to hang, and almost no rules! Project looms come in a variety of shapes, sizes, and styles such as stars, circles, rainbows, mountains, clouds, animals, and more! The brilliant aspect of the project loom is that because your project remains in the frame, it matters very little if the yarn you use has weak spots, is overspun or underspun, or is not really a yarn at all! Use the yarn in a plain tabby weave (over one, under one, repeat), make bubbles, create tassels, or simply stuff it into the spaces between the warp. Let your imagination be your guide!
Don’t let imperfection spoil your creative fun, for often that which we perceive as flawed is where true beauty can be found.
Sarah Elizabeth is a Canadian born, classically trained painter and sculptor with a Baccalaureate of Arts from the University of Guelph. Her current focus is in mixed media works with a basis in textiles. Sarah uses traditional and functional handcrafts such as spinning, weaving, macramé, felting, and stitching to inform the basis for her professional works, which are inspired by the breathtaking landscapes of the Kootenays. Sarah is the artist and owner behind Sarah Elizabeth Fibre Works, a destination fibre art supply business based in Rossland, BC, Canada with a focus on ethical, sustainably sourced and produced fibre art supplies and tools for all fibre art enthusiasts including knitting, crochet, weaving, spinning, felting, macramé, stitching, and more.
PLY Magazine believes that Black lives matter, as well as LBGTQI+ lives. Those most vulnerable and persecuted in our communities deserve our love and support. Please be good to each other.


Leave a Reply
Want to join the discussion?Feel free to contribute!