

Mixing Things up for a Sweater
words and photos by: Johanna Carter
I always admire those who are able to spin mountains of yarn for a big project, ready to knit a wonderful sweater or cardigan. It is a satisfying feeling when you finish all that work, especially if you started with washing and combing the wool or even raising your own sheep.
Mixing spinning and knitting
The typical way to work through a larger project is to spin all the singles first and ply them in a particular order so you get the yarn even throughout the whole project. I don’t have so many bobbins, but my bigger problem is that I am quite impatient and want to get on with knitting once I have an idea. And normally, my brain is full of ideas for fibre work and the limit is the time, as I am a musician and teacher. I can’t sit at the spinning wheel for a long time if I’m not on holiday, so during the school year I mostly knit, and during the holidays I can dye, spin, use my drum carder, and do lots of fibre work. The only time I was able to produce bigger quantities of yarn before I knitted them up was during the Tour de Fleece in the two years during the pandemic, when we did not go on holiday at the beginning of July.

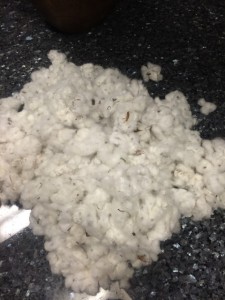
A highly photogenic collection of naturally dyed fibres.
I like to finish knitting one big project like a sweater or cardigan before I start the next one, or at least until I can’t carry it in my bag easily anymore, so I have an excuse to begin the next one. Sometimes it is good to have a second project on the go – I call it mindless knitting, where I don’t have to look very much – which I can keep my hands busy during Zoom or other meetings, which helps me listen.
Mixing colours and fibres
Usually I dye my yarn with plants which I collect in the woods or get from garden flowers. I also use cochineal and indigo, which I buy, to get lots of different colours. I really love the greens and blues I get from dyeing with indigo. I have lots of dyed wool, and all those colours give me inspiration for further projects.

Beautiful greens and blues dyed by the author using indigo and other natural dyes.
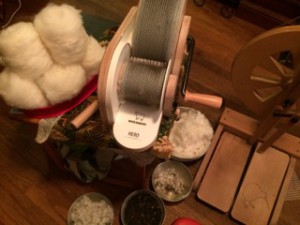
Blending the wool on the drum carder I can get even more shades. I like to blend with fibres like silk, alpaca, or plant fibres, and I love sari silk, to get those little bits of colour in my yarn.
Fibres of different types and colours are blended on a drum carder for elegant results.
When I have an idea for the next sweater, I start carding, and then I can begin to spin. Once I have spun enough yarn – say, for one day – I cast on and start knitting, usually top down, so I don’t have to decide too much in advance about length and width.

An idea for the author’s next sweater in the gathering stages.
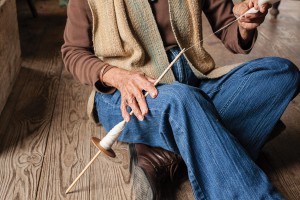
When I spin on my wheel, I have to sit at home, but while spinning I can read a book or talk to others during online meetings. I also like to spin on my spindles, and that works on a walk, or a museum visit. I take them on holiday as they don’t need much space, and when I spin for a lace shawl, I don’t even need much wool either. At home there are spindles all over the place; I can spin when I am waiting for the kettle to boil, when the computer is slow, when I am cooking. Like that I can make good use of a short time and the yarn still grows.

Knitting as soon as the yarn is spun helps the author complete sweater projects in a timely manner.
I can take my knitting almost everywhere, which is why I don’t want to wait to get started until I have spun all the yarn for a whole sweater. I knit at home, on the bus or train. The only thing I have to make sure of is to be one step ahead with the yarn.
I love to knit Fair Isle sweaters. My favourite method is to use only one bobbin, which I don’t even fill, because I need smaller quantities of lots of colours. Then I wind a ply ball and ply it on itself. For that I put my thumb through the ball, so I can tension the two singles with my fingers and they don’t get tangled, as long as my thumb (or a cardboard roll or a pencil) stays in the middle. I don’t have any leftovers from plying, and it is quick when I suddenly need more yarn.

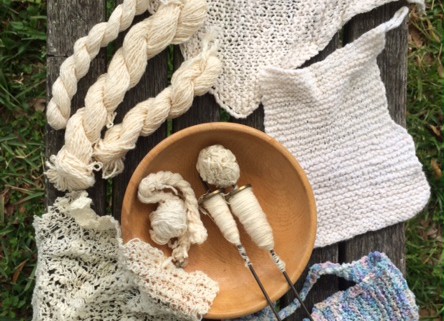
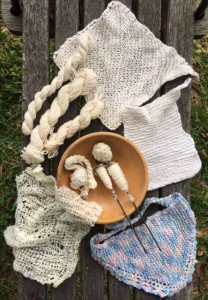
Several charming sweaters dyed, spun, and knit by the author.
I have never had problems with the yarn not being consistent enough throughout a project. I just know what yarn I want and my fingers seem to remember what to do. I am sure it is good advice to have a little card tied to the spinning wheel with a bit of the singles you are aiming for, so you can check and make sure you are spinning a consistent yarn.
Mixing breeds
There are so many different breeds, but some of my favourites are Shetland, BFL, and Jämtland – a Swedish breed. After dyeing them, I often forget what I have used, so when I do a new project it often turns out that I have used different breeds and fibres just to get the right colour. For the Fair Isle knitting I want to juggle lots of colours, which is more important to me than making a sweater out of only one breed.
Recently I made a pullover for my husband using about 12 different breeds and colours, even mixing short and long draw. For me it was a breed experiment and a way to use up lots of smaller quantities of wool I had in my stash. For that sweater I used combed top without blending.

Mixing in knitting during the spinning process is a wonderful way for a spinner to avoid being overwhelmed during a sweater project.
My feeling is that some people don’t dare to start spinning for a bigger project because they get overwhelmed by the quantity they have to spin and then all the knitting there is to do, especially when you want to spin the yarn entirely on spindles. Mixing the spinning and knitting for the same project is more interesting; you get more variety and more freedom to choose what you want to do next as long as you don’t run out of yarn. It breaks the project down into smaller, less daunting parts. The only thing you might want to plan is to have enough fibre at the start, but even that is not necessary, there is always a sheep growing more wool.

How to Spin
So early last month my new book came out. It’s by Storey Publishing and it’s called How to Spin. The title is right to the point I think.
Here’s what I know about learning to spin:
- It takes some time
- It takes some practice
- It takes some patience
- It’s best if you can have an in person teacher
Really, you can learn on almost any wheel. Consider all this years ago when the family had whatever wheel was available and whoever was learning learned on that wheel.
If you can’t get a wheel get a spindle. You can learn on any spindle.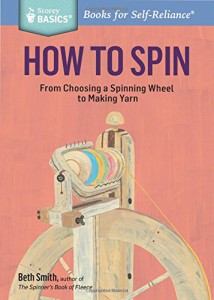
You can learn with any fiber. People all over the world learn to spin with cotton or silk or cashmere as their first fiber.
As with everything, once you learn and begin to try things you can figure out what you love the most or what works best for you.
Stop worrying and wondering and thinking and just start trying. And if you already know how to spin, start trying new things and brooadening your horizons.
As far as the book goes, I think it’s good for most spinners. Sometimes you just forget something or there is some basic thing you never really got. Maybe check out How to Spin and see if I can answer your question.
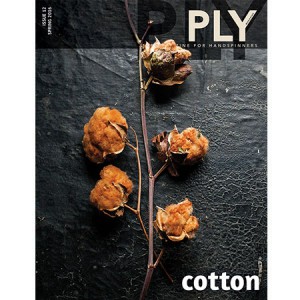
What’s inside the Cotton issue?
The Spring 2016 “Cotton” issue is busy making its way to various destinations around the world. Whether you’re a subscriber waiting for your copy to arrive, or you’ve been thinking of subscribing and you’d like a preview before you buy, today’s post is here to give you a sneak peek inside the issue!
—————————————————————————————————
 So many spinners stick mainly to animal fibers for their spinning, and never really get a chance to try cotton. Others have tried it but for whatever reason it didn’t click. Still others love cotton so much that they sing its praises throughout the spinning world – and we’ve tried to bring that level of enthusiasm to this issue. Many, many thanks to Joan Ruane for helping to bring this issue to life and sharing her inspiring love of cotton with the rest of us. Let’s dig in!
Great Articles!
We’ve rounded up the a talented group of spinners and asked them to share their insights and experiments with us, and as always we’ve got a tip jar full of helpful hints from our readers, humor by Franklin Habit, and how to keep your spinning body happy by Carson Demers! Take a look at what you’ll get!:
- Cotton: the Miracle Fiber, by Irene Laughing Cloud Schmoller – Irene LOVES cotton, and it shows in her article which covers the history of the plant itself and its many uses in everyday life.
- Cotton Lessons, by Stephenie Gaustad – Learn from Stephenie’s early “mistakes” with cotton spinning and you’ll be off on the right foot with her tips for how cotton begs to be spun.
- Prep it! Dyeing Cotton Naturally, by Ric Rao – The photography alone will take your breath away with this article – who knew you could achieve such vibrant colors with dyes you picked or grew yourself? Venture into the world of natural dyeing with Ric; you won’t be sorry.
- Prep it! Carding Cotton Lint and Making a Puni, by Joan Ruane – If you live near a cotton mill you can probably get cotton lint directly from them! Otherwise, we encourage you to buy some online and follow along with Joan as she shows you how to hand card and roll punis from this fiber.
- Prep it! Blending Cotton, by Susan Sullivan Maynard – If working with cotton by itself isn’t your thing, this article is just what you need! There’s plenty of information and even a color-coded chart to help you blend cotton with other fibers to achieve the result you’re hoping for.
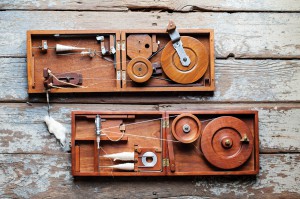
- Charkha Tips and Tricks, by Eileen Hallman – Have you ever seen a Charkha in action? These adorable mini-spinning contraptions were literally made for spinning cotton, and Eileen’s got all the tips you need to start working with one today.
- Spin it! Cotton on a wheel, by Joan Ruane – If you’re a wheel spinner, you don’t have to change your whole methodology just to begin spinning cotton. Joan will guide you through the process of changing just a few things to make cotton work on your wheel, even if you’re accustomed to animal fibers.
- Cotton Spindles from Around the World, by Kristin Merritt – Kristin wrote and illustrated the gorgeous spindles for this article, which is a fantastic comparison of spindles used for cotton. She also has an accompanying Spin It! article to help you learn to spin cotton on a spindle!
- Hot Button: Boiling Cotton – Several experts sound off this issue on the issue of boiling cotton fibers for spinning.
- Cotton Farming in New Mexico Prehistory, by Glenna Dean – Glenna is an archeobotanist (someone who studies the growth and use of plants in historical times), and in this exploration she shows us how ancient people used land that most would think wasn’t suitable for farming at all to grow cotton.
- Cotton Spinning and Sprang in the Pueblo Southwest, by Louie Garcia – A traditional Pueblo fiber artist, Louie takes us on a journey of Pueblo ancestry and their relationship to cotton fibers.
- The Arizona Openwork (Tonto) Shirt Project, by Carol James – In 2013, Carol James met Joan Ruane and the two of them went to visit the historical Tonto shirt, an openwork garment dating back to the 13th century. Together, they hatched a plan to re-create that shirt. Follow along with their project in this article.
- Cotton Spinning in Uganda, by Allen Nansubuga – Allen is one of the founders of Crochet4Life, an organization that empowers Ugandan women to bring in their own income through the production of handmade cotton goods. Read about his project in this issue!
- Khadi: the Freedom Cloth, by Chitra Balasubramaniam – Khadi is a handspun, handwoven cloth that has come to represent India’s freedom from British rule. We think you’ll love the story Chitra weaves and her gorgeous photos of Khadi production in India.
 Fantastic Projects
In every issue of PLY, you’ll find a handful of projects for knitting, weaving, crocheting and more – along with instructions for how to best spin the yarns you’ll use in those projects. Here are the projects from the Winter issue:
- Cotton Cactus Flower Shirt, by Jill Holbrook – Spin along and knit the perfect summer garment – a cotton tunic style shirt made using two different natural colors of this versatile fiber.
- Weave with your First Handspun Cottons, by Patricia Santangelo – Try weaving with your first handspun cotton – yes, even that “beginner stuff” you think isn’t usable. You’ll be surprised what it teaches you! And who couldn’t use a few extra towels?
Everything Else!
Tip Jar will empower you to overcome your fears and get into spinning cotton. In Ergo Neo, Carson explains the best way to spin in a chair for comfort and bodily health. Who’s That Spinner? introduces us to Kay Toombs, who explains her cotton spinning history and how she learned to spin and weave with Multiple Sclerosis. Scene is full of things on the spinning scene that you’ll want to know about including the upcoming Ply Away retreat, the 70-year anniversary of a Florida guild, and a symposium on flax and linen. Beth Smith offers a variety of pattern suggestions to get you to Use Your Yarn, even those first handspun cottons.
If you haven’t subscribed yet, you can do that right here on our website! And be sure to pick up a copy of this issue if you don’t already have one (or it isn’t on its way to you)!
Growing and Spinning Florida Native Cotton
Today we’ll hear from guest blogger Caroline Tacker, who tells us about how she got started in the fiber world with a spur-of-the moment purchase of some inexpensive cotton plants!
I grow and spin Florida Native Cotton, which at its best has a ¾-inch staple. I currently use an Ashford Kiwi and Traditional for my spinning, but I can also use a Tahkli spindle. This cotton was grown in my front yard.
The Cotton that Almost Wasn’t
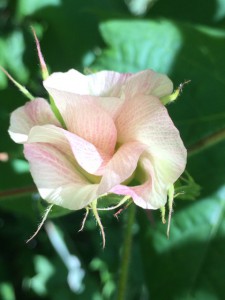
The bloom from a Florida Native cotton plant
Florida Native Cotton is part of the Hibiscus family, as are all cottons. It is an endangered plant in Florida. In the early 1940s a new bug was found on the cotton that resembled the boll weevil. Fearing another boll weevil-like attack, they decided to systematically destroy the plants. It just so happened that World War II broke out and those men left this project to join the armed forces. Hence some of this cotton survived… and NO new boll weevil was ever verified. There is an original strand of this cotton behind a synagogue at mile marker 31 on the way down to Key West. I can verify it’s there as I have seen it!
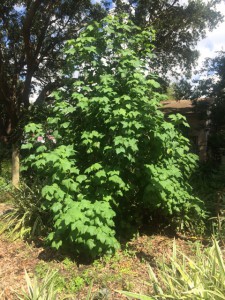
Florida Native Cotton grows much like our hibiscus: if left unattended it gets gangly and out of control. I do prune my plant back, to try and make it ascetically pleasing, and also to make it look like it belongs in the yard/garden. It is not cold tolerant; it prefers to grow below the subtropic line of Florida. I did lose all my plants to a freeze 5 years ago. Since then, a “volunteer” showed up.
The use of Florida Native Cotton in History
Caroline’s cotton plant
There is limited information about Florida Native Cotton; the one thing I haven’t seen about it is whether or not it was ever really used for anything. I’m sure people used it because that would be in our nature as pioneers: use what you have. As to what they used it for or on, I have not found any information. As to spinning it, my thoughts are it would be too labor intensive and not a good use of time for people who made everything from scratch, but I cannot find anything confirming they did or did not.
My Fiber Journey
My start down the fiber path started over 11 years ago in the spring when I attended a Florida native plant sale in St Petersburg, Florida (where I live). There I found Florida Native Cotton seedlings which they were selling at 3 pots for $1. I thought… if they live great, if they don’t I’m only out $1.
I was told that cotton liked full sun and carbon monoxide, so I planted my seedlings in the easement of my front yard, next to the road. As they grew over the next several months, they bloomed and then I had this white beautiful fuzzy cotton! Now that I had this lovely fiber… I had to figure out how to process it.
harvested Florida Native cotton
I did several web searches – how to clean, gin, etc. – and after a year of not finding much about how to process cotton, other than commercially. I’d kind of given up. Then someone suggested I go to Heritage Village (our local living museum). I contacted them and asked if they could teach me how to process my cotton and in exchange I would become a volunteer. In March of 2006, I met Wendy who taught me how to “gin” my cotton by hand and spin it on a tahkli spindle. I had the process down in about 45 minutes.
While volunteering at Heritage Village during their County Jubilee Festival, I met Judy of the Pinellas Weavers Guild. She was spinning on a lovely spinning wheel. We talked for awhile and she invited me to come to a guild meeting. I did and joined the Guild in December of 2006. Have loved being around other “fiber” minded people, I am currently still a member… and I am their curre
Caroline’s cotton ready to spin
nt president. I have also been the past Secretary and Vice-President.
So to sum it up… almost 12 years ago I purchased three Florida Native Cotton plants for $1. I have since learned to spin on a tahkli spindle, purchased 2 spinning wheels, a drum carder, a loom and other associated small equipment. I “play” with lots of different fibers, and I do sell some of the things I make, but I ALWAYS come back to cotton. I just love it.
Samples of Caroline’s cotton spinning projects
Have you ever tried to grow or spin cotton straight from the plant? Tell us about your experiences & ask your questions in the comments!

Caroline Tacker is a Florida native born in Orlando, living in St. Petersburg for the past 25 years. She volunteers with Heritage Village as a living history docent (spinning cotton by hand) and is a member of the Pinellas Weavers Guild, Bay Area Knitting Guild, and Florida Tropical Weavers Guild. Find her on Facebook for more information.


Leave a Reply
Want to join the discussion?Feel free to contribute!