

Mixing Things up for a Sweater
words and photos by: Johanna Carter
I always admire those who are able to spin mountains of yarn for a big project, ready to knit a wonderful sweater or cardigan. It is a satisfying feeling when you finish all that work, especially if you started with washing and combing the wool or even raising your own sheep.
Mixing spinning and knitting
The typical way to work through a larger project is to spin all the singles first and ply them in a particular order so you get the yarn even throughout the whole project. I don’t have so many bobbins, but my bigger problem is that I am quite impatient and want to get on with knitting once I have an idea. And normally, my brain is full of ideas for fibre work and the limit is the time, as I am a musician and teacher. I can’t sit at the spinning wheel for a long time if I’m not on holiday, so during the school year I mostly knit, and during the holidays I can dye, spin, use my drum carder, and do lots of fibre work. The only time I was able to produce bigger quantities of yarn before I knitted them up was during the Tour de Fleece in the two years during the pandemic, when we did not go on holiday at the beginning of July.

A highly photogenic collection of naturally dyed fibres.
I like to finish knitting one big project like a sweater or cardigan before I start the next one, or at least until I can’t carry it in my bag easily anymore, so I have an excuse to begin the next one. Sometimes it is good to have a second project on the go – I call it mindless knitting, where I don’t have to look very much – which I can keep my hands busy during Zoom or other meetings, which helps me listen.
Mixing colours and fibres
Usually I dye my yarn with plants which I collect in the woods or get from garden flowers. I also use cochineal and indigo, which I buy, to get lots of different colours. I really love the greens and blues I get from dyeing with indigo. I have lots of dyed wool, and all those colours give me inspiration for further projects.

Beautiful greens and blues dyed by the author using indigo and other natural dyes.
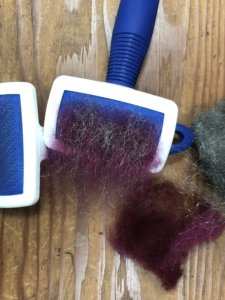
Blending the wool on the drum carder I can get even more shades. I like to blend with fibres like silk, alpaca, or plant fibres, and I love sari silk, to get those little bits of colour in my yarn.
Fibres of different types and colours are blended on a drum carder for elegant results.
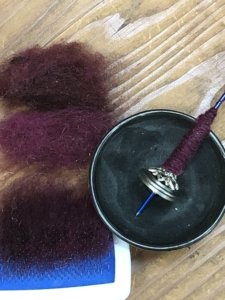
When I have an idea for the next sweater, I start carding, and then I can begin to spin. Once I have spun enough yarn – say, for one day – I cast on and start knitting, usually top down, so I don’t have to decide too much in advance about length and width.

An idea for the author’s next sweater in the gathering stages.
When I spin on my wheel, I have to sit at home, but while spinning I can read a book or talk to others during online meetings. I also like to spin on my spindles, and that works on a walk, or a museum visit. I take them on holiday as they don’t need much space, and when I spin for a lace shawl, I don’t even need much wool either. At home there are spindles all over the place; I can spin when I am waiting for the kettle to boil, when the computer is slow, when I am cooking. Like that I can make good use of a short time and the yarn still grows.

Knitting as soon as the yarn is spun helps the author complete sweater projects in a timely manner.
I can take my knitting almost everywhere, which is why I don’t want to wait to get started until I have spun all the yarn for a whole sweater. I knit at home, on the bus or train. The only thing I have to make sure of is to be one step ahead with the yarn.
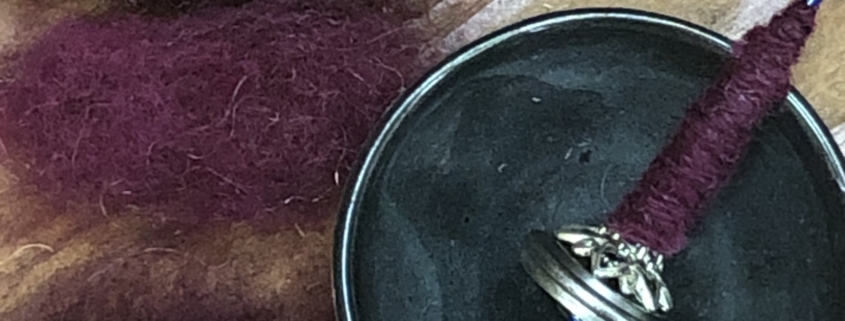
I love to knit Fair Isle sweaters. My favourite method is to use only one bobbin, which I don’t even fill, because I need smaller quantities of lots of colours. Then I wind a ply ball and ply it on itself. For that I put my thumb through the ball, so I can tension the two singles with my fingers and they don’t get tangled, as long as my thumb (or a cardboard roll or a pencil) stays in the middle. I don’t have any leftovers from plying, and it is quick when I suddenly need more yarn.

Several charming sweaters dyed, spun, and knit by the author.
I have never had problems with the yarn not being consistent enough throughout a project. I just know what yarn I want and my fingers seem to remember what to do. I am sure it is good advice to have a little card tied to the spinning wheel with a bit of the singles you are aiming for, so you can check and make sure you are spinning a consistent yarn.
Mixing breeds
There are so many different breeds, but some of my favourites are Shetland, BFL, and Jämtland – a Swedish breed. After dyeing them, I often forget what I have used, so when I do a new project it often turns out that I have used different breeds and fibres just to get the right colour. For the Fair Isle knitting I want to juggle lots of colours, which is more important to me than making a sweater out of only one breed.
Recently I made a pullover for my husband using about 12 different breeds and colours, even mixing short and long draw. For me it was a breed experiment and a way to use up lots of smaller quantities of wool I had in my stash. For that sweater I used combed top without blending.

Mixing in knitting during the spinning process is a wonderful way for a spinner to avoid being overwhelmed during a sweater project.
My feeling is that some people don’t dare to start spinning for a bigger project because they get overwhelmed by the quantity they have to spin and then all the knitting there is to do, especially when you want to spin the yarn entirely on spindles. Mixing the spinning and knitting for the same project is more interesting; you get more variety and more freedom to choose what you want to do next as long as you don’t run out of yarn. It breaks the project down into smaller, less daunting parts. The only thing you might want to plan is to have enough fibre at the start, but even that is not necessary, there is always a sheep growing more wool.
Just Give It a Whirl
Words and Photos by Michele Marshall
“What if…?” might be the most exciting phrase in a maker’s world.
I have dabbled in various forms of fiber, paper, and mixed media arts for most of my adult life. In each creative endeavor, I’ve discovered “what if” often precedes an exciting and fun phase of exploration that extends my knowledge and enjoyment of my craft.
Put simply, I’ve made a lot of ugly stuff!
Okay, put graciously, I’ve made a lot of things that were “less than attractive” and had no purpose whatsoever.
The trick is learning to accept things don’t always work and to reflect on why they didn’t or what was learned in the doing. Then you figure out how to apply those lessons to future explorations or extend what you already know. It’s called playing, except as adults we have forgotten how much fun it is!
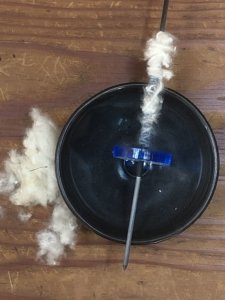
I know people who collect and use support spindles, and I had wondered why they felt the need for another spinning tool. Then I encountered cotton. While I can spin it, laboriously, on my wheel, I started to think “What if I tried cotton on a support spindle? Would it be more fun?” Support spindles are relatively inexpensive, so I acquired one (or more) and started with cotton. It went well, and I found cotton took no more time on a support spindle because I traded all that treadling time for drafting time.
But support spindles took me by surprise. I hadn’t really thought about what “supported” spindling really meant. It makes all sorts of “what if” options come alive! The single needn’t be strong, just able to hold together reasonably well.
“What if I try supported spinning?” became a minor fixation for me. I started a collection of things I wanted to try spinning on my support spindles when time and motivation allowed. I collected bits of moss, air plants, pharmaceutical cotton, clean dryer lint, finely shredded paper, steel wool, hand-combing waste, pygmy goat down, cottonwood seeds – and looked forward to a day to play.
One of the first things I considered was some of my materials might not be friendly to my traditional fiber tools. It’s one thing to expose the metal or carbon fiber shaft of a support spindle to something organic but quite another to consider putting those organic materials into, say, your hand cards or drum carder. Fortunately, I have a pair of cat combs I had purchased early in my cotton spinning explorations, both inexpensive and washable or disposable.
I started with some combing waste, mostly because I had a fair amount of it on hand from a recent spin. It was a bit neppy and soft, but also not something I had to worry about ruining. Think of it like the mud in mud pies; if it turns out well, you can always upgrade the ingredients! I decided to try blending it with steel wool. The steel has a longer “staple” length than my wool, so I added it to one card after I finished the blending, removing that batch without any rolling, like a batt. I added a second, wool only, blended “batt” on top and then rolled the two together from the side, rather than the tip, and drafted from the tip end.
I plied the single, creating a sparkly 2-ply yarn that is surprisingly strong. I certainly wouldn’t wear it, but it could make an interesting addition to a tapestry weaving or a needle felting project.
The collection of “what if” items itself taught me a few things, one of which is that sometimes you have to stop and play in the moment. While in Florida, I collected some air plants, thinking their short, flexible stems might be something I could spin. Sadly, I didn’t have a support spindle with me, and by the time I was able to get to my spindles, the plants had dried too much to be of use.
I had no such problems with the moss, which I tried spinning on its own, but it either broke apart with too much twist or refused to take twist at all. By blending the moss with cotton, in the same way I used the steel wool and combing waste, I got a passable single. The moss, however, became bruised in the process and eventually caused the cotton to weaken with dampness. It also made a mess, one I am glad I didn’t have to clean away from the moving parts of a wheel.
Some things that seem like they might be spinnable simply refuse to be spun on their own. Dryer lint was a disaster. I thought I could spin it just as it was, holding it loosely in my hand and letting my leader work some twist into the fluff.
Several sneezes later, I gave this up. There simply wasn’t any staple length at all to the fluff.
Combining a couple of “What if” ideas, I carded some pharmaceutical cotton, the type they stuff in the top of medicine bottles, with the dryer lint. With this blend, I made an interesting sort of Donegal tweed-like yarn. The lint isn’t terribly strong and tends to shed a bit, but it presents all sorts of interesting ideas about adding it to batts or carding it into singles. I started thinking about collecting “sentimental lint” from washing things like children’s clothes or old flannel shirts and realized I get a consistent beige-colored lint from washing flannel sheets.
The cotton/lint play taught me that not all pharmaceutical cotton is the same. The first bits I played with were very nice, much like the handspinners’ cotton I’ve purchased. The second bits, however, were bluntly cut, full of nepps, and lumpy. But these less-than-nice cotton pieces allowed me to see the fibers in the clumps move apart and into place when it double drafts, something I find particularly difficult to see in smoother preparations.
By now my spinning area was a mess. I had moss, lint, fluff, wool, and steel dust surrounding me. But I couldn’t clean up until I saw what I could do with the cottonwood seeds.
I was encouraged because, unlike dryer lint, the seeds have a staple. It might be only 1/4-inch long, but it is something to work with. On a whim, I tried spinning the seeds from their cloud. And it works! The single is soft and prone to breaking easily, but it’s a single. I started thinking about goose down. Haven’t I read that people used to weave with such things?
And what if I combine desirable seeds, dryer lint, and cotton? I think cosmos seeds might be a good candidate for the experiment. The cotton and dryer lint are biodegradable, and I’m told wool makes good compost, too. What if I use a little square loom and make the base from the cotton/lint/seed single and then do the final weaving with a fine wool single? What if I planted and watered this square? I could mail them to family and friends in their birthday cards.
I have so many more options I want to try, ideas generated through playing with inspiration and materials. Playing opens up our stash, and our minds, to potentially exciting discoveries. It gives us new muscle memory for taking into our default and new spins. And it makes spinning a never-ending rabbit hole of exploration and possibility.
Now, go play in your stash!

Michele Marshall has always been fascinated by people make things and usually has to try it herself if give half a chance. She lives with her husband in the hills of Indiana and can be found on Ravelry as Mingo08.

Winter 2020 ads on sale
Ads are officially on sale for the next issue on Warmth (Winter 2020).
We are dedicated to keeping this magazine content heavy and ad light (ads are only 12–15% of our content). Hopefully you’ve noticed this, and hopefully you’ve noticed the ads. We love our advertisers – without them, we couldn’t bring you this magazine. So if you’ve got a spinning-related business, consider advertising! We’ve got a limited number of spaces available at a variety of sizes/aspects and affordable prices.
Art due September 1, with the issue shipped December 10, 2020.
Check out all the details about ads here.
Introducing PLY’s new graphic designer
Elizabeth Fitzpatrick is the new graphic designer/layout artist for PLY, and we asked her a few questions so we could all get to know her a little better. Her first issue is the Summer 2020 issue on Supported Spindles.
Tell us a little bit about yourself, what fiber craft(s) you do, and how you got started in the fiber world.

My introduction to the fiber world is through my partner of 22 years, Maxine. She learned how to crochet when she was young, but about 15 years ago we were on vacation and walked into a yarn store. Thus began her true fiber journey. I just tag along. She tried to teach me how to knit, which is when I discovered I’m really terrible at counting. So I don’t do any spinning, knitting, or fiber-ing. A few years ago we started our company, knittingbuddha studio. Maxine does the handspun, knitting, and teaching, I do the design. My one foray into fiber was doing the felted sign of a knitting Buddha that hangs in our show booth.
Tell us about your journey in graphic design. What made you get started with it and what is your past experience?
When I was young and living in the NY area, every Sunday one summer, the newspaper featured a Peter Max painting as a full spread. I loved his work. It was fun and colorful, but it also bridged this gap between fine art and commercial art, and that spoke to me. At the same time, John Lennon and Yoko Ono launched a billboard campaign titled “War Is Over.” In our small town of 1,000 people, a “War Is Over” billboard was posted right before the river bridge. It was a small billboard, but I remember staring at it and thinking it was different than any billboard I had ever seen before. Simple black text on a white background. It was a message, it was art, and it was performance. And it was on a billboard! I wanted to do that.
I started my design career in the early 80s, back when being a graphic designer was a hands-on craft involving mechanical layouts, t-squares, drawing boards, proportion wheels, and amberlith overlays. I’ve worked as a designer laying out newspaper ads, designing logos, and creating graphics for K-12 English learning programs and as the artistic director for a non-profit arts organization. Plus, I have 20 years of experience as an art director for several trade magazines, and now PLY!
What was it like when you found out you were going to be the new graphic designer for PLY? How has the experience been so far?
I was a bit blown away to be chosen as the PLY designer. When I applied, I wasn’t originally picked as a finalist. But those who weren’t chosen were given the opportunity to go ahead and submit a mock up. I decided to do it because, at the very least, I could use it as a portfolio piece. I received some great feedback from Jacey, she had me do a couple of other pieces, and then she offered me the job. It was awesome. I celebrated with wine and cake.
The thing about PLY is it’s very much a showcase magazine with big, beautiful pictures and wonderful illustrations. My previous magazine work involved pipelines and construction. There wasn’t much room for interesting design work, so it’s great to work on a magazine with an artistically receptive audience. Like spinning, the joy of designing is in the process. It’s always nice to have the finished product, but it’s the process that makes it worthwhile, and that’s how I felt working on my first issue of PLY.
What do you do with your free time? What else would you like to share about yourself?
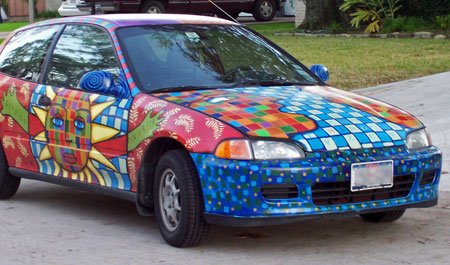
I am also a fine artist. I’ve sold some paintings over the years and was active in the Art Car scene for a little while. I’ve painted five cars and a VW bus. A few years ago I received a ukulele as a gift and have worked my way to the ceiling of beginner and the floor of intermediate. I now have a repertoire and play for our four dogs. They don’t seem to ever tire of hearing “Dock of the Bay.” I’ve got a bunch of DIY projects that I continually procrastinate on. I consider our house a big sculpture I will probably never finish. It’s all in the process.


Leave a Reply
Want to join the discussion?Feel free to contribute!