

Mixing Things up for a Sweater
words and photos by: Johanna Carter
I always admire those who are able to spin mountains of yarn for a big project, ready to knit a wonderful sweater or cardigan. It is a satisfying feeling when you finish all that work, especially if you started with washing and combing the wool or even raising your own sheep.
Mixing spinning and knitting
The typical way to work through a larger project is to spin all the singles first and ply them in a particular order so you get the yarn even throughout the whole project. I don’t have so many bobbins, but my bigger problem is that I am quite impatient and want to get on with knitting once I have an idea. And normally, my brain is full of ideas for fibre work and the limit is the time, as I am a musician and teacher. I can’t sit at the spinning wheel for a long time if I’m not on holiday, so during the school year I mostly knit, and during the holidays I can dye, spin, use my drum carder, and do lots of fibre work. The only time I was able to produce bigger quantities of yarn before I knitted them up was during the Tour de Fleece in the two years during the pandemic, when we did not go on holiday at the beginning of July.

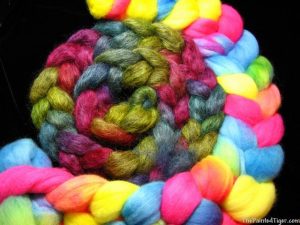
A highly photogenic collection of naturally dyed fibres.
I like to finish knitting one big project like a sweater or cardigan before I start the next one, or at least until I can’t carry it in my bag easily anymore, so I have an excuse to begin the next one. Sometimes it is good to have a second project on the go – I call it mindless knitting, where I don’t have to look very much – which I can keep my hands busy during Zoom or other meetings, which helps me listen.
Mixing colours and fibres
Usually I dye my yarn with plants which I collect in the woods or get from garden flowers. I also use cochineal and indigo, which I buy, to get lots of different colours. I really love the greens and blues I get from dyeing with indigo. I have lots of dyed wool, and all those colours give me inspiration for further projects.

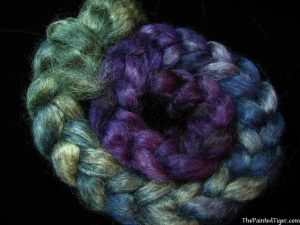
Beautiful greens and blues dyed by the author using indigo and other natural dyes.
Blending the wool on the drum carder I can get even more shades. I like to blend with fibres like silk, alpaca, or plant fibres, and I love sari silk, to get those little bits of colour in my yarn.
Fibres of different types and colours are blended on a drum carder for elegant results.
When I have an idea for the next sweater, I start carding, and then I can begin to spin. Once I have spun enough yarn – say, for one day – I cast on and start knitting, usually top down, so I don’t have to decide too much in advance about length and width.

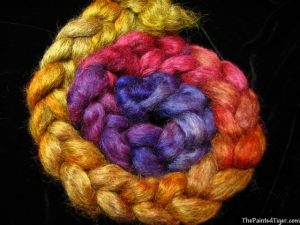
An idea for the author’s next sweater in the gathering stages.
When I spin on my wheel, I have to sit at home, but while spinning I can read a book or talk to others during online meetings. I also like to spin on my spindles, and that works on a walk, or a museum visit. I take them on holiday as they don’t need much space, and when I spin for a lace shawl, I don’t even need much wool either. At home there are spindles all over the place; I can spin when I am waiting for the kettle to boil, when the computer is slow, when I am cooking. Like that I can make good use of a short time and the yarn still grows.

Knitting as soon as the yarn is spun helps the author complete sweater projects in a timely manner.
I can take my knitting almost everywhere, which is why I don’t want to wait to get started until I have spun all the yarn for a whole sweater. I knit at home, on the bus or train. The only thing I have to make sure of is to be one step ahead with the yarn.
I love to knit Fair Isle sweaters. My favourite method is to use only one bobbin, which I don’t even fill, because I need smaller quantities of lots of colours. Then I wind a ply ball and ply it on itself. For that I put my thumb through the ball, so I can tension the two singles with my fingers and they don’t get tangled, as long as my thumb (or a cardboard roll or a pencil) stays in the middle. I don’t have any leftovers from plying, and it is quick when I suddenly need more yarn.

Several charming sweaters dyed, spun, and knit by the author.
I have never had problems with the yarn not being consistent enough throughout a project. I just know what yarn I want and my fingers seem to remember what to do. I am sure it is good advice to have a little card tied to the spinning wheel with a bit of the singles you are aiming for, so you can check and make sure you are spinning a consistent yarn.
Mixing breeds
There are so many different breeds, but some of my favourites are Shetland, BFL, and Jämtland – a Swedish breed. After dyeing them, I often forget what I have used, so when I do a new project it often turns out that I have used different breeds and fibres just to get the right colour. For the Fair Isle knitting I want to juggle lots of colours, which is more important to me than making a sweater out of only one breed.
Recently I made a pullover for my husband using about 12 different breeds and colours, even mixing short and long draw. For me it was a breed experiment and a way to use up lots of smaller quantities of wool I had in my stash. For that sweater I used combed top without blending.

Mixing in knitting during the spinning process is a wonderful way for a spinner to avoid being overwhelmed during a sweater project.
My feeling is that some people don’t dare to start spinning for a bigger project because they get overwhelmed by the quantity they have to spin and then all the knitting there is to do, especially when you want to spin the yarn entirely on spindles. Mixing the spinning and knitting for the same project is more interesting; you get more variety and more freedom to choose what you want to do next as long as you don’t run out of yarn. It breaks the project down into smaller, less daunting parts. The only thing you might want to plan is to have enough fibre at the start, but even that is not necessary, there is always a sheep growing more wool.
The Power of Creation!
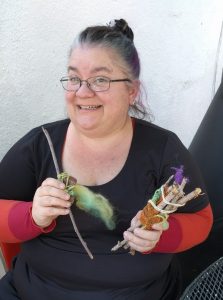
Words and photos by Cat Ellen
The power of creation. The very phrase could conjure up poetic descriptions of galaxies swirling into being or an intimate up-close look at new generations born and raised, whether children or small animals. For others, the word creation evokes the craftroom and the workbench, raw materials, stash, tools, and supplies. It can mean warm kitchens and bubbling hearths, comfort foods, and innovative new ideas.
Those of us who create handmade textiles have a strong sense of what it takes to process a fleece; spin a thread; weave a cloth; create a reliable dye bath from natural materials; hand-stitch, design, and knit a garment; or otherwise keep our families and loved ones in blankets and clothing or protected against the elements. We can recognize a handknit scarf at 20 paces and have probably held long discussions explaining the differences between crochet, knitting, and woven techniques.
If we focus on the word power, for some this means electricity, new gadgets, and space-age technology, manufacturing, and automation. How can I rev up this engine faster? More efficiently? How fast can I cook this meal? How soon can I get this delivered? Or more broadly, can I have power over my bills, my email, my social media, my laundry, my education, my retirement?
Sometimes, I find myself pondering whether every advancement is really worth it. My social media feed is filled with memes asking, “Are you old enough to remember?” featuring pictures of tools for home repair, home production, or manual handiwork. And I have friends dedicated to home sufficiency in gardening, canning, woodworking, and sewing. They joke about the zombie apocalypse and disaster recovery planning, including who needs to be part of any recovery team. The crafty, textiles friends are tagged to help clothe us when we need to rebuild civilization.
Simply creating things with my hands is power. It’s power over the capitalistic, consumer world I live in. Rather than be a passive victim and slave to the current fashion world, instead I make design decisions based on my own artistic preferences. I choose what color is in this season, possibly based on how my friend’s crop of dyestuffs grew in her garden. Or maybe I’m supporting a local dyer I only know over the internet, but we’ve commiserated over bouts with the flu or celebrating who just finished and defended their PhD thesis. All the while, we’re knitting for the holiday season or we’re spinning for a wedding shawl or we’re fermenting an indigo pot out back.
If you’ve been raised in a western textiles tradition, you may have only been taught about tool-based solutions. Which wheel should I buy to spin bulky? Do I need a new flyer to spin for this lace project? Which vendor has the best dyes for my protein fibers? Which loom should I buy, and how many various dents do I need? Can I use this loom for my tablet weaving project, or do I need a different-sized, different-shaped loom? Should I buy a warping board and a niddy noddy and a spinning weasel?
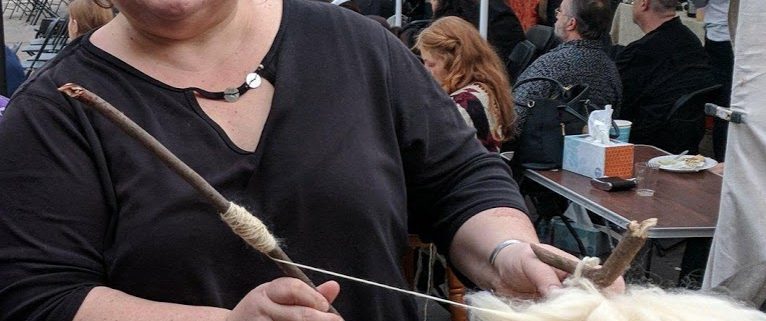
But what if my solutions were process based rather than tool based? Could I learn to spin with simpler tools? Could I weave with nothing much more than a few sticks, dexterity, and quite a bit of practice and memorization?[1]
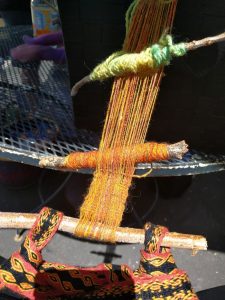 When you think about weaving at its core, it is simply a matter of wrapping strings around a collection of sticks and then manipulating strings among other strings. If you describe your loom, you’re telling me what shape your sticks have been arranged in: backstrap loom, inkle loom, rigid heddle loom, warp-weighted loom, four-harness – all are just descriptions of the shape of the sticks where you’ll manipulate the strings. I needed to demonstrate this description in a park one time, so I gathered a handful of sticks. I made some string on my drop spindle and proceeded to warp a small sampler. Need some heddles? Make more string. I didn’t need money or a large piece of equipment. I can make fabric with sticks and string.
I am still learning how to manipulate strings – whether described as backstrap weaving or card weaving, the weaving complexity is not defined by how many thousands of dollars I spent on tools nor how large a workshop I need to dedicate to my craft. The power of my creation is limited only by the hours I put into my skill development, the research put into learning from those who have come before me, and the creativity of my own innovation.
Recently, a musician friend passed away. In lieu of a memorial service, we held a Life Celebration event. Dozens of friends showed up to sing, play music, and celebrate our friend’s life. I’d left the house without any spinning, but another friend was destashing art supplies from her home. I arrived at the event, and she handed me 4 ounces of wool. All I needed was a stick, which we found on the grounds of this industrial park. I spent a happy 5 hours twirling a stick and some fluff and making yarn.
Go ahead. Take all my worldly spinning goods. I will bounce back immediately. There’s always another stick somewhere. The power of my creation, of my creativity, is not limited by my possessions. Instead, I find an exciting challenge in taking scraps and creating something new. The problem fleece someone thought was only good for mulch? I can soak it in cold water, pick it clean, spin it by hand, and dye it with cochineal, and you would never know the wool wasn’t originally the best in the stash.
Rather than allowing ourselves to be disappointed at the limit of our budgets or our current collection of tools, we have the power to do more than just be a consumer. We are makers.
That’s the power of creation: making something greater than the sum of its parts.
Cat Ellen has been spinning for about 20 years and prefers a drop spindle over anything else. When not teaching people to make string from sticks and fluff, she can be found teaching American Tribal Style bellydance or copyediting performance material for the Santa community.
[1] I credit Abby Franquemont for teaching me to distinguish between tool-based and process-based solutions at PlyAway 2 in 2017.
Behind the Scenes: Indie Dyer Brooke Logan of The Painted Tiger
We have been lucky enough to work with Brooke Logan from The Painted Tiger on a number of PLY projects. Today, we’ve got a sneak peek behind the scenes into Brooke’s business and a giveaway of her gorgeous Gotland fiber!
About The Painted Tiger
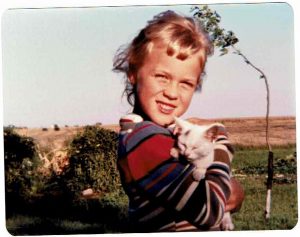 It is always interesting to hear how people got into the fiber arts for a career. My story is a long-ish and convoluted one. I grew up on a small homestead, and my mom raised orphan lambs, both to help with the endless lawn mowing and for some pin money. I got to help feed the bottle lambs. One summer, Mom went off to Siever’s School of Fiber Arts in Wisconsin and returned with a spindle and all kinds of plans for spinning and weaving. She established a flock of brown sheep and bought a spinning wheel and handcards. Her plans fizzled after the first lambing season – and the first giant felt donut she made in the washing machine – and when the ram came after my brother and me – but we still had orphan lambs every year from spring to fall. One year, she got them just in time for my Spring Break! (Because they are newborns, orphan lambs need to be fed every 4 hours around the clock the first week.)
Fast forward to 2002 when I was a SAHM with a toddler, looking to make my own pin money. Ebay was a great work-at-home option, and after many tries at a username, The Painted Tiger was it! Looking for a more consistent product to sell to streamline shipping, I started making custom knit striped scarves, which tied in with the Tiger part quite well. In 2004, I joined the community choir that had just formed and found myself in charge of wardrobe. When I couldn’t find the scarves and ties I wanted to reflect the “river” part of our choir name, I learned how to dye them.
 In the process of my research, I discovered the new indie dyer scene. I had enjoyed dyeing the scarves and ties and was ready to apply my knowledge to yarn – voila, Painted! I started selling on Ebay and Etsy and then launched ThePaintedTiger.com in 2008. I improved my childhood spinning skills and decided to dye fiber, too. In keeping with my business name, I specialize in handpainted colorways and enjoy making stripes and gradients on yarn and fiber. One of my favorite things to dye is for Tiger Club, my monthly yarn and/or fiber club, because I love to come up with new ways to put color on wool, and it gives me an excuse to try new fibers, as I try to offer a different one each month of the year.
About Gotland Wool
 It is believed that Gotland sheep originated from sheep brought by the Vikings to the Swedish island of Gotland. The original Gutefår sheep were horned, with no belly wool and white markings around the eyes and nose. In the 1920s, the Gotland sheep was developed by a farmer who wished to refine the breed and saw a ram he liked being transported on a train to slaughter. He purchased the ram and started a breeding program to create a polled (no horns) sheep with a beautiful curly fleece.
Gotland wool can vary from pale silver to nearly black. It can range from 29–34 microns. When spun into a laceweight yarn, Gotland will knit into a light and drapey fabric. It will have a soft halo, giving the garment warmth. The long fibers have a wonderful natural luster, which can be brought out by spinning worsted.
(Information paraphrased from http://gsbana.org, the Gotland Sheep Breeders Association of North America.)
Why do I love to dye Gotland?
This fiber just has a wonderful sheen to it, and I always love dyeing non-white wools – the way the natural color interacts with the dyes is amazing. This particular wool is a very dark grey, so the effects are subtle yet stunning. Here are a couple of my favorite gradients, plus a comparison of the Gotland with Polwarth dyed in the exact same colors.
Want to WIN a braid of Brooke’s gorgeous gradient Gotland? (Try saying that 3 times fast!) Leave a tip for our Spring 2018 issue, and our favorite tip will be the lucky winner! (See below.)
 We need a few good Tips!
Our Spring issue is all about flax, and we know that can be a scary fiber to work with the first few times: even just the idea of it can make spinners too timid to try. What’s your best tip for getting over the fear of the unknown and giving it a try, or what’s the best way to start? How do you build the best first flax experience?
The person who submits our absolutely favorite tip will get a prize from us! It’s our way of saying thanks for sharing your wisdom with the PLY readers. (One prize for one tip per issue, subject to our selection and you’ll know the winning tip by which one we print first!).
Click here to submit your tip for this issue: https://plymagazine.com/contribute/tip-jar/
A Day in the Life of a Fiber Mill Owner
If you’ve ever bought a fleece, chances are you’ve had at least a fleeting dream of owning your own fiber mill. What’s it really like to run an operation like that? Today, Kim Biegler of Ewethful Fiber Farm & Mill gives us the inside scoop!
People who come to tour Ewethful Fiber Farm & Mill often ask me, “How did you ever get into doing this?”
My fiber story is short and sweet: It involves a love for animals, knitting, and a husband who I refer to as my “supportive enabler.” My mom taught me to knit when I was young and my aunt taught me to crochet; fiber and needles have been in my life for as long as I can remember. I knitted on and off throughout my life but always seemed “too busy” to devote much time to it.
Once my husband, Mitch, and I moved to the country, my passion for everything fiber progressed quickly. I had more peace and quiet time, which naturally evolved into more knitting time. One day I saw a Shetland sheep for sale on Craigslist, and Mitch encouraged me to buy him. Turns out, you can’t have just one sheep, so more came to live on the farm. Mitch then bought me a spinning wheel for Christmas and my love of spinning was solidified!
I thought long and hard about opening a mini fiber mill. The main reasons for my hesitation were
- Financial – starting a mill is very expensive.
- The level of setup involved – electrical, plumbing, air circulation – all seemed very overwhelming. Not to mention that there is serious mechanical equipment involved.
- I was concerned that at the end of the day, I would be too tired of fiber to knit or spin.
Eventually, I worked through these concerns and challenges, and with the help of my husband and family, Ewethful Fiber Farm & Mill opened in the spring of 2017.
What’s it actually like to own a mini fiber mill? I’m not going to lie, it’s absolutely amazing. I’m still able to write that, even after spending a whole day trying to get my first real attempt at “the perfect yarn” to come to fruition. A 2-ply fingering turned out as a 2-ply sport – a little overplied and a few more slubs than I’d like. So goes the life of a spinner!
I’ve only just started my milling career and some days the learning curve feels huge. I anticipate learning until my very last day at the mill. While I’m sure there will be fewer hurdles over time, I’m not sure they will ever get less frustrating; however, even with the challenges, there are many highs in the fiber business. As I get more familiar with my equipment and its capabilities, I try to have a game plan before I walk in the door of the mill. As with any business, establishing your priorities for each day will help keep your head on straight.
As other fiber addicts know, it can be overwhelming to walk into a space full of dirty fleeces needing washing, clean fleeces needing carding or blending, and roving needing to be spun into yarn. It’s easy to run frenetically between machines, all the while accomplishing very little.
Running the Mill
Now, I prioritize starting the washer and the spinning machine. These two machines are capable of running on their own. After I get them up and running I turn my attention to either the picker, carder, pin-drafter, or dehairing machine. The picker is the machine that opens up the locks and blends fibers prior to going on the carder. The carder is a larger version of the handcarders we’ve all used – with lots of rollers, swift and fancy. After the carding, the fiber moves to the pin-drafter, which is an essential part of making yarn. The pin-drafter aligns the fibers into more parallel roving. Next is the spinner. As opposed to handspinning where lumpy bumpy fiber is manipulated inch by inch, the spinner needs the most consistent and even fiber possible to create an even, slub-free yarn. Finally, the dehairing machine is capable of pulling those scratchy guard hairs from alpaca, pygora, qiviut, and other similar types of fibers. The dehairer is a slow and steady machine that processes about 2 pounds of fiber per hour.
-
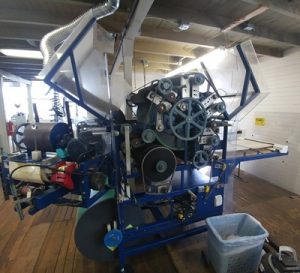
- carding machine
-
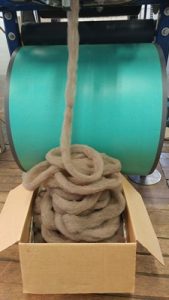
- carding into roving
-
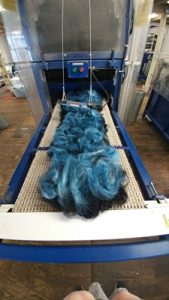
- carding fiber
-
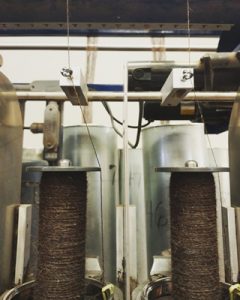
- spinning Shetland
I love going to work every day. I fall asleep thinking about what the next day will bring and what potential there is to accomplish in the day. Some fiber types give me a little more trepidation than others, but each day I continue to develop my skills – and that is good for the fiber soul. As part of my business plan, I’ve incorporated time to knit or spin for myself every day in order to keep my passions alive. This helps me reorient myself and rejuvenates my creative inspiration around the fiber arts.
About the writer:
Kim Biegler is the owner of Ewethful Fiber Farm & Mill in Halsey, Oregon. Ewethful processes fiber for sheep, alpaca, llama, Angora rabbit, dog hair, bison, and goat. Ewethful’s retail shop sells handmade goods, fiber products, and local antiques, and also offers classes in knitting, spinning, and fiber arts. Visit the website to learn more and to browse the online shop. Follow along on Instagram and Facebook for the latest fiber happenings!


Leave a Reply
Want to join the discussion?Feel free to contribute!