

Mixing Things up for a Sweater
words and photos by: Johanna Carter
I always admire those who are able to spin mountains of yarn for a big project, ready to knit a wonderful sweater or cardigan. It is a satisfying feeling when you finish all that work, especially if you started with washing and combing the wool or even raising your own sheep.
Mixing spinning and knitting
The typical way to work through a larger project is to spin all the singles first and ply them in a particular order so you get the yarn even throughout the whole project. I don’t have so many bobbins, but my bigger problem is that I am quite impatient and want to get on with knitting once I have an idea. And normally, my brain is full of ideas for fibre work and the limit is the time, as I am a musician and teacher. I can’t sit at the spinning wheel for a long time if I’m not on holiday, so during the school year I mostly knit, and during the holidays I can dye, spin, use my drum carder, and do lots of fibre work. The only time I was able to produce bigger quantities of yarn before I knitted them up was during the Tour de Fleece in the two years during the pandemic, when we did not go on holiday at the beginning of July.

A highly photogenic collection of naturally dyed fibres.
I like to finish knitting one big project like a sweater or cardigan before I start the next one, or at least until I can’t carry it in my bag easily anymore, so I have an excuse to begin the next one. Sometimes it is good to have a second project on the go – I call it mindless knitting, where I don’t have to look very much – which I can keep my hands busy during Zoom or other meetings, which helps me listen.
Mixing colours and fibres
Usually I dye my yarn with plants which I collect in the woods or get from garden flowers. I also use cochineal and indigo, which I buy, to get lots of different colours. I really love the greens and blues I get from dyeing with indigo. I have lots of dyed wool, and all those colours give me inspiration for further projects.

Beautiful greens and blues dyed by the author using indigo and other natural dyes.
Blending the wool on the drum carder I can get even more shades. I like to blend with fibres like silk, alpaca, or plant fibres, and I love sari silk, to get those little bits of colour in my yarn.
Fibres of different types and colours are blended on a drum carder for elegant results.
When I have an idea for the next sweater, I start carding, and then I can begin to spin. Once I have spun enough yarn – say, for one day – I cast on and start knitting, usually top down, so I don’t have to decide too much in advance about length and width.

An idea for the author’s next sweater in the gathering stages.
When I spin on my wheel, I have to sit at home, but while spinning I can read a book or talk to others during online meetings. I also like to spin on my spindles, and that works on a walk, or a museum visit. I take them on holiday as they don’t need much space, and when I spin for a lace shawl, I don’t even need much wool either. At home there are spindles all over the place; I can spin when I am waiting for the kettle to boil, when the computer is slow, when I am cooking. Like that I can make good use of a short time and the yarn still grows.

Knitting as soon as the yarn is spun helps the author complete sweater projects in a timely manner.
I can take my knitting almost everywhere, which is why I don’t want to wait to get started until I have spun all the yarn for a whole sweater. I knit at home, on the bus or train. The only thing I have to make sure of is to be one step ahead with the yarn.
I love to knit Fair Isle sweaters. My favourite method is to use only one bobbin, which I don’t even fill, because I need smaller quantities of lots of colours. Then I wind a ply ball and ply it on itself. For that I put my thumb through the ball, so I can tension the two singles with my fingers and they don’t get tangled, as long as my thumb (or a cardboard roll or a pencil) stays in the middle. I don’t have any leftovers from plying, and it is quick when I suddenly need more yarn.

Several charming sweaters dyed, spun, and knit by the author.
I have never had problems with the yarn not being consistent enough throughout a project. I just know what yarn I want and my fingers seem to remember what to do. I am sure it is good advice to have a little card tied to the spinning wheel with a bit of the singles you are aiming for, so you can check and make sure you are spinning a consistent yarn.
Mixing breeds
There are so many different breeds, but some of my favourites are Shetland, BFL, and Jämtland – a Swedish breed. After dyeing them, I often forget what I have used, so when I do a new project it often turns out that I have used different breeds and fibres just to get the right colour. For the Fair Isle knitting I want to juggle lots of colours, which is more important to me than making a sweater out of only one breed.
Recently I made a pullover for my husband using about 12 different breeds and colours, even mixing short and long draw. For me it was a breed experiment and a way to use up lots of smaller quantities of wool I had in my stash. For that sweater I used combed top without blending.

Mixing in knitting during the spinning process is a wonderful way for a spinner to avoid being overwhelmed during a sweater project.
My feeling is that some people don’t dare to start spinning for a bigger project because they get overwhelmed by the quantity they have to spin and then all the knitting there is to do, especially when you want to spin the yarn entirely on spindles. Mixing the spinning and knitting for the same project is more interesting; you get more variety and more freedom to choose what you want to do next as long as you don’t run out of yarn. It breaks the project down into smaller, less daunting parts. The only thing you might want to plan is to have enough fibre at the start, but even that is not necessary, there is always a sheep growing more wool.
It’s time for Spinzilla!
Amy Ross Manko is here to kick off one of the biggest events of the year for spinners: Spinzilla!
![]()
What are your plans for the first full week of October? My plan, and the plans of 77 teams of up to 25 spinners each, is participation in a fun event called Spinzilla. Spinzilla is a week of spinning for fun, challenging yourself and friendly competition. Last year’s teams were made up of spinners representing fourteen countries from all over the world, who come together for this annual event to raise money to support The National Needlearts Association’s initiative to bring the fiber arts to youth through the Needle Arts Mentoring Program. Spinners of all levels celebrate the joy of spinning yarn by hand, support local small businesses and aim to “spin enough yarn to reach around the world,” according to the Spinzilla website. Spinning begins at 12:01am Monday, October 3rd and ends at 11:59pm on Sunday, October 9th in whatever time zone you are in. This week has traditionally been known as Spinning and Weaving Week, and Spinzilla is a great way to celebrate it!
This will be my fourth year on a Spinzilla team. Year one, I spun for a local yarn shop’s team and had no idea what I was doing as a new spinner. I made some yarn and had some fun, but didn’t really understand what I was doing (or why!) so I just kept spinning all week and felt pretty good about myself at the end of the week.
The second year, I joined Team KnitGirllls and spun my personal record of over 5000 yards in a week, and had a blast doing it, too. I was PUMPED and we were sure that we would win. At the end of the week when the final tallies were announced, we had lost to Team Fancy Tiger Crafts by about 800 yards of yarn. Literally one skein separated us from the first place team. We were devastated. We all felt we could have spun just one more braid and changed the outcome. We all vowed to increase our production by one braid for next year and try again. After all, it’s all in good fun and for a good cause, right?
The third year, Team KnitGirllls was determined to spin more than ever and finally win the coveted Golden Niddy Noddy (yes, that’s a thing… I’ve seen it and it’s MAGNIFICENT) for Leslie and Laura. We got to work spinning more yardage than ever and keeping our eyes on the prize! At the end of the week, I’d spun a new personal record: over 6000 yards of yarn. This HAD to be good enough for victory, right? Nope. Team Louet North America blew us completely out of the water with 271,607 yards! One of their team members spun over 48,000 yards herself. We finished in third place with just over 183,000 yards. This was definitely nothing to feel badly about, but nearly 90,000 yards less than the winner.
After that, I vowed that this year would be different. I’d remember what Spinzilla is all about and spin for fun and fellowship. No pressure. No numbers. No drive to win. I formed my own team here in our hometown and partnered with a local maker-space to host a registration party with a batt-making bar, spin-ins, wheel tune-up parties, “closing ceremonies” and a plan to just enjoy each other’s company and share our love of spinning with others. This is what I’d been missing most alone in my living room, binge-watching reality television and spinning away. This is what Spinzilla is all about: sharing our love of fiber with other fibery folk. Our team boasts both seasoned veterans and newbies, wheel spinners and spindlers and even a sixteen year old young woman!
Whether you spin “rogue” alone in your room, join a team (virtual or in real life) or watch from the sidelines, I can tell you one thing: Spinzilla is the most fun you’ll ever have making yarn and raising money to support the youth-mentoring programming of TNNA. Last year they raised $17,700 while spinning 5,246,497 yards of yarn.
Please visit www.spinzilla.org for more information or to register for a team. (Team PLY is full already, but there are plenty of other great teams to join!)
Amy Ross Manko is the Chief Executive Farmer of The Ross Farm and with her husband, “Scooterpie the Shepherd Guy,” and their son, lives on a 170 acre sheep farm in Southwestern Pennsylvania that’s been in her family over 120 years and is on the National Register of Historic Places. They raise ten breeds of Heritage and Rare breed sheep and produce natural, breed-specific yarns and roving from the flock.
Spinning at the Hardware Store
I love a good hardware store as much as I love a good book store. I can wander for hours exclaiming over all the doodads. There are so many things that can be used for other purposes, including spinning tools.
I have four hardware store tools that I use for spinning that I wouldn’t want to do without, all of them suggestions from other spinners.
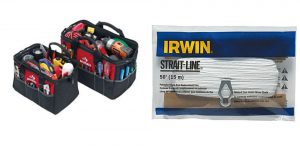
Tool Bags – I remember sitting waiting for a class to start and another spinner walked in with a hardware store tool bag filled with all of her spinning tools. Watching her pull out all of the things like Mary Poppins, I knew I had to have one. They are really durable, have a ton of pockets for organizing, come in a lot of sizes and have sturdy handles. I went out that week and bought one. Now I have several. My husband steals them.
Chalk Line – This is a genius suggestion from super spinner Beth Smith – use cotton chalk line for a drive band. It’s sturdy, smooth and cheap, 100 yards for less than $2.50.
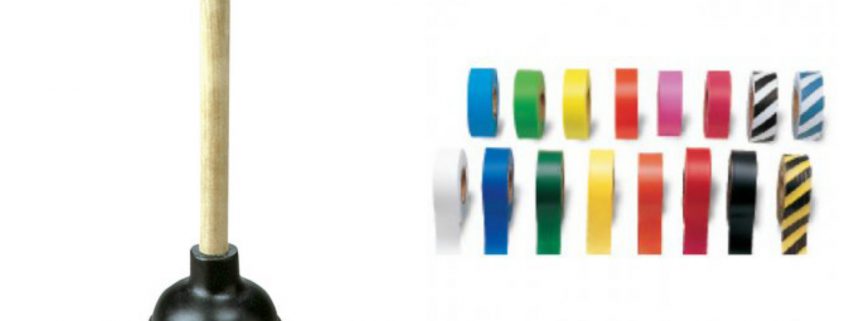
Sink Plunger – I only had to watch Judith Mackenzie wet finish bison yarn using 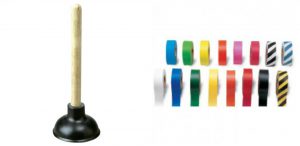 a sink plunger once to know I found finishing nirvana. I use it mostly when I want wool yarns more than just fulled.
Surveyor’s Tape – Deb Menz uses this magical tape when she dyes. I used it in a dyeing class with her years ago to mark samples. Cut it to any length, tie it on your skein and write on it with a Sharpie – the info stays on through dye and rise, hot and cold. I can still read the dye notes on my skeins from 5 years ago.
What spinning treasures have you found at the hardware store?
Save
Save
Save
Fair Fiber Wage, a look from the other side
You can’t pay people what they’ll take, you have to pay them what they’re worth. This simple premise becomes difficult for a myriad of reasons. The first and most confusing for some is that often people don’t know what they’re worth. That not knowing comes from a culture of silence, a lack of transparency, and as usual, the relentless pursuit of the almighty buck by people in power.
This is a huge issue in all areas of creation, and it’s hard for anybody to get a fair shake (or even to know what a fair shake is, what with all the shushing that goes on about money), but where it concerns craft, artists, fiber-work, and women is the one I’m most familiar with and the one I’m specifically talking about here. Those are a lot of areas that historically don’t get a lot of respect, right? Craft. Artists. Fiber-work. Women. Geez, it’s like a stacked deck, and I’m thrilled that Mary Beth and Abby are willing to show their cards, if you will, and get the conversation rolling.
I taught for 10 years before I started PLY Magazine and then PLY Away. I supported a family of 3, then 4, then 5 with teaching and writing, and it wasn’t easy. I could talk about that, but the truth is, I don’t teach very often now, so that’s no longer my reality and there are people with strong voices who can (and are) speaking to that. What I can speak to is the position I’m in now, which is overwhelmingly informed by my previous position as a teacher trying to eke a living out of the thing I was good at and loved doing. Now I run a magazine and put on an annual fiber retreat, and I try to do it fairly and with transparency.
I want to talk about the financials of a retreat, of a big retreat. I want to assure you that anyone who says it’s just not financially viable to pay teachers fairly (they wouldn’t use that word, of course; they’d say “pay teachers more than the industry standard” or something that makes it easier to swallow) is wrong. The key is not expecting a huge profit. Why should that be my (the organizer, underwriter, parent company, corporation) right? I believe that. The first thing you have to be willing to do is pay people what they are worth, and shockingly, that must include yourself (what I mean here is that I should get paid fairly and not expect huge profits and large salaries).
Before I get into the actual nitty-gritty numbers of PLY Away, let me give you the bottom line, in case financials bore you like they bore me (unless they’re my own). With all the outgoing and incoming money, the bottom line is it can be done. When I started this retreat, I told myself that if I could run a first-time retreat the way I wanted it to be run, treat everyone fairly, have it be enjoyable for teachers, vendors, and students alike, and break even, then I’d do it again.
I did and I am. It wasn’t hugely profitable, but that’s okay, I don’t need it to be. I don’t know when we started needing things to bring in huge profits to be worth our while. We don’t need to be rich to be happy, and this industry is not about getting rich, right? It’s about making things with our hands, about community, about who we are and who we want to be. If any aspect of this industry suffers (the farmers, the shepherds, the dyers, the teachers, the designers, the writers), the community is less. What I’m trying to say is that I didn’t need PLY Away to make a million; I just needed it to be sustainable and good. It is both those things.
Here’s our bottom line. If we sell all of our classes ¾ of the way out, there is a profit of $12k. If we sell all of the classes all the way out, there is a profit of $42k. And if we only fill the classes half full, we’ll lose about $17k. The truth is we’ll probably hit around the ¾ mark. That’s the hope anyway. And if we don’t, if we can’t do this, do it well and fairly, we shouldn’t be doing it. That’s that. You don’t sacrifice people and their livelihoods for profit. I won’t ever do that, and that’s not just for them, it’s for me.
So if you’re interested, let’s run through the numbers of what PLY Away’s actual debits and credits are, shall we?
Money Out
First, the venue. And it’s a nice venue. Really nice. You’ve gotta have a nice venue because as much as people say that they’d travel to a shack in the middle of nowhere to take a class with X, you can’t really expect them to, at least not more than once. So you pay for a venue in a nice location with good rooms, well-lit and roomy classes, and lots of food choices that is walkable to interesting things and is generally nice to be in. For me, there’s only one such place within 2 hours and that’s the Westin at Crown Center. Next year a new venue is opening, and that may give me some bargaining room, but for now, this is what I have. I tell you all this so you don’t get it in your head that I must get off cheap and other retreats surely pay more.
Here’s what I pay for the venue: $20,000 (that’s for the classrooms and marketplace for 5 days)
Then there’s food. No venue will rent to you if you don’t sign a food and beverage guarantee. And it’s a lot. I have to agree to use $10,000 worth of food and beverages. At first I thought that’d be easy because it’d include what our attendees use – wrong. It’s just what I order for the event. Things that can and are included in that 10k: the coffee and tea cart open to all in the marketplace, the coffee and tea cart in the spinners’ lobby, the break time snacks in the spinners’ lobby, and the banquet.
And about the banquet, I chose the most inexpensive meal available, which is $50/plate, but because there is a 25% tax on top of it, it’s really about $65, which is what I charged for each banquet ticket. A straight wash, the banquet, but it’s worth it because it adds to the experience, gets everyone together, and is fun!
So that’s the main venue costs. But wait! It’s 20k and 10k, but like I said, there’s a 25% tax on each of those (and annoyingly, the tax doesn’t count towards the 10k food and beverage agreement; it’s added after I reach 10k). So that means the venue’s total cost to me is $37,500. About 50 people bought tickets to the banquet (the other 60 people booked a full schedule of classes, so I paid for their banquet), so that means you can take $3250 off that total. So my new check to the Westin is more like $34,250.
The next major expense is the teachers. Here’s what I pay (and here’s a link if you want to see more about this).
- $650 per full day of teaching, $325 per half day of teaching, paid before departure for first-time teachers.
- $700 per full day of teaching, $350 per half day of teaching, paid before departure for returning teachers.
- $40 per diem for food, personal expenses, etc. (keep in mind we do cover at least 2 dinners too)
- $25 per day for shipping expenses (no receipts needed)
- travel (airfare or current IRS rate for car mileage up to price of airfare)
- single room at PLY Away venue from the night before teaching begins until morning after teaching ends
- optional teachers’ dinner
- optional banquet ticket
- optional last night dinner and teacher wind-down
When I break that down for the teachers we have, it looks like this:
15 teachers (9 new teachers, 6 returning teachers) teaching a total of 5 days (some teach 1, 2, 3, or 4 days; anyone with 3 days or more gets a half or full day break in the middle if they want it) for a total of:
New teachers total: $17,000
Returning teachers total: $15,500
Total teacher salaries: $32,500
But that’s not all it takes to bring a teacher. There’s the per diem, which for 15 at $40 each day they’re here comes out to $2000. There’s shipping at $25 per day for each teaching day, which equals $1300. There’s airfare and travel, which comes out to about $6700. All of those things together come to another 10k even. And of course we have hotel rooms, which come to $15,000 if you include my own room too.
So far that’s
$34,250 for the venue
$32,500 for teacher salary
$10,000 for per diems, shipping, and travel
$15,000 for hotel rooms
$91,750: total
But that’s not really all it costs. There’s the teachers’ dinner: $600.
I like to buy each teacher a pretty good assortment of snacks for their rooms because I know how sick I get of eating out each meal and it’s sometimes hard to find good, healthy stuff. I find out which teachers are GF, Veg, Vegan, etc. and I hit Trader Joe’s and Whole Foods and each teacher gets a goodie bag that I hope will last them the entire time they’re at PLY Away: a bunch of bananas, apples, oranges, muffins, trail mix, granola and cereal bars, nuts, chocolate, and a large bag of popcorn or something like it. This doesn’t cost a lot, but I can tell you it’s really appreciated. $300.
I also want the vendors to be happy and taken care of so I hire a couple of people to help unload their goods: $1600.
We also do a big $500 giveaway to one spinner who fills up his/her punch card in the marketplace. In an attempt to support the vendors, we run a contest; anyone who purchases from 10 different vendors in the marketplace is entered and the winner gets $500 to be spent in the marketplace. There’s also a *no purchase option, but to be honest, it’s super annoying and nobody did it last year, but we had over 100 cards in the drawing: $500.
Then there are the little things like banners, shirts, programs, buttons, goodie bags, advertising, website stuff, etc.: $2000.
So the total for those extra things is $5000.
Which brings our grand total outgoing money to $96,750.
Money In
Okay, now what about what we bring in? Here’s hoping it’s more than that, right?
I struggled with class fees. I want them to be fair, but they also have to cover that huge number up there, right? I looked at lots of different retreats and festivals, and in the end, what we needed to bring in to make it all work falls just below the the middle of retreat class prices, which I’m okay with. It’s a good chunk of change, for sure, but there’s a range and I feel like each class is worth it.
Here are the classes we offer and the money each brings in if it sells ½, ¾, or 100% out. The number is () is the cost and the other number is how many we’re holding of that type of class.
Class length ½ sold ¾ sold sold out
3-day classes ($380): 3 $9,120 $13,680 $18,240
2-day classes ($275): 6 $13,200 $19,800 $26,400
1-day classes ($165): 17 $22,440 $33,660 $44,880
1/2-day ($90): 26 $18,720 $28,080 $37,440
Total class intake $63,480 $95,220 $126,960
Of course, the event registration company takes a percentage of that so we have to adjust those numbers down a bit.
Total intake after reg fees $60,306 $90,459 $120,612
But that’s not all we take in. We’d be in trouble if it was, right?
We have sponsors who help immensely and when I say we couldn’t do it without them, I truly mean it (to check out our sponsors, go here), to the tune of about $12,000.
We have vendors, and each booth space is $350 so that brings in about $7,000.
T-shirts are a wash because we sell them at cost, and we give away the goodie bags and the buttons.
So, here’s where we are:
Total intake if we sell all of our classes ¾ out, which I feel is a reasonable goal:
$90,459 class intake after fees
$12,000 from sponsors
$7,000 from marketplace booth sales
$109,459 total income with classes 3/4 filled
And with our output at $96,750, that stands to make PLY Away about $12,000 profit.
If we sell only half out, it’s a total intake of $60,306 plus sponsors and marketplace (total $79,306) and minus the total output for a total loss of $17,453. Yes, that’s a loss. Scary stuff, but that won’t happen.
Of course, the ideal situation is that every class sells out totally and PLY Away makes a huge profit of 42k! But that’s a little much to ask, isn’t it? All I want is to keep going, make and pay a fair wage, and be and spread happiness. It’s what I got into this to do, and when I can’t do that anymore, either via the magazine or the event, it’ll be time to do something else. I don’t see that time around any corner though.
I want to note here that I could make more. I don’t have to have the extras like the give-a-ways, the vendor help, the teacher snack bags, and the teacher dinner. I could charge more for classes — if you look around at like-retreats, we’re a little below the middle. But I like the choices I’ve made and will keep making them as long as it works for PLY Away. I mostly want to point this out to point out that this type of model is viable even if you need to make more than I do. There’s a higher profit margin possible without paying people unfairly, you just have to want to make it work.
So that’s it. If you made it this far, I applaud your stick-to-it-ness and perhaps you’d like a job. Someday we’ll be hiring. You’re not going to get rich, but you will be treated fairly.


Leave a Reply
Want to join the discussion?Feel free to contribute!