

Mixing Things up for a Sweater
words and photos by: Johanna Carter
I always admire those who are able to spin mountains of yarn for a big project, ready to knit a wonderful sweater or cardigan. It is a satisfying feeling when you finish all that work, especially if you started with washing and combing the wool or even raising your own sheep.
Mixing spinning and knitting
The typical way to work through a larger project is to spin all the singles first and ply them in a particular order so you get the yarn even throughout the whole project. I don’t have so many bobbins, but my bigger problem is that I am quite impatient and want to get on with knitting once I have an idea. And normally, my brain is full of ideas for fibre work and the limit is the time, as I am a musician and teacher. I can’t sit at the spinning wheel for a long time if I’m not on holiday, so during the school year I mostly knit, and during the holidays I can dye, spin, use my drum carder, and do lots of fibre work. The only time I was able to produce bigger quantities of yarn before I knitted them up was during the Tour de Fleece in the two years during the pandemic, when we did not go on holiday at the beginning of July.

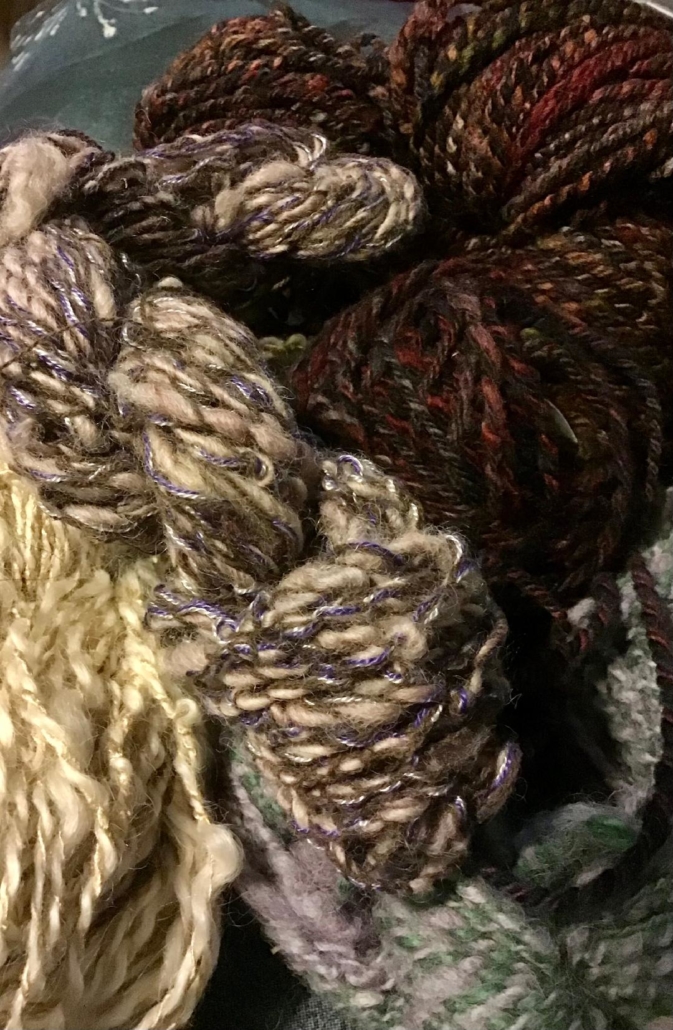
A highly photogenic collection of naturally dyed fibres.
I like to finish knitting one big project like a sweater or cardigan before I start the next one, or at least until I can’t carry it in my bag easily anymore, so I have an excuse to begin the next one. Sometimes it is good to have a second project on the go – I call it mindless knitting, where I don’t have to look very much – which I can keep my hands busy during Zoom or other meetings, which helps me listen.
Mixing colours and fibres
Usually I dye my yarn with plants which I collect in the woods or get from garden flowers. I also use cochineal and indigo, which I buy, to get lots of different colours. I really love the greens and blues I get from dyeing with indigo. I have lots of dyed wool, and all those colours give me inspiration for further projects.

Beautiful greens and blues dyed by the author using indigo and other natural dyes.
Blending the wool on the drum carder I can get even more shades. I like to blend with fibres like silk, alpaca, or plant fibres, and I love sari silk, to get those little bits of colour in my yarn.
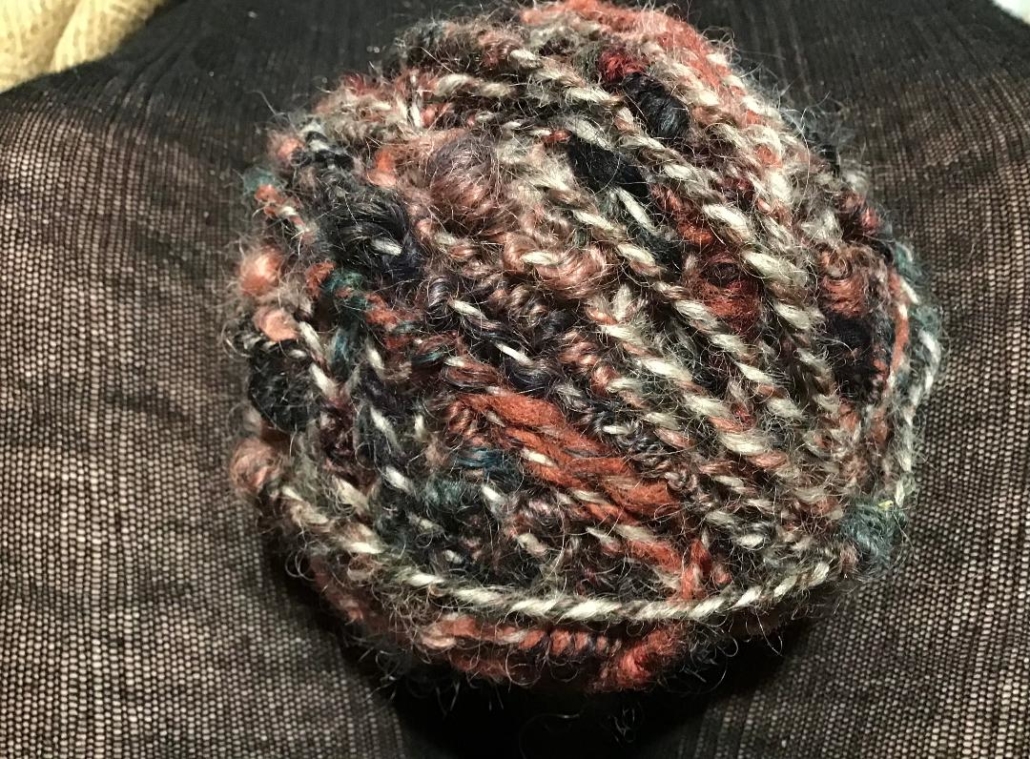
Fibres of different types and colours are blended on a drum carder for elegant results.
When I have an idea for the next sweater, I start carding, and then I can begin to spin. Once I have spun enough yarn – say, for one day – I cast on and start knitting, usually top down, so I don’t have to decide too much in advance about length and width.

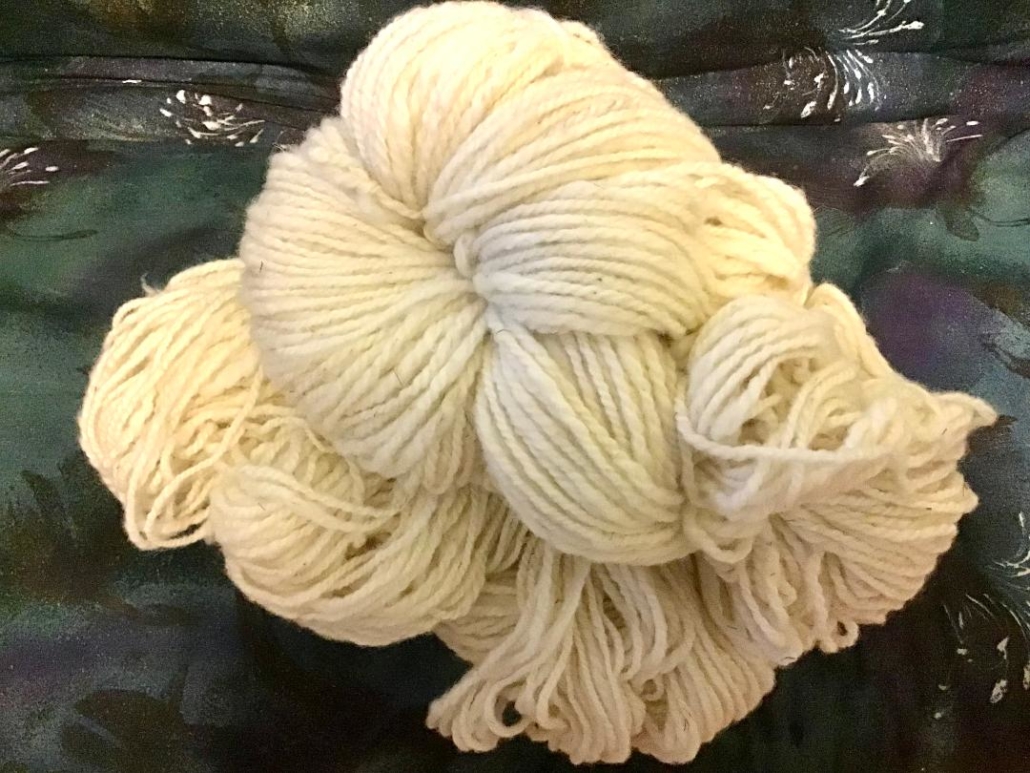
An idea for the author’s next sweater in the gathering stages.
When I spin on my wheel, I have to sit at home, but while spinning I can read a book or talk to others during online meetings. I also like to spin on my spindles, and that works on a walk, or a museum visit. I take them on holiday as they don’t need much space, and when I spin for a lace shawl, I don’t even need much wool either. At home there are spindles all over the place; I can spin when I am waiting for the kettle to boil, when the computer is slow, when I am cooking. Like that I can make good use of a short time and the yarn still grows.

Knitting as soon as the yarn is spun helps the author complete sweater projects in a timely manner.
I can take my knitting almost everywhere, which is why I don’t want to wait to get started until I have spun all the yarn for a whole sweater. I knit at home, on the bus or train. The only thing I have to make sure of is to be one step ahead with the yarn.
I love to knit Fair Isle sweaters. My favourite method is to use only one bobbin, which I don’t even fill, because I need smaller quantities of lots of colours. Then I wind a ply ball and ply it on itself. For that I put my thumb through the ball, so I can tension the two singles with my fingers and they don’t get tangled, as long as my thumb (or a cardboard roll or a pencil) stays in the middle. I don’t have any leftovers from plying, and it is quick when I suddenly need more yarn.

Several charming sweaters dyed, spun, and knit by the author.
I have never had problems with the yarn not being consistent enough throughout a project. I just know what yarn I want and my fingers seem to remember what to do. I am sure it is good advice to have a little card tied to the spinning wheel with a bit of the singles you are aiming for, so you can check and make sure you are spinning a consistent yarn.
Mixing breeds
There are so many different breeds, but some of my favourites are Shetland, BFL, and Jämtland – a Swedish breed. After dyeing them, I often forget what I have used, so when I do a new project it often turns out that I have used different breeds and fibres just to get the right colour. For the Fair Isle knitting I want to juggle lots of colours, which is more important to me than making a sweater out of only one breed.
Recently I made a pullover for my husband using about 12 different breeds and colours, even mixing short and long draw. For me it was a breed experiment and a way to use up lots of smaller quantities of wool I had in my stash. For that sweater I used combed top without blending.

Mixing in knitting during the spinning process is a wonderful way for a spinner to avoid being overwhelmed during a sweater project.
My feeling is that some people don’t dare to start spinning for a bigger project because they get overwhelmed by the quantity they have to spin and then all the knitting there is to do, especially when you want to spin the yarn entirely on spindles. Mixing the spinning and knitting for the same project is more interesting; you get more variety and more freedom to choose what you want to do next as long as you don’t run out of yarn. It breaks the project down into smaller, less daunting parts. The only thing you might want to plan is to have enough fibre at the start, but even that is not necessary, there is always a sheep growing more wool.
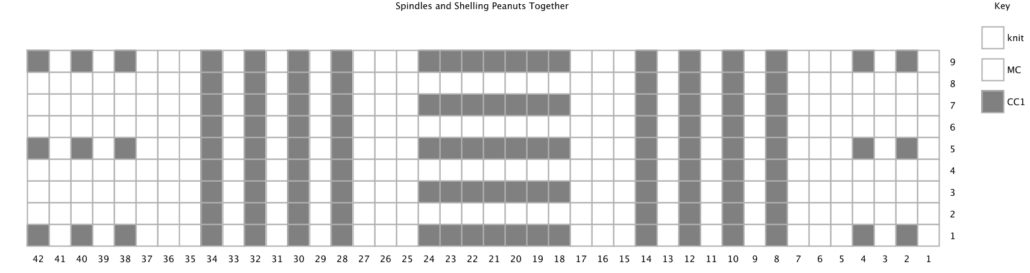
Correction to the Loft (Summer 2022) Issue
In the Loft issue (Summer 2022), for the Bogolanfini pattern (page 88), one of the charts was cut off during printing. For the Spindle and Shelling Peanuts Together chart, there should be two more columns on the left side (41 and 42). Updated chart below.
PLY Magazine believes that Black lives matter, as well as LBGTQI+ lives. Those most vulnerable and persecuted in our communities deserve our love and support. Please be good to each other.
Did you know we also have a monthly PLY newsletter? Sign up here!
The Story of a Coat
words and photos by Rebecca Harkins
The pandemic gave me the perfect opportunity to achieve a lifelong dream to make my own wool shirt. Since I raise sheep and have a lot of fiber available to spin, I decided to use handspun wool.
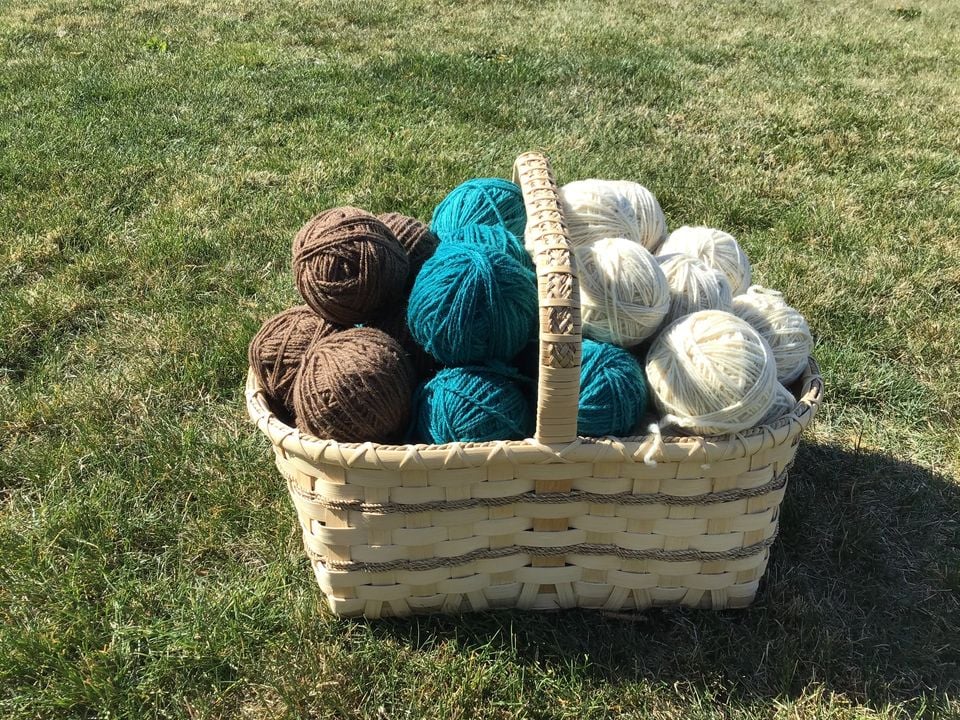
The first thing to decide was what the fabric design would be. My dream shirt just had to be plaid. I wanted a simple pattern with larger blocks of color and I wanted to use what I already had. I had a beautiful natural chocolate brown Shetland roving and a large quantity of white roving available. I also had a huge tub of teal dye (when calculating how much dye to order for a project, decimal points really matter). Since I didn’t want the shirt to end up too dark, I decided to also include white in the fabric design. These 3 colors went into the plaid I designed for the shirt.
Once the colors, fabric design, and fabric pattern were chosen, it was time to figure out how much fiber I would need. This involved much discussion, several napkins and notebooks, several phone calls and emails to friends to check my math, stopping to spin, weave, full asample, and finally adjust my calculations yet again. I do think rocket science would be easier. Nervous, I decided to add an error rate to my calculations so I would spin enough to make some extra fabric. Besides, who wouldn’t like extra custom-made wool fabric?
With calculations done, I prepared all of my fiber and set to spinning on my Kromski Symphony wheel. I chose to ply my yarn to make a stronger yarn for weaving. Over the next two months, the mountain of finished skeins grew and grew. I kept a tally of the yardage of each skein as I completed it so I could track my progress towards my goal. My Symphony is a real workhorse, so each skein took an average of 1 hour 35 minutes to spin. It took an average of 44 minutes to ply and skein each ball. All told I spun 13,095 yards or 7.44 miles of 2-ply yarn. My wraps per inch (WPI) for the plied yarn was 22.
With the spinning all done, it was time to dye. The brown would stay as it was, but I needed to dye just slightly more than half of the white to teal. My dyepot could hold two skeins of yarn and I had nineteen skeins to do.
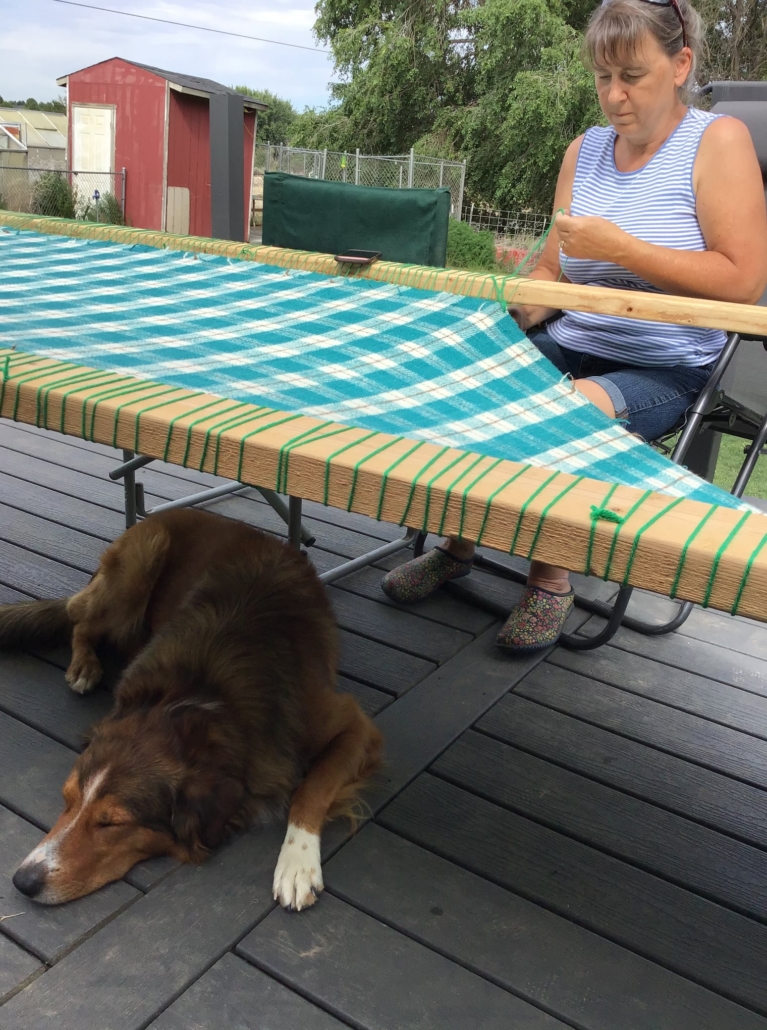
The next step was to warp the loom. My loom is a Paxton 4-shaft floor loom. As I was warping, I deliberately mixed up the different dye lots, using one strand of this dye lot and the next strand another dye lot to disguise any dye lot differences. This blending worked astonishingly well and added a beautiful depth to the teal. My loom has a sectional beam allowing me to warp in 1-inch segments, which were then put on the loom.
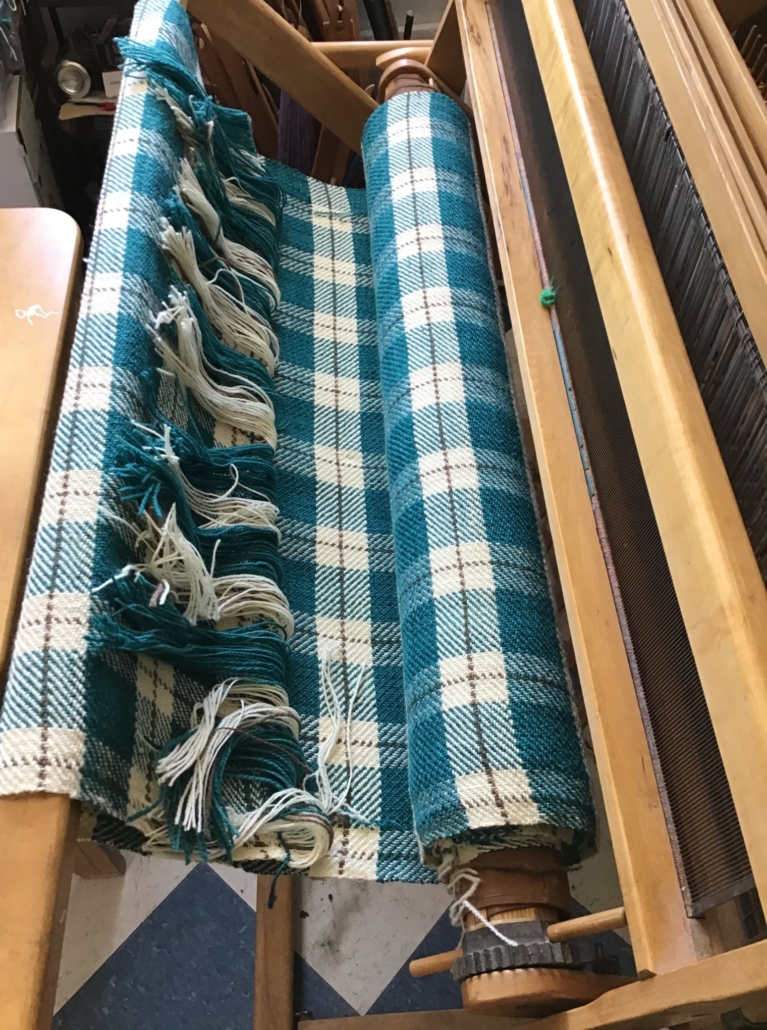
Once the cloth was woven, it needed to be fulled. Fulling is the process of felting or partially felting wool fabric to make it more stable. This process wasa lot of work as I chose to do the feltingby hand because I was concerned the machine would felt thefabric into a ball. This process is done by wetting the fabric with soap and water and squishing and rubbing it repeatedly to make it felt. In total the squish and rub process took 5 hours.
Once I thought it was felted sufficiently, I sewed it onto a wooden frame under tension to dry. I had done some research about the historical fabric finishing techniques and found that fabrics were stretched and hooked onto a frame and left to dry. I had a frame made to fit my fabric and stitched the fabric to the frame (instead of hooks) to stretch the fabric while it dried. The frame allowed me to lean the whole piece against the wall, protecting it from accidentally being walked on as it was laid out to dry. This took 2 hours! The whole fullingprocess would have been more fun with friends like the “waulking the wool” parties depicted in Outlander. Darn the pandemic.
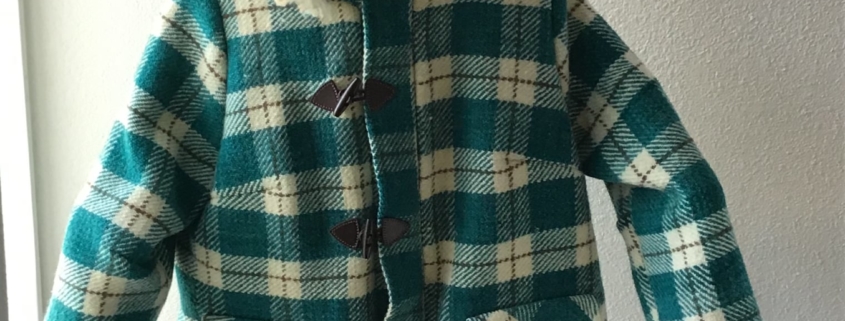
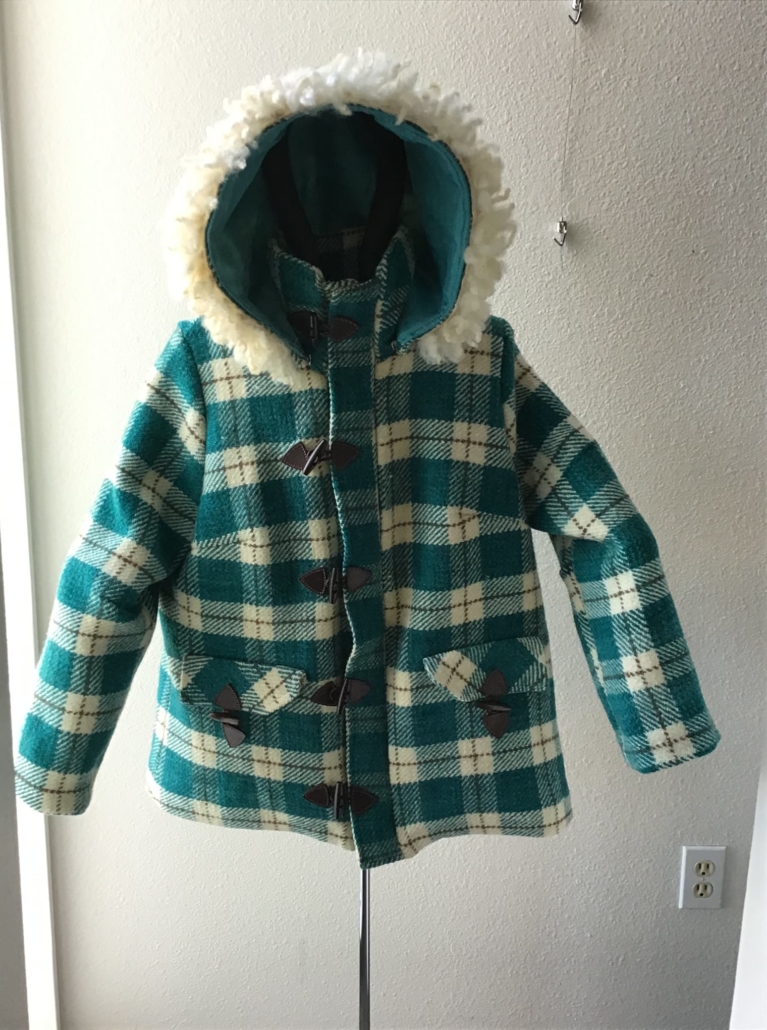
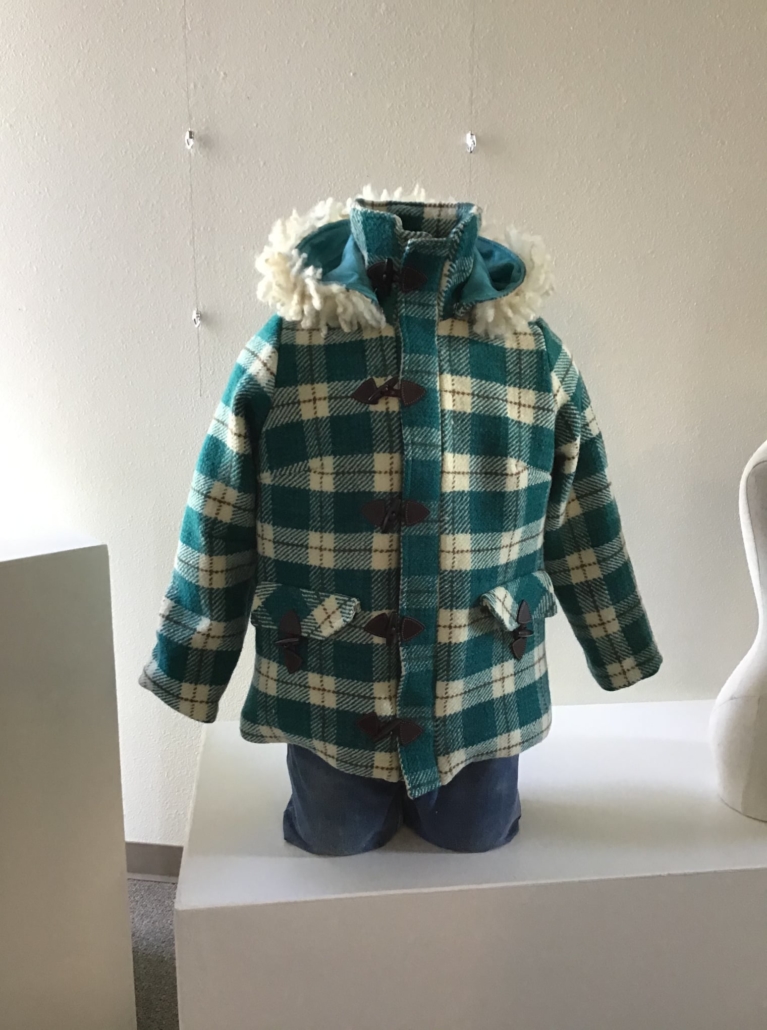
When the fabric had dried, I discovered it was thicker than planned. This meant it was much too thick to be made into a shirt. I then had to rethink my project and started looking at different patterns. I decided the heavy fabric would work very nicely for a cozy winter parka, so I found a pattern to use. Before I could cut the fabric, I had to assemble the pattern; it took me 2 hours to tape together the sheets and cut out the pieces. I was then ready to pin the pieces to the fabric. Since the fabric was a plaid, it was necessary to take extra care to make sure the plaid lines all matched up on the different pieces. If the plaid lines were not matched properly, it would be very obvious in the finished jacket. This took extra time as I had to pin the layers of the fabric together, aligning the plaid lines in the separate layers. Then I carefully placed the pattern pieces. Once the outer fabric of the jacket was cut, I pinned and cut out the silk fabric for the lining.
Once all the pattern pieces were ready (both outer fabric and lining), it was time to start assembling the coat. I learned a lot about sewing this project and how to do things I had never done before. The biggest thing I learned how to do was match plaids around the coat. This was a real challenge and required a lot of double checking that I’d done it right. I also learned that lightweight silk fabric is no fun to work with and when in doubt pin more until you run out of pins. My favorite thing I learned was how to do inset pockets correctly. I love that they are completely finished and they are wonderful to use. The coat was hand finished by hemming and sewing on toggle buttons. Once all the machine sewing was completed, the coat was pressed.
To finish the hood, I wove a faux fur band on an Inkle loom with 100 percent wool yarn. The fur is made from 100 percent Romney wool locks shorn from my flock that were hand knotted into the weaving. This makes a very durable but flexible band that is finished so it can be sewn onto the hood. For washing, this will be removed and washed separately if needed.
Over the course of this project I kept track of the hours I spent planning, spinning, dyeing, warping, weaving, fulling, and sewing. All together, I put just over 222 hours into this project! I used over 13,000 yards of yarn and made and used 5.25 yards of fabric.
Even though I didn’t end up with what I had planned at the start of my adventure, it was an amazing process. I learned a lot starting the project right from the basic materials. My advice to others;don’t be afraid of big projects. Enjoy the process. Be flexible in your plans; sometimes things just don’t work out as planned. And finally, be excited to stretch yourself and your skills.
Rebecca Harkins is a fiber artist and shepherd with more than 15 years experience. She raises Romneys and Merinos and enjoys using their wool in her work. She also enjoys teaching and writing about fiber arts. She dyes, spins, felts, and weaves the wool from her sheep, making beautiful tapestries, afghans, and garments.
PLY Magazine believes that Black lives matter, as well as LBGTQI+ lives. Those most vulnerable and persecuted in our communities deserve our love and support. Please be good to each other.
Did you know we also have a monthly PLY newsletter? Sign up here!
Did you know we also have a monthly PLY newsletter? Sign up here!
6 Reasons Why We Should Mix it Up
Words and Photos by Joanne Seiff
There’s really something exquisite about a habit. That morning dog walk, cup of coffee, or the cookie we eat after lunch – life is full of delicious, everyday activities. For many spinners, spinning the same vanilla kind of yarn becomes so automatic that one day you may long to break out and try something new. Or you can’t see the point, because this is the only kind of yarn you’ll ever use. Worse, now that you’ve spun the same kind of yarn for so long, you fear this is it – you can’t make anything different. So why mix it up?
- It’s good for you intellectually. Research shows that learning new things, including hands-on, flow activities like spinning, can help develop new neural pathways in our brains. There’s some indication this can prevent dementia, depression, and all sorts of other health concerns. So if you’re a long-time laceweight Merino spinner, spinning that bulky crunchy longwool might be like eating more fibre or a daily constitutional. It’s worth pushing yourself. Keep those neurons firing and stay healthy and active.
- It might get your body moving! If you’ve long been a single treadle, Saxony spinning wheel spinner, you’re likely not using one foot as much as the other. A double treadle wheel might be worth exploring. If you’re always spinning sitting down, a hand spindle might help you move your shoulders and arms in ways they need to stretch. A walking wheel can help you put extra steps into every day without going outdoors in bad weather. There are lots of ways to stretch and move while also continuing to spin. Spinning may not be a high-intensity workout, but keeping moving, in all directions, can be good for us at any age.
- It improves your mental health in small ways. Really! No kidding. A change is as good as a rest, and all those other clichés. Sometimes, grabbing a hand-dyed braid in bright colours can be just the stimulating pick me up you need to feel more joy in the dead of winter. Colour has that power, when used carefully. Other times, a seemingly endless run of cream-colored crisp Texel hand-carded rolags might provide just the soothing texture you need to calm down during trying times.
- It meets specific goals. There can be little more satisfying than creating something, by hand, from start to finish. Sometimes I meet spinners in a rut who successfully spin small batches of yarn but cannot graduate to sweater-sized quantities. Or they churn out factory-sized quantities of uniform yarn but at the wrong weight or using the wrong fibre for the job at hand. Figuring out what you really need and then changing your spinning to meet that goal can be a game changer. For instance, what if you really need a warm, brown, hardwearing pill-free sweater for hiking and working outdoors, but you only spin 4-ounce braids of Merino pink hand-dyes? It’s time to help yourself meet those goals! Change your usual activities and start to spin a naturally brown medium or long wool instead.
- It gifts us with novelty. If you’re struggling with the same-old, same-old in other parts of your life (hello, pandemic blues), it’s okay to change it up for no reason at all. Not to learn something new or for a specific project or even because you’re actually feeling unwell in body or mind. What if you just want to play? Enjoying a new exploration – in processing fibre, dyeing, colour blending, technique, spinning tool, whatever – can help address that need for “new new new” that our society often thrusts upon us. Your values may not align with that of fast fashion, but sometimes we still yearn for a treat. Surely a little packet of exotic fibre – yak or qiviut, anyone? – or a stint of spinning cotton, flax, or hemp might change up a habitual wool spinner’s routine.
- It meets others’ needs. Often, we break out of habits not because it’s good for us but because it’s good for others. In other words, they need us. For instance, your local school needs woollies to hand out for children who come to school without warm clothes. This calls for some warm mitts and hats in a hurry – perhaps in superwash wools or down breeds that won’t felt on the playground. Since you’re a spinner, you can work to meet that need, whether it’s a laceweight christening shawl, a chemo cap, or those mittens spun and knit in a hurry for those cold elementary school kids.
There are lots of reasons to mix it up as a spinner! There’s no need to pick just one reason. In fact, you don’t have to try something different because it’s healthy for your mind, body, or mood or to meet personal goals or to try something new or meet anyone else’s needs. Instead, why not try it because it’s fun?
Joanne Seiff has written three fiber-related books: Three Ply, Fiber Gathering, and Knit Green. She writes, edits, spins, knits, designs, and teaches in Winnipeg. See her designs on Payhip, Ravelry, and Lovecrafts.com—her designs might sing in your handspun. Read joanneseiff.blogspot.com or @yrnspinner on Instagram to learn more!
PLY Magazine believes that Black lives matter, as well as LBGTQI+ lives. Those most vulnerable and persecuted in our communities deserve our love and support. Please be good to each other.
Did you know we also have a monthly PLY newsletter? Sign up here!


Leave a Reply
Want to join the discussion?Feel free to contribute!