


Mixing Things up for a Sweater
words and photos by: Johanna Carter
I always admire those who are able to spin mountains of yarn for a big project, ready to knit a wonderful sweater or cardigan. It is a satisfying feeling when you finish all that work, especially if you started with washing and combing the wool or even raising your own sheep.
Mixing spinning and knitting
The typical way to work through a larger project is to spin all the singles first and ply them in a particular order so you get the yarn even throughout the whole project. I don’t have so many bobbins, but my bigger problem is that I am quite impatient and want to get on with knitting once I have an idea. And normally, my brain is full of ideas for fibre work and the limit is the time, as I am a musician and teacher. I can’t sit at the spinning wheel for a long time if I’m not on holiday, so during the school year I mostly knit, and during the holidays I can dye, spin, use my drum carder, and do lots of fibre work. The only time I was able to produce bigger quantities of yarn before I knitted them up was during the Tour de Fleece in the two years during the pandemic, when we did not go on holiday at the beginning of July.

A highly photogenic collection of naturally dyed fibres.
I like to finish knitting one big project like a sweater or cardigan before I start the next one, or at least until I can’t carry it in my bag easily anymore, so I have an excuse to begin the next one. Sometimes it is good to have a second project on the go – I call it mindless knitting, where I don’t have to look very much – which I can keep my hands busy during Zoom or other meetings, which helps me listen.
Mixing colours and fibres
Usually I dye my yarn with plants which I collect in the woods or get from garden flowers. I also use cochineal and indigo, which I buy, to get lots of different colours. I really love the greens and blues I get from dyeing with indigo. I have lots of dyed wool, and all those colours give me inspiration for further projects.

Beautiful greens and blues dyed by the author using indigo and other natural dyes.
Blending the wool on the drum carder I can get even more shades. I like to blend with fibres like silk, alpaca, or plant fibres, and I love sari silk, to get those little bits of colour in my yarn.
Fibres of different types and colours are blended on a drum carder for elegant results.
When I have an idea for the next sweater, I start carding, and then I can begin to spin. Once I have spun enough yarn – say, for one day – I cast on and start knitting, usually top down, so I don’t have to decide too much in advance about length and width.

An idea for the author’s next sweater in the gathering stages.
When I spin on my wheel, I have to sit at home, but while spinning I can read a book or talk to others during online meetings. I also like to spin on my spindles, and that works on a walk, or a museum visit. I take them on holiday as they don’t need much space, and when I spin for a lace shawl, I don’t even need much wool either. At home there are spindles all over the place; I can spin when I am waiting for the kettle to boil, when the computer is slow, when I am cooking. Like that I can make good use of a short time and the yarn still grows.

Knitting as soon as the yarn is spun helps the author complete sweater projects in a timely manner.
I can take my knitting almost everywhere, which is why I don’t want to wait to get started until I have spun all the yarn for a whole sweater. I knit at home, on the bus or train. The only thing I have to make sure of is to be one step ahead with the yarn.
I love to knit Fair Isle sweaters. My favourite method is to use only one bobbin, which I don’t even fill, because I need smaller quantities of lots of colours. Then I wind a ply ball and ply it on itself. For that I put my thumb through the ball, so I can tension the two singles with my fingers and they don’t get tangled, as long as my thumb (or a cardboard roll or a pencil) stays in the middle. I don’t have any leftovers from plying, and it is quick when I suddenly need more yarn.

Several charming sweaters dyed, spun, and knit by the author.
I have never had problems with the yarn not being consistent enough throughout a project. I just know what yarn I want and my fingers seem to remember what to do. I am sure it is good advice to have a little card tied to the spinning wheel with a bit of the singles you are aiming for, so you can check and make sure you are spinning a consistent yarn.
Mixing breeds
There are so many different breeds, but some of my favourites are Shetland, BFL, and Jämtland – a Swedish breed. After dyeing them, I often forget what I have used, so when I do a new project it often turns out that I have used different breeds and fibres just to get the right colour. For the Fair Isle knitting I want to juggle lots of colours, which is more important to me than making a sweater out of only one breed.
Recently I made a pullover for my husband using about 12 different breeds and colours, even mixing short and long draw. For me it was a breed experiment and a way to use up lots of smaller quantities of wool I had in my stash. For that sweater I used combed top without blending.

Mixing in knitting during the spinning process is a wonderful way for a spinner to avoid being overwhelmed during a sweater project.
My feeling is that some people don’t dare to start spinning for a bigger project because they get overwhelmed by the quantity they have to spin and then all the knitting there is to do, especially when you want to spin the yarn entirely on spindles. Mixing the spinning and knitting for the same project is more interesting; you get more variety and more freedom to choose what you want to do next as long as you don’t run out of yarn. It breaks the project down into smaller, less daunting parts. The only thing you might want to plan is to have enough fibre at the start, but even that is not necessary, there is always a sheep growing more wool.

Book Review: Fleegle Spins Supported by Susan Glinert Stevens
reviewed by Sukrita Mahon
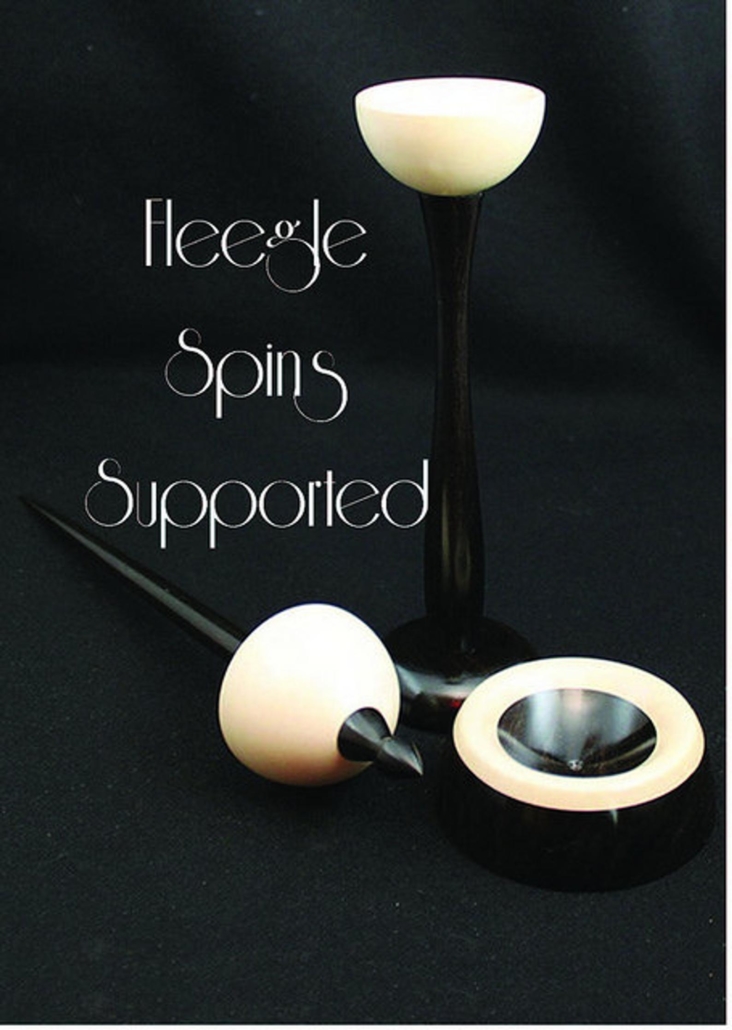
Perhaps because of the rise of the internet and social media, spinning is enjoying a revival – possibly its second one in the post-industrial era, the first having taken place in the 1960s–70s or so. In a lot of ways, though, it remains a niche interest, with quirks that even those within the community struggle to explain. One such quirk is demonstrated in the highly unusual format of this “book”: it’s a USB drive shipped manually, containing an interactive PDF and videos. I’m just as baffled as you probably are. Why not make the files available for download?
This “book” was published in 2012, and I wonder if this was an attempt on the author’s part to bypass both conventional publishing routes as well as the personal expense of self-publishing. I do wish they had an alternative method of distribution and still hold out hope of an upgrade one day.
The buy-the-USB format means the book is highly inconvenient and expensive to purchase outside the U.S. or Americas. I had purchased my copy in Australia through the spindle maker Malcolm Fielding, as part of a “learn to spin on supported spindles” set. This offering is no longer available since the maker has retired and passed on the business to their successor. If I had to purchase it from the U.S. today, the price combined with shipping would be a serious deterrent.
That said, if you can get over the feeling of confusion of buying a “USB book,” the material it contains is excellent. Trying to learn support spindle spinning can be a very frustrating experience. There seems to be almost no literature on the subject (barring a few magazine issues), videos online feel incomplete and lacking enough description, and local guilds may or may not have the required knowledge. Fleegle, aka Susan, provides all the technical information for the beginner to start spinning supported.
There are many reasons to learn support spindle spinning: it’s the only way I find it possible to spin cotton, for instance. It can be a much more accessible way of learning to spin long draw, as it feels a lot more intuitive than on a wheel. I often hear that support spinning may be more comfortable for long stretches of time compared to using a drop spindle, but I’m awkward enough that either can result in pinched nerves. For those who prefer spinning seated, or who have mobility issues, it may be worth looking into as an option.
The book contains an interactive PDF and a printable PDF, along with 25-odd videos. It is photo-heavy and humorously written, briefly referencing the Ravelry forums, where the idea for the book originated – Fleegle is the author’s Ravelry name. This may or may not be appealing to readers, depending on how they relate to the “forum era” of the internet. I have to admit that there’s a portion about a hairy frog that I’m still puzzled about but don’t care enough to try to understand.
The section on fiber is very extensive: it covers dog and cat hair, possum, cow and horse hair, deer hair, pig fur… the list is endless and fascinating. I learned a lot from it, despite the fact that almost every spinning book has a fiber chapter. The author takes full advantage of the fact that we have unprecedented access to novel fibers today, and the idea that we are only limited by our imaginations is very freeing. The experimental portions, such as spinning straw, are interspersed with practical information, such as how to handle various preparations of silk.
For those looking to use plant-based fibers, there is a section on flax, ramie, nettle, milkweed, fireweed, pineapple, and even kozo or mulberry paper. The author correctly calls out the polluting processing methods of increasingly popular fibers, such as bamboo, soy, banana, and milk, that are promoted as plant-based despite being unsustainable. There is even a section on spinning with feathers.
Fleegle goes on to explore color and working with different fiber preparations for support spindles: from processing and working with raw fleece to using dyed tops and blended batts. It is quite in-depth but still interesting for intermediate-level spinners. The ever-relevant question of how to avoid colors blending into “mud” as they are spun is addressed. There are tutorials on making fauxlags and pseudo-rolags, which are very useful for long draw.
There’s a chapter called Support Spindles Around the World, which explores the various spindle styles and traditions that exist worldwide. The diversity in form and spinning style in each tradition is very intriguing. This chapter ends with a portion on bead style spindles, which I have yet to use. However, there is an instructional chapter on how to make your own bead spindle, with photographs. The book mentions another spindle I have yet to see in the wild – a lap spindle with built-in support. These are available online from makers such as Spindolyn.
It’s easy to get overwhelmed when trying to decide on a spindle to buy, although it gets easier with practice. The section on the anatomy of a support spindle and what to look for is extremely useful. Many of their favorite makers are listed here, which is helpful despite the fact that such a list could never be conclusive. The author has gone above and beyond in giving us readers all the information we may need: even to the extent of showing step-by-step photos of how support spindles are made.
The spinning how-tos are meticulously presented, with every technique both written out and demonstrated on video. Special care is taken to show both left- and right-handed technique. Among the tutorials are park and draft, long draw, and semi-continuous spinning. Fleegle spins with an ease that is so graceful and enviable; it makes you want to be that good, too. They go on to explain how to make a cop, whether to choose to make a temporary cop or a permanent one, and what the difference is. Despite the detail, the reader is encouraged to try everything and break the rules.
Plying on a support spindle is examined in some depth, even though it’s a little impractical. We are walked through troubleshooting steps while winding off onto plying balls, which is much appreciated. In case you were looking for a real challenge, there is a how-to on chain plying on a support spindle. Personally, I don’t think I’m going to try that anytime soon, but it’s good to know it’s possible.
The book ends with a section on spinning bowls, which is amusing since the novice support spinner may not yet know that bowl collecting is about to be a significant part of their new interest.
All in all, Fleegle Spins Supported is a fantastic resource for the beginning support spindler, particularly one who feels disheartened with most available tutorials. It’s just a shame about the USB format.
Rating: 3.5/5
PLY Magazine believes that Black lives matter, as well as LBGTQI+ lives. Those most vulnerable and persecuted in our communities deserve our love and support. Please be good to each other.

Call for Proposals: Winter 2021 issue on Head and Hands
The end of the year in the Northern hemisphere means winter and lots of accessories to keep warm. Projects that keep your head and hands warm are some of the most satisfying projects to spin. They are reasonably sized, and the sky is the limit as far as the yarn you spin.
What are your favorite yarns for hats, mittens, and gloves to keep you cozy from the first snap of cool through seriously cold and why? How do you spin a durable yarn for mittens or gloves that will last a season or more of dog walking in the cold mornings? Do you ski or sled? What fibers, yarns, and garments deal best with cold and wet?
Head, hands, and heart, what do you keep in mind when spinning and knitting to keep your family warm? Show us how you recreate historic mittens or gloves. Do you have any traditional knitting in your family tree? Tell us the story.
Small projects are a great way to sample brand-new-to-you yarns; tell us how you do it. Or maybe you use a small project like a hat as the sample and swatch for a bigger project? Share your process! Small accessories are wonderful for special yarns, yarns that might be too fragile (or expensive) for a whole sweater. What is the most luxurious yarn you would make a hat out of?
Not all hats, mitts, and gloves are about keeping warm; there are plenty of times you wear them for style – they are great for showing off yarns. What yarns are great to show off color, color, color? Have you even knit gloves in a wild color combo that you’d never use anywhere else? What is the best yarn structure for different types of colorwork? Fair Isle, intarsia, multi-color brioche, or slip stitch?
Quick but never boring, what’s your favorite yarn for heads and hands? Accessories beg to be embellished; how do you spin to embroider on your handspun projects?
Proposals of articles and projects are due by December 1, 2020. We’ll get back to you in January, and final pieces are due June 1, 2021.

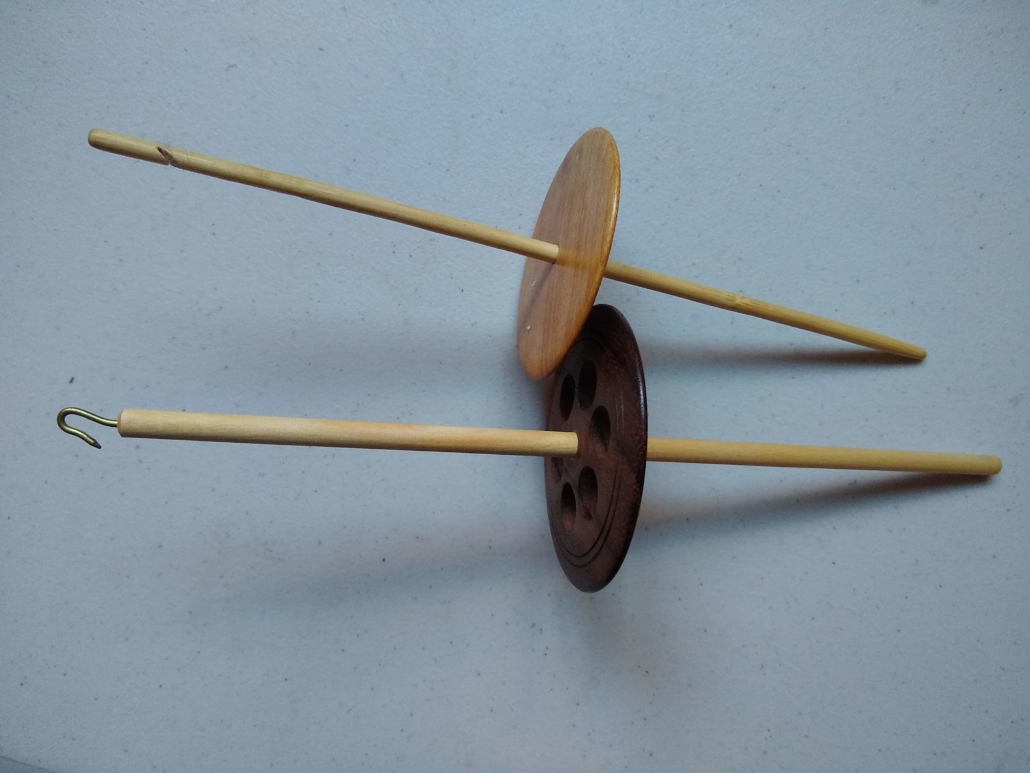
How to Choose a Second Spindle
words and photos by Amelia Garripoli
Great! You got your hands on a starter spindle and have been impressing friends with your new-found skills. But you know there’s more. You see lots of other spindles online and among your spindle-spinning friends. How do you choose what to get next?
Upgrade
For me, the answer was easy – my son, a toddler at the time, sat on my first spindle, a homemade CD spindle. So I went to the only local fiber store at the time and bought the only spindle they offered, a top-whorl Mongold spindle. I got lucky as the Mongold was one of the best spindles available at the time. I didn’t mind the price as I was adoring this new skill and knew I would be doing it a lot. And it was worth it!
So, one approach to take is to choose an “upgrade” from your starter spindle, toddler-damaged or not. Given you have put in time on that spindle already, the most straightforward upgrade is a well-made spindle of the same type so you can continue applying the skills you are developing.
Try a different type
But perhaps you are more adventurous than that; if so, you might want to choose a different type of spindle as your second spindle. If you started with a top-whorl, perhaps try a Turkish spindle. If you started with a tahkli, perhaps try a Navajo spindle. If you started with a bottom-whorl, perhaps try a Tibetan spindle. You will find you have a lot more to learn, as each type of spindle has its own techniques to master. But having 2 different types of spindles also means you can put one down when you get overwhelmed by it and try the other.
My third spindle helped me – after the Mongold, I got a Navajo spindle. Having the chance to put one down and try the other, I could apply skills common to all spindles such as drafting, while moving between suspended and supported spindle skill development. This let me persevere. When the Navajo spindle frustrated me, I would return to the Mongold spindle.
Match your skills
Your current skills may also be pointing you to a second spindle. If you are spinning super-fine and fighting your spindle to do so, try a featherweight – Bosworth makes excellent ones, or look for an Ahka spindle, which are typically also light. Or if you are loving chunky yarn, you may want to try a Navajo spindle or a Portuguese spindle. These supported spindles are good for spinning thicker yarns, as are heavier suspended spindles. Focus your choice to focus your spinning, choosing the spindle appropriate for the yarn you want to spin.
Choose lightweight spindles for finer yarns, heavier spindles for thicker yarns. Or look to the historical spindle used for the yarn you want to produce – spinning is such an ancient skill that historically appropriate spindles often are the best tool for the job.
Watch a friend
A fourth way to make the choice is to see what your spindle-spinning friends spin. Find out what spindle type they like, and get one of those. Your friend may happily help you learn its techniques and provide you with ample demonstrations of how to spin on it. In fact, learning by mimicking those who already have the skills is a time-tested way of developing spinning skills.
I have a friend whose favorite spindle is the tahkli. The tahkli is not a common beginner spindle, but she gravitated toward it due to her love of cotton. Her demonstrations, calm technique, and results convinced me I could master this spindle’s needs and kept me going when I struggled to become a supported spindle spinner.
Make one spindle work for you
I have run across people who have only one spindle and do not desire to own more. I applaud their minimalism, and with persistence you can make one basic spindle spin a wide variety of yarn, despite everything written to encourage you to own more than one spindle, including this article! That one spindle could be a simple homemade spindle; it could be a suspended spindle or a supported spindle. My go-to “solitary” spindle would be a Turkish spindle just under an ounce with a long enough stem below the arms that I could use it supported or suspended. This would let me spin fine spindles, and it would also spin thicker yarns and ply, albeit a little slowly at first until the weight of the yarn on it helped speed it up.
Now, these 4 sensible options – upgrade, adventure, focus, or friend – may all fly out the window if you get the opportunity to go to a wool festival vendor hall, in person or virtually. If you see a spindle that appeals to you, it may become your second spindle. Like choosing fiber that appeals to you, having a tool you like will help you persist as you learn.
Happy spindling!
Amelia Read Garripoli spins, weaves, and dyes near her parents in Colorado, having recently relocated her stash, spindles, and lots more from Washington. She’s spinning and weaving her way through the pandemic at home but can’t wait to attend and teach at Colorado guilds and festivals!
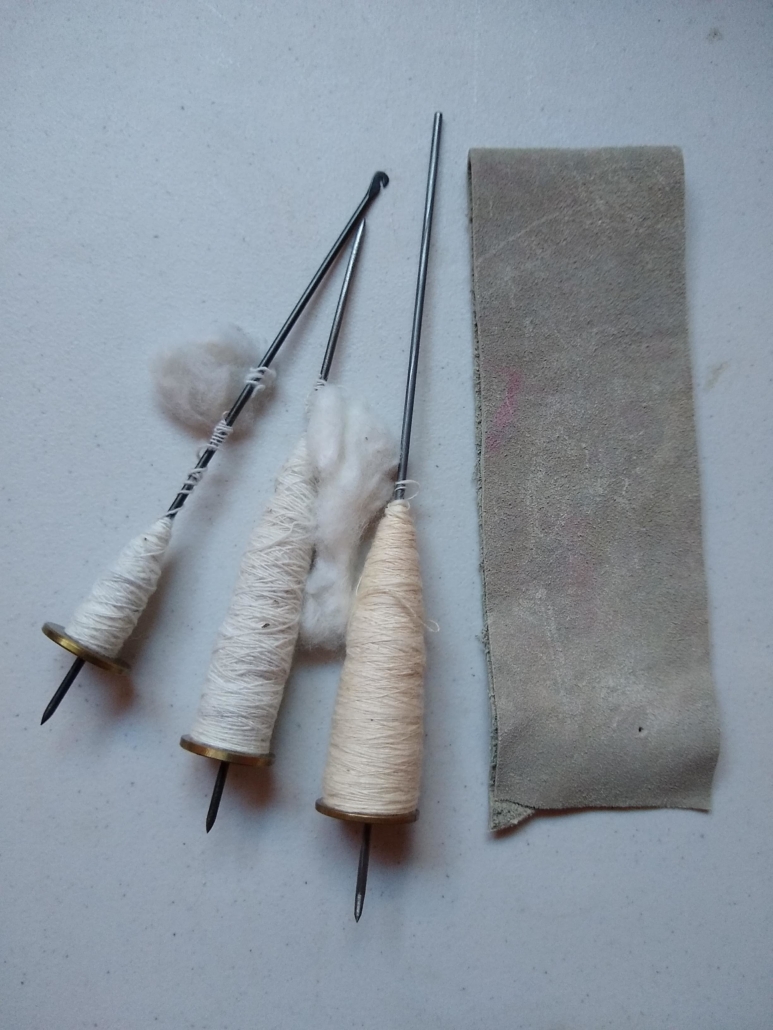
The tahklis and a leather strip to spin them on. With the strip on my leg, I can spin in a small space.
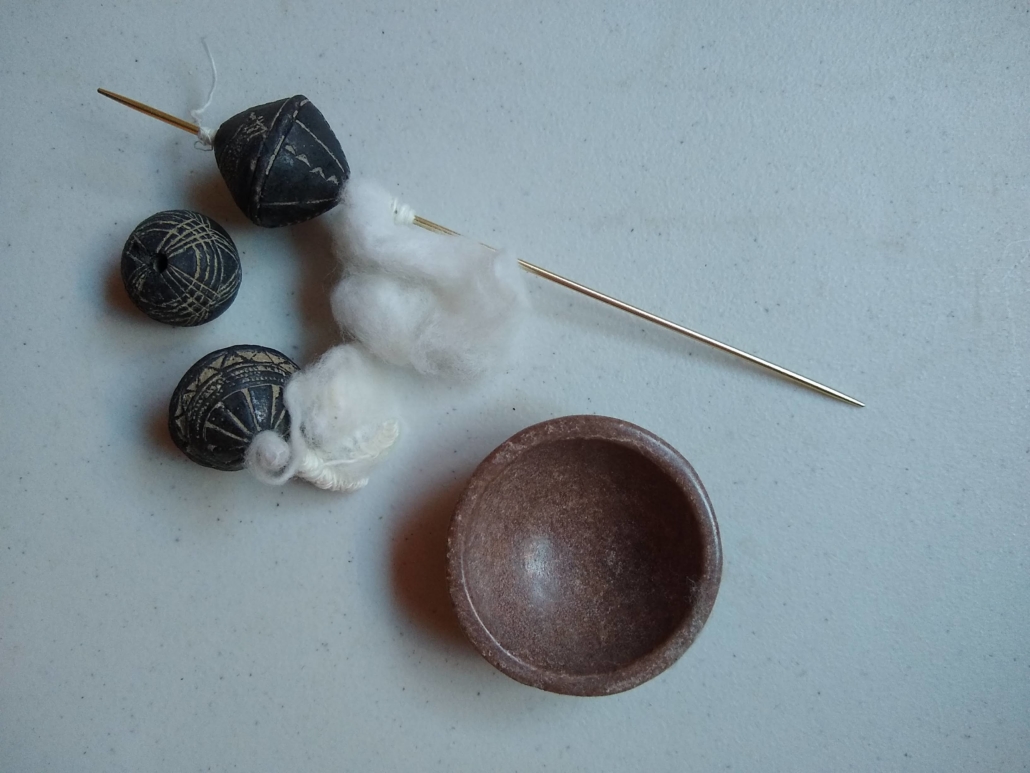
I was interested to try out some of the beads I have; the conic ones are African and the round one is South American – or so I was told at the point of purchase. The one on the double-pointed knitting needle spun the best, nicely balanced. A little fimo bowl travels with these in a pencil case for use while spinning. I still like my tahklis better but was pleased with the bead that spun well.
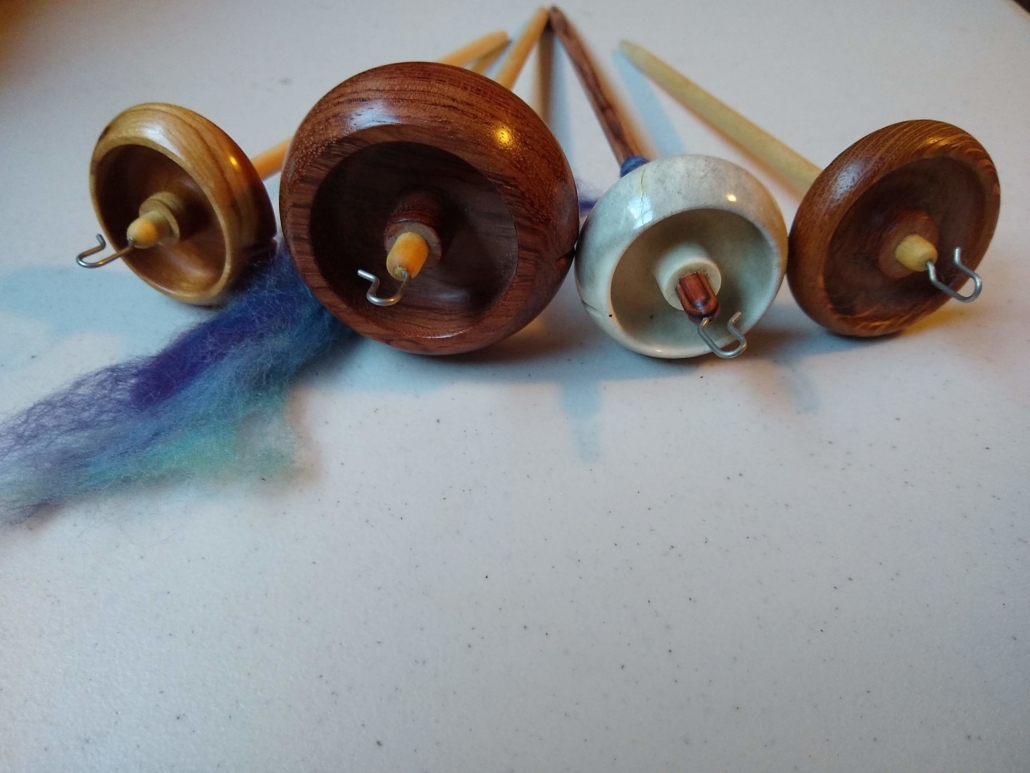
Ahkas! These are my favorite support spindle, though you wouldn’t know that from their nakedness.
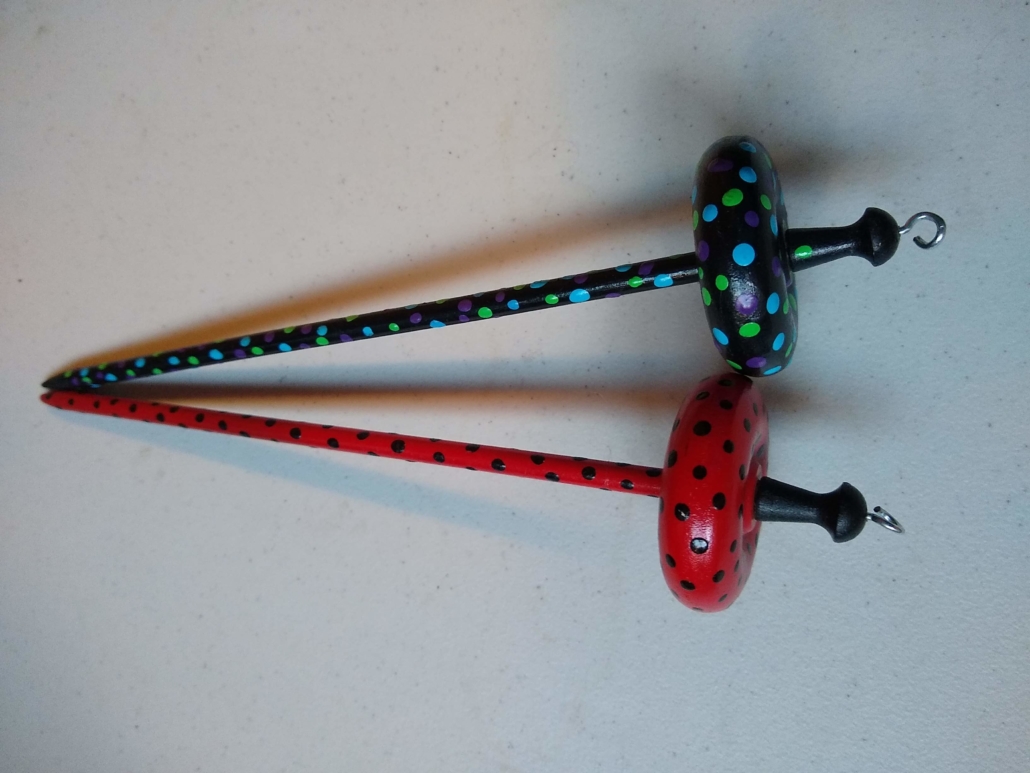
Spindles can be special just because someone cared; the red ladybug style was made by my BFF Debbie, and the black polka-dotted one was made by my daughter Natalie when Debbie gifted her the paints and parts. They are sweet spinners, at just about an ounce in weight, and the dots on the shaft give them a nice grippability for flicking. Even toy wheel spindles rock!
Bosworths!
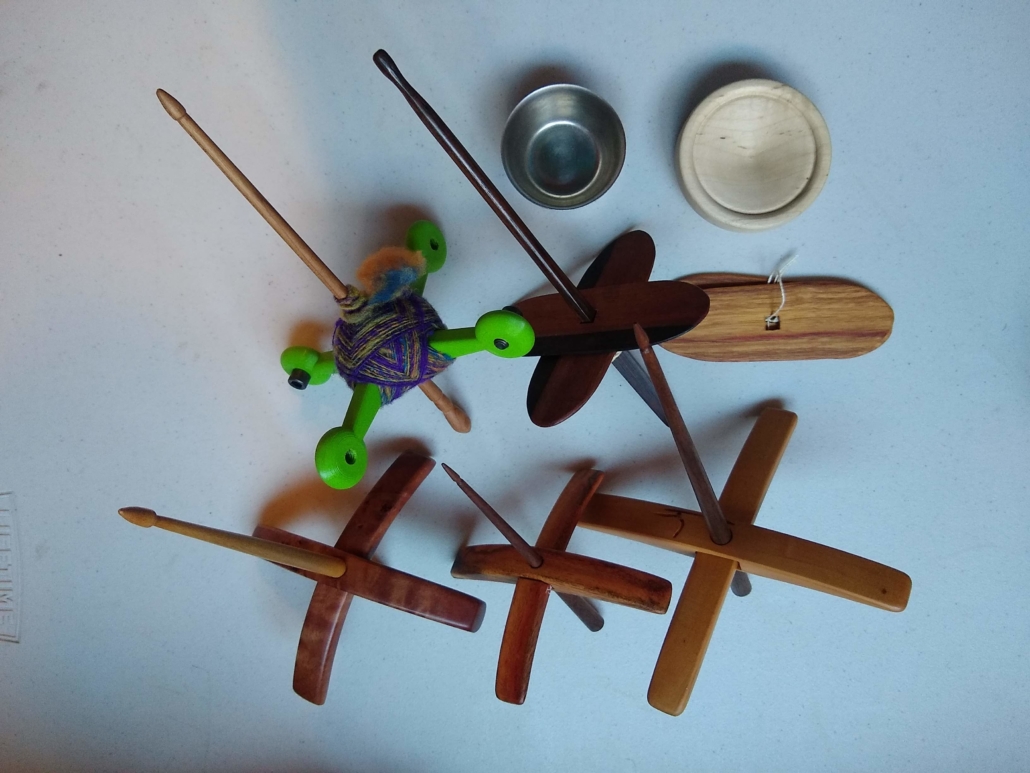
A flight of spindles! Lovely Turkish/cross-arm spindles, along with a metal bowl and dimpled wooden saucer to try out support spindling. As you can tell, I got mesmerized winding the mandala on the Snyder weighted-arm spindle.
PLY Magazine believes that Black lives matter, as well as LBGTQI+ lives. Those most vulnerable and persecuted in our communities deserve our love and support. Please be good to each other.


Leave a Reply
Want to join the discussion?Feel free to contribute!