

Mixing Things up for a Sweater
words and photos by: Johanna Carter
I always admire those who are able to spin mountains of yarn for a big project, ready to knit a wonderful sweater or cardigan. It is a satisfying feeling when you finish all that work, especially if you started with washing and combing the wool or even raising your own sheep.
Mixing spinning and knitting
The typical way to work through a larger project is to spin all the singles first and ply them in a particular order so you get the yarn even throughout the whole project. I don’t have so many bobbins, but my bigger problem is that I am quite impatient and want to get on with knitting once I have an idea. And normally, my brain is full of ideas for fibre work and the limit is the time, as I am a musician and teacher. I can’t sit at the spinning wheel for a long time if I’m not on holiday, so during the school year I mostly knit, and during the holidays I can dye, spin, use my drum carder, and do lots of fibre work. The only time I was able to produce bigger quantities of yarn before I knitted them up was during the Tour de Fleece in the two years during the pandemic, when we did not go on holiday at the beginning of July.

A highly photogenic collection of naturally dyed fibres.
I like to finish knitting one big project like a sweater or cardigan before I start the next one, or at least until I can’t carry it in my bag easily anymore, so I have an excuse to begin the next one. Sometimes it is good to have a second project on the go – I call it mindless knitting, where I don’t have to look very much – which I can keep my hands busy during Zoom or other meetings, which helps me listen.
Mixing colours and fibres
Usually I dye my yarn with plants which I collect in the woods or get from garden flowers. I also use cochineal and indigo, which I buy, to get lots of different colours. I really love the greens and blues I get from dyeing with indigo. I have lots of dyed wool, and all those colours give me inspiration for further projects.

Beautiful greens and blues dyed by the author using indigo and other natural dyes.
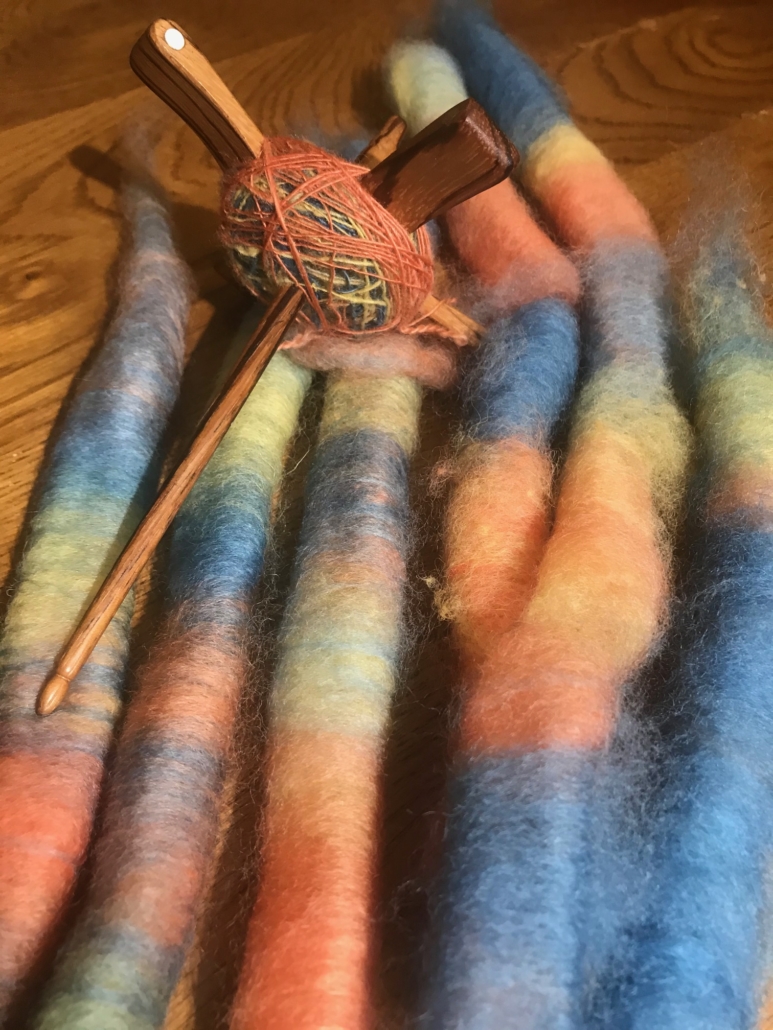
Blending the wool on the drum carder I can get even more shades. I like to blend with fibres like silk, alpaca, or plant fibres, and I love sari silk, to get those little bits of colour in my yarn.
Fibres of different types and colours are blended on a drum carder for elegant results.
When I have an idea for the next sweater, I start carding, and then I can begin to spin. Once I have spun enough yarn – say, for one day – I cast on and start knitting, usually top down, so I don’t have to decide too much in advance about length and width.

An idea for the author’s next sweater in the gathering stages.
When I spin on my wheel, I have to sit at home, but while spinning I can read a book or talk to others during online meetings. I also like to spin on my spindles, and that works on a walk, or a museum visit. I take them on holiday as they don’t need much space, and when I spin for a lace shawl, I don’t even need much wool either. At home there are spindles all over the place; I can spin when I am waiting for the kettle to boil, when the computer is slow, when I am cooking. Like that I can make good use of a short time and the yarn still grows.

Knitting as soon as the yarn is spun helps the author complete sweater projects in a timely manner.
I can take my knitting almost everywhere, which is why I don’t want to wait to get started until I have spun all the yarn for a whole sweater. I knit at home, on the bus or train. The only thing I have to make sure of is to be one step ahead with the yarn.
I love to knit Fair Isle sweaters. My favourite method is to use only one bobbin, which I don’t even fill, because I need smaller quantities of lots of colours. Then I wind a ply ball and ply it on itself. For that I put my thumb through the ball, so I can tension the two singles with my fingers and they don’t get tangled, as long as my thumb (or a cardboard roll or a pencil) stays in the middle. I don’t have any leftovers from plying, and it is quick when I suddenly need more yarn.

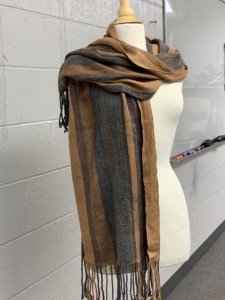
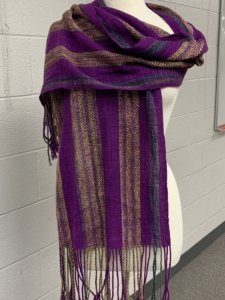
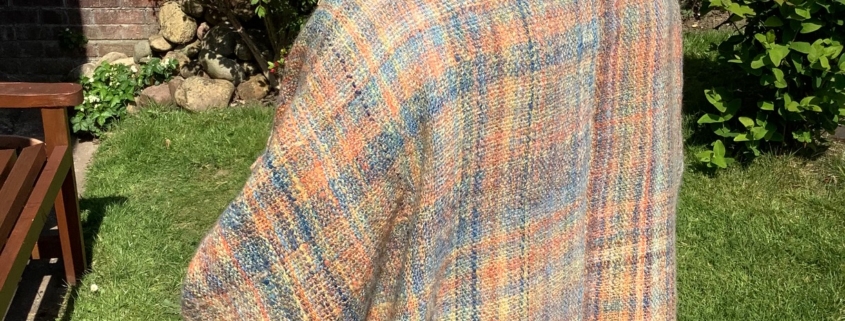
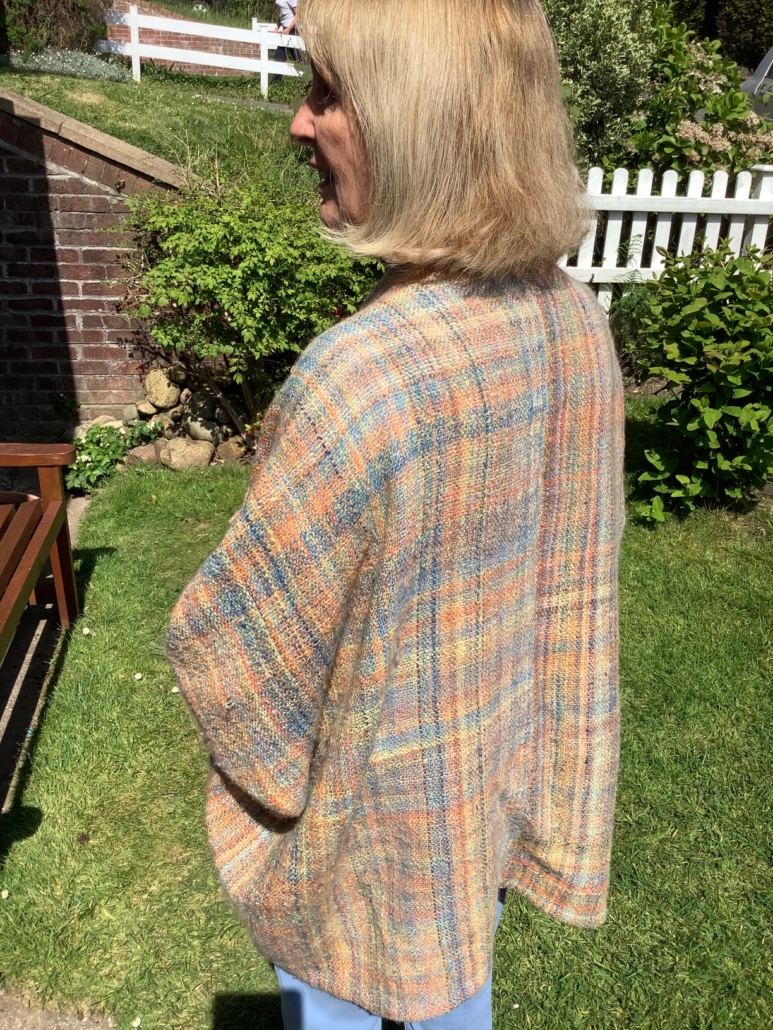
Several charming sweaters dyed, spun, and knit by the author.
I have never had problems with the yarn not being consistent enough throughout a project. I just know what yarn I want and my fingers seem to remember what to do. I am sure it is good advice to have a little card tied to the spinning wheel with a bit of the singles you are aiming for, so you can check and make sure you are spinning a consistent yarn.
Mixing breeds
There are so many different breeds, but some of my favourites are Shetland, BFL, and Jämtland – a Swedish breed. After dyeing them, I often forget what I have used, so when I do a new project it often turns out that I have used different breeds and fibres just to get the right colour. For the Fair Isle knitting I want to juggle lots of colours, which is more important to me than making a sweater out of only one breed.
Recently I made a pullover for my husband using about 12 different breeds and colours, even mixing short and long draw. For me it was a breed experiment and a way to use up lots of smaller quantities of wool I had in my stash. For that sweater I used combed top without blending.

Mixing in knitting during the spinning process is a wonderful way for a spinner to avoid being overwhelmed during a sweater project.
My feeling is that some people don’t dare to start spinning for a bigger project because they get overwhelmed by the quantity they have to spin and then all the knitting there is to do, especially when you want to spin the yarn entirely on spindles. Mixing the spinning and knitting for the same project is more interesting; you get more variety and more freedom to choose what you want to do next as long as you don’t run out of yarn. It breaks the project down into smaller, less daunting parts. The only thing you might want to plan is to have enough fibre at the start, but even that is not necessary, there is always a sheep growing more wool.

October Vlog with Jacey and Jillian
On October 18, Jacey Faulkner and Jillian Moreno kicked off the PLY vlog with a live virtual chat with spinners from around the world. If you missed the vlog (or just want to hear it again), you can catch up with it here. Listen as Jacey and Jillian each share their favorite parts of the recent Basics issue. Watch with glee as Jacey shares one of the mystery boxes she receives from Judith MacKenzie, filled with surprises for each issue. Need a visual on joins for both worsted and woolen spinning? Jacey shows you how she does each. Jillian shares the wonderful fiber and tools from indie artists featured in the Basics issue. You’ll also get a sneak peek at the upcoming Winter issue on Warmth and learn some behind the scenes secrets of PLY. Don’t miss the great Q&A as they answer questions from spinners like you! (And watch for announcements for future live vlogs from PLY.)
Links mentioned in the video:
PLY Magazine believes that Black lives matter, as well as LBGTQI+ lives. Those most vulnerable and persecuted in our communities deserve our love and support. Please be good to each other.

Reader Feature: Leslie Ann Bestor
Tell us a little bit about yourself and how you got started spinning.
Basically, I tricked myself into learning to spin. My first fiber love was knitting, and I followed that bliss and focused on learning, making, and teaching for years. Then I picked up weaving, which was like coming home to me, and I became devoted to learning and exploring it deeply. I resisted the siren’s call of spinning for a long time, convinced it would take away from my weaving and add a second learning curve when I really just wanted a singular focus on my weaving.
And then Spinzilla happened. I had just become Weaving Manager at WEBS yarn store and ignored the call for a team captain until it became apparent the spinners were too busy to take it on. I didn’t spin, but I recognize a fun competition when I see it and volunteered, thinking my organizing and cheerleading skills could lead the day. Then, as the event came closer, I realized it would feel weird to be exhorting my teammates to “spin more!” and “faster!” when I wasn’t adding to the team total. So a weaving guildmate taught me to spin, and I made lumpy yarn with much encouragement from my teammates and fell in love both with spinning and the community of spinners.
Of course, spinning lives up to my worst fears: it competes with weaving for my time and money, adds another type of fiber stash to an already packed house, needs more tools – and it soothes my soul and, ironically, has opened a whole new style of weaving to me.
Do you have a favorite type of yarn to spin?
I have a fondness for the sheepy things; I love the sproing and bounce. But then I took a silk spinning workshop last August (2019) and became entranced. I declared 2020 to be the Year of Silk and decided to focus on learning and experimenting and trying new things with silks and silk blends. It feels so indulgent and luxurious to work with, yet it is strong and has that wonderfully long staple.
What do you like to make with your handspun yarn?
For a long time I was definitely a process spinner – my joy was in the time spinning and the finished yarn was an afterthought waiting for a suitable project to show up. In the past couple of years, I’ve come into making intentional yarn, creating the yarn I envision for a project, usually weaving. I’ve been weaving a series of wide scarves on my rigid heddle loom, mixing my handspun with a commercial weaving yarn to create warp-dominant pieces that showcase the handspun. This has been a lot of fun, especially with the silks and silk blends.
My other favorite reason to spin is for gift giving. Many of my friends and family create things from yarn, and I love to surprise them with something special – a luxe blend or amazing colorway. And then I get to indulge myself, too, in the spinning process.
How long have you been reading PLY?
Since I started spinning in 2014. Spinning friends who mentored me raved about it, and I could see why. I fell in love with the simple beauty, the eye candy, and as I learned to spin, I learned more and more from the articles. I have many issues in my bookcase, they are my reference library and resource guides, and a couple that I bought digitally (the Silk issue is pretty much open on my laptop all the time these days).
What do you look forward to most when you get an issue?
An afternoon/evening of relaxation, inspiration, and education! I get myself a beverage and settle into a cozy corner to pore through it. Admire the front cover and see what Jacey has to say, scan the contents and see if anything jumps out, and then begin a long perusal. Sometimes it’s a brief once-through with an eye to coming back to certain things. Other times, when I have the time, I devour the articles as I go. After it lolls around the house for a few weeks, it goes on the shelf with the others, ready to refer to for guidance or inspiration. They feel pretty timeless to me.
Tell us about a project you worked on that was inspired by an article, project, or issue of PLY.
Since I have been raving about silk, you can guess that my favorite issue of PLY is the Silk one. Once I took the silk spinning class, I bought the issue digitally and consumed it, rereading articles several times. I wanted to learn more about different kinds of silk, and 2 of the articles got my interest. The first was an experiment with multiple types of silk comparing luster and direction of spin/ply which seemed like a great way to try the different types of silk. The second was a project to make what the author called a deconstructed cowl. It was colorful and playful and involved an assortment of fiber preps, so here was another great way to learn about the varieties of silk. When I declared 2020 the Year of Silk, I got ready for it by seeking out and buying all the soft and shiny bits for these 2 projects.
When the pandemic came along I thought spinning would be my salvation, relaxing and calming me as usual. But when I tried my default yarn, the mindless kind I thought would be soothing with its regularity, my mind just raced with anxious thoughts. I realized I needed something to help me focus my mind, which learning some new will do, but I didn’t want to add stress; I needed something fun. Immediately I thought of the deconstructed cowl, and here is how it went:
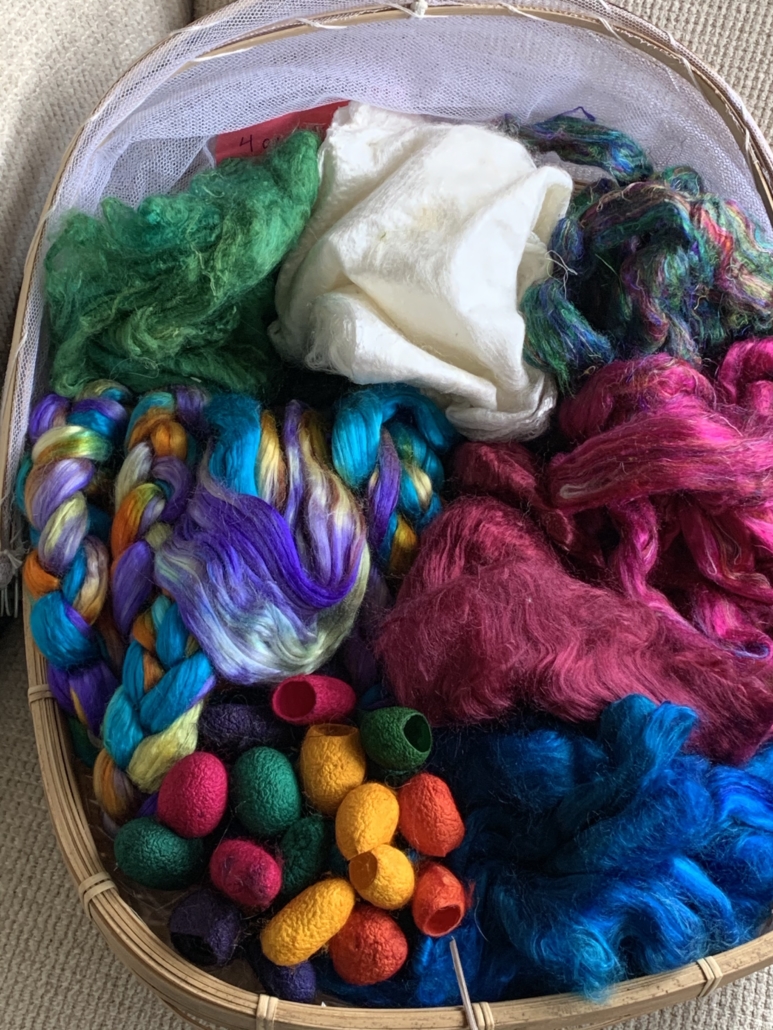
I had some of the supplies already and then bought the rest to go (nominally) colorwise with them. I looked for the brightest, most cheerful colors I could find. I filled my basket with bombyx brick, hand painted bombyx combed top, hankies, cocoons, sari waste, and more random bombyx top. I set the basket next to me while I was spinning the single and chose randomly what to spin next.
This part of the project was so delightful! I put no pressure on myself to make perfect yarn, and since the project was a bit wacky, it was all going to look crazy anyway. At the same time, I was focused on learning to work with the fibers, so my mind was occupied with what was in my hands rather than what was in the world. This spinning was definitely my happy place: the colors were fun, I got to keep changing it up, there was no wrong way, and – the shiny!
I spun the top and the brick over the fold with a short forward draw and the sari silk with a short forward draw; the hankies I drafted out and just added twist at the wheel (Lendrum double treadle with jumbo plyer).

The second step involved coiling the single around a core (I used 10/2 cotton, a weaving yarn). I had never done coils before and certainly never saw myself spinning an art yarn (how did I get here?), but the pictures in the article were so clear and precise that it was easy to pick up. To be honest, I’m not sure I got it right, but the end result works; it looks like success to me. The coiling was fun, too, kind of like holding the reins on a cantering horse. Of course, that would be a carousel horse because it was so brightly colored, and then there were these cocoons dangling like little bobbles! I posted pictures to my spinning group, and a friend dubbed it Seuss-like, a comparison I love.

I did change things up when I had a break in my coiled yarn which allowed me to do the plying from 2 separate bobbins rather than trying to wind a plying ball, which sounded tricky. Of course the bobbins weren’t even, but I realized the leftover coiled yarn makes a perfect necklace.
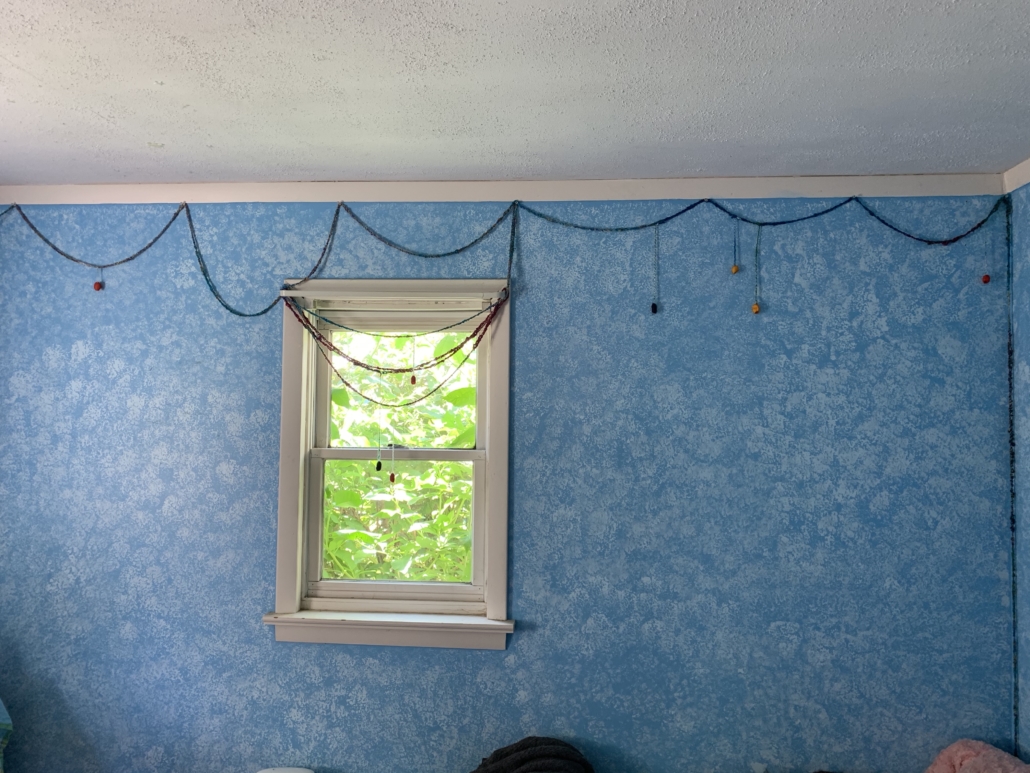
The last step was to crochet this twisted and plied colorful cord. I wound the plied yarn onto my swift and worked from the swift to crochet what I now call the Seussian Silk Garland. It is heavy and shiny and has these dangly colorful cocoons. I wish I were living in my parents’ house with their big bay window because that would be the perfect place to hang this garland, as a swag that would sparkle and shine in the sun. For now, I have my garland draped around the walls of my bedroom, very renaissance in a Seussian way. It will be my goofy garland of the pandemic, a symbol of joy and learning shining through.
Epilogue: I have started my second PLY pandemic project, the study of spin/ply twist direction on luster. I am proceeding slowly, as I apparently need breaks for wild color, but I’m learning a lot as I work through the different varieties of silk.
Leslie Ann Bestor can be found on Ravlery as carpeyarnum and Instagram @leslieannbestor.
If you’d like to participate in an upcoming reader feature, fill out the reader feature form and Karen will contact you.
PLY Magazine believes that Black lives matter, as well as LBGTQI+ lives. Those most vulnerable and persecuted in our communities deserve our love and support. Please be good to each other.
My Garden Coat
words and photos by Sally Hands
As a committed spindle spinner for over 10 years, I thought the time had come to spin a really big project.
I usually use local fleece as I’m lucky enough to live in Wales where we have more sheep than people. I’m also a big fan of the Fibreshed movement and of saving the planet. I won’t use fibre with air miles on it; I buy local and grow my own dyes – woad and madder for blue and brick red and onion skins from the kitchen for yellow.
A couple of summers ago, I came back from a nearby farm (Cwmchwefru Wool) with a big Corriedale/ Shetland fleece, soaked it overnight, washed it in the morning with dish soap in very hot water, and then spun it in the machine in sections inside a pillowcase.

Over a period of weeks, I dyed it with the plant dyes from the garden. I had to source some woad from a supplier as I didn’t have enough fresh stuff. I ended up with a big pile of multicoloured fluff in different shades. The dyeing didn’t have to be consistent since I was going to blend and mix it.
It’s nice sometimes to make projects with minimal equipment in a small space. With a spindle, rigid heddle loom, and something to card or comb with, this was one of those projects. Even a relative beginner could make this, and if you weren’t a confident spindle spinner when you started, you would be when you finished! For a beginner, I’d recommend you prepare a smooth lump-free length of fibre; I comb mine and then blend it a bit, either by using a blending board or just by breaking off small pieces of coloured fluff and spinning them randomly. And it helps to pre-draft.
My favourite spindle is a Turkish spindle from Ian Tait at IST Craft on the Isle of Wight, and this spindle was great for all the singles. To make a 2 ply, I put 2 cops into 2 old teapots and plied from the spouts. This puts a useful tension on the yarn as you ply. I plied on the heavy low-whorl spindle I learned to spin on. I was using the same yarn for warp and weft and spun both the same way, but I did put a bit of extra twist in. You don’t want your yarn fraying in the beater as it’s woven. The singles were a lively multicoloured thread in blues, reds, and yellows, and I plied randomly.
This way of spinning is slow. With the Turkish spindle I have to watch my hands for the over-two under-one wind on. It could be quicker to use a light high whorl spindle with a faster spin and an easier wind on where you don’t have to look at your hands. But my Turkish spindle is a favourite, and this was a big project; I’d be spinning a little bit every day for nearly a year, so I used the spindle I loved. I work as an artist and musician and have come to realise it’s the process that is a joy more than the finished piece.
I almost always spin my default yarn. It’s quite fine: the singles are 32 WPI, and the 2 ply is 18 WPI. I spin a small cop as twirling a heavy spindle hurts due to an old shoulder injury. My 2-ply skein weighed about 32 grams when it was washed and measured around 90 yards. I looked at the first skein in these colours and thought it looked lovely. Only another 25 skeins to go!
When the pile of skeins grew to about 20, I just had to wind the warp. I couldn’t wait to see the colour effect. I wound a warp on the rigid heddle loom that was 28 inches wide. Since I was going to weave 120 inches, I added on top of that about 18 inches to the warp for waste. The warp in the random spun yarn looked yummy!
I quickly went on to spin the rest of the yarn and wove the weft to 120 inches. After cutting the fabric off the loom and admiring it, I zig-zagged with the sewing machine across the middle halfway up and cut across, giving me 2 rectangles measuring 28 inches x 60 inches. After being washed, it was a little smaller. I pressed it damp after again spinning it in the washing machine in a pillowcase to protect it and stitched it by hand into a loose cocoon coat.
I’ve been so pleased with this simple coat. I’ve been asked where I bought it, and I’ve worn it to the opera. My yarn wove nicely in a 10-dent reed, but you can spin the yarn to any thickness; just warp it in a fatter reed if it’s thicker. I’ve seen loads of cocoon jackets and coats on Pinterest this year, and if you want to be environmentally friendly you can wear it over basic leggings and a t-shirt and look dressed up. You don’t have to shop for new clothes.
I’m considering my next big project and may buy black, fawn, and grey fleece from the farm and make a multicoloured yarn in natural sheep shades next time. Just don’t worry about quick projects; enjoy the spinning. It’s the process that satisfies the soul!
Sally Hands is an artist and musician working in Wales. She spends all day making and teaching art and music; at night she has acquired the bad habit of spindle spinning lying across an armchair with her feet in her husband’s lap demanding a foot massage. You can find her @sallyhands on Instagram.
PLY Magazine believes that Black lives matter, as well as LBGTQI+ lives. Those most vulnerable and persecuted in our communities deserve our love and support. Please be good to each other.


Leave a Reply
Want to join the discussion?Feel free to contribute!