

Mixing Things up for a Sweater
words and photos by: Johanna Carter
I always admire those who are able to spin mountains of yarn for a big project, ready to knit a wonderful sweater or cardigan. It is a satisfying feeling when you finish all that work, especially if you started with washing and combing the wool or even raising your own sheep.
Mixing spinning and knitting
The typical way to work through a larger project is to spin all the singles first and ply them in a particular order so you get the yarn even throughout the whole project. I don’t have so many bobbins, but my bigger problem is that I am quite impatient and want to get on with knitting once I have an idea. And normally, my brain is full of ideas for fibre work and the limit is the time, as I am a musician and teacher. I can’t sit at the spinning wheel for a long time if I’m not on holiday, so during the school year I mostly knit, and during the holidays I can dye, spin, use my drum carder, and do lots of fibre work. The only time I was able to produce bigger quantities of yarn before I knitted them up was during the Tour de Fleece in the two years during the pandemic, when we did not go on holiday at the beginning of July.

A highly photogenic collection of naturally dyed fibres.
I like to finish knitting one big project like a sweater or cardigan before I start the next one, or at least until I can’t carry it in my bag easily anymore, so I have an excuse to begin the next one. Sometimes it is good to have a second project on the go – I call it mindless knitting, where I don’t have to look very much – which I can keep my hands busy during Zoom or other meetings, which helps me listen.
Mixing colours and fibres
Usually I dye my yarn with plants which I collect in the woods or get from garden flowers. I also use cochineal and indigo, which I buy, to get lots of different colours. I really love the greens and blues I get from dyeing with indigo. I have lots of dyed wool, and all those colours give me inspiration for further projects.

Beautiful greens and blues dyed by the author using indigo and other natural dyes.
Blending the wool on the drum carder I can get even more shades. I like to blend with fibres like silk, alpaca, or plant fibres, and I love sari silk, to get those little bits of colour in my yarn.
Fibres of different types and colours are blended on a drum carder for elegant results.
When I have an idea for the next sweater, I start carding, and then I can begin to spin. Once I have spun enough yarn – say, for one day – I cast on and start knitting, usually top down, so I don’t have to decide too much in advance about length and width.

An idea for the author’s next sweater in the gathering stages.
When I spin on my wheel, I have to sit at home, but while spinning I can read a book or talk to others during online meetings. I also like to spin on my spindles, and that works on a walk, or a museum visit. I take them on holiday as they don’t need much space, and when I spin for a lace shawl, I don’t even need much wool either. At home there are spindles all over the place; I can spin when I am waiting for the kettle to boil, when the computer is slow, when I am cooking. Like that I can make good use of a short time and the yarn still grows.

Knitting as soon as the yarn is spun helps the author complete sweater projects in a timely manner.
I can take my knitting almost everywhere, which is why I don’t want to wait to get started until I have spun all the yarn for a whole sweater. I knit at home, on the bus or train. The only thing I have to make sure of is to be one step ahead with the yarn.
I love to knit Fair Isle sweaters. My favourite method is to use only one bobbin, which I don’t even fill, because I need smaller quantities of lots of colours. Then I wind a ply ball and ply it on itself. For that I put my thumb through the ball, so I can tension the two singles with my fingers and they don’t get tangled, as long as my thumb (or a cardboard roll or a pencil) stays in the middle. I don’t have any leftovers from plying, and it is quick when I suddenly need more yarn.

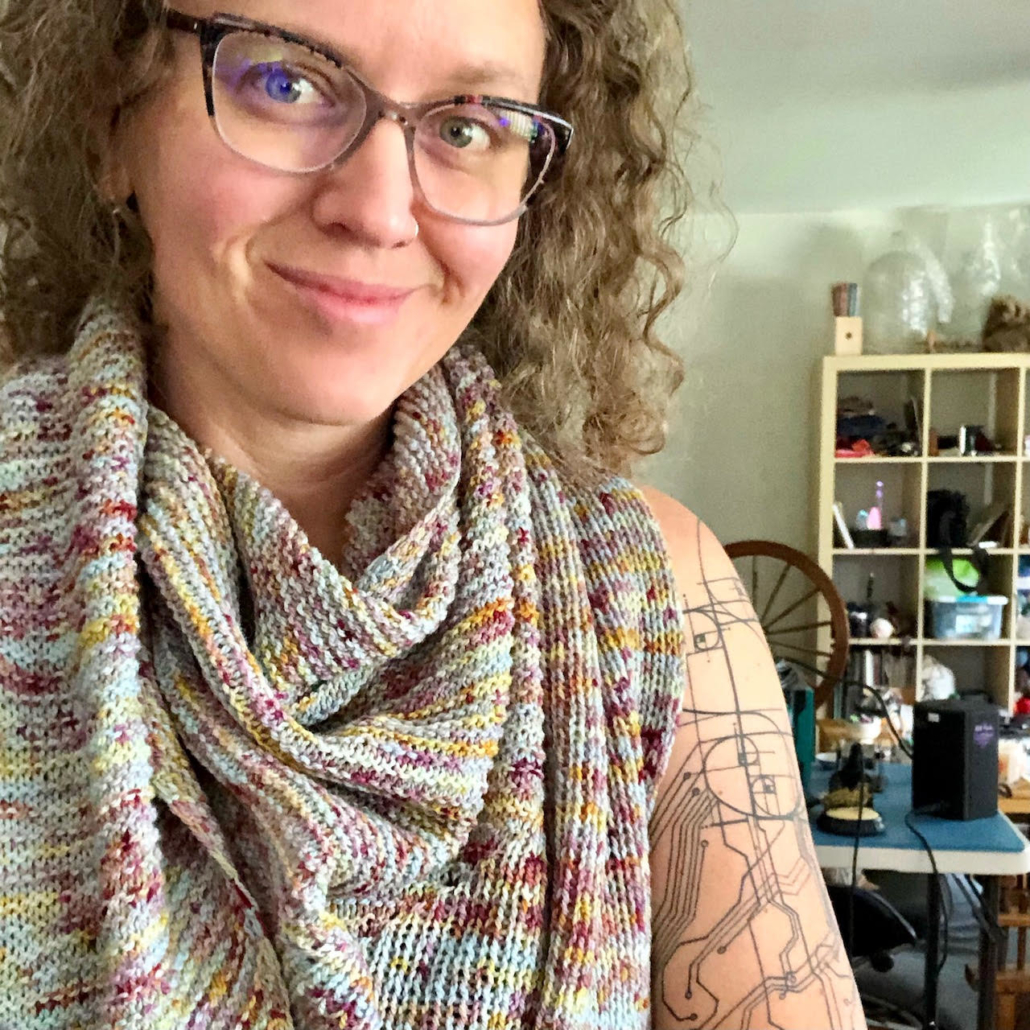
Several charming sweaters dyed, spun, and knit by the author.
I have never had problems with the yarn not being consistent enough throughout a project. I just know what yarn I want and my fingers seem to remember what to do. I am sure it is good advice to have a little card tied to the spinning wheel with a bit of the singles you are aiming for, so you can check and make sure you are spinning a consistent yarn.
Mixing breeds
There are so many different breeds, but some of my favourites are Shetland, BFL, and Jämtland – a Swedish breed. After dyeing them, I often forget what I have used, so when I do a new project it often turns out that I have used different breeds and fibres just to get the right colour. For the Fair Isle knitting I want to juggle lots of colours, which is more important to me than making a sweater out of only one breed.
Recently I made a pullover for my husband using about 12 different breeds and colours, even mixing short and long draw. For me it was a breed experiment and a way to use up lots of smaller quantities of wool I had in my stash. For that sweater I used combed top without blending.

Mixing in knitting during the spinning process is a wonderful way for a spinner to avoid being overwhelmed during a sweater project.
My feeling is that some people don’t dare to start spinning for a bigger project because they get overwhelmed by the quantity they have to spin and then all the knitting there is to do, especially when you want to spin the yarn entirely on spindles. Mixing the spinning and knitting for the same project is more interesting; you get more variety and more freedom to choose what you want to do next as long as you don’t run out of yarn. It breaks the project down into smaller, less daunting parts. The only thing you might want to plan is to have enough fibre at the start, but even that is not necessary, there is always a sheep growing more wool.
YouTube Channel and Submissions for SCENE
YouTube Channel
Did you know that PLY has a YouTube channel? We’re posting videos from the vlog, the Ask Jacey column, and videos that go along with some of the articles in the magazine.
Be sure to check out the two videos that go along with articles from the most recent Electric issue. Watch Amelia Garripoli demonstrate the power plying method and see a time lapse video of carding on an electric carder.
Submissions for SCENE
Have or know of a new product, event, fiber, or tool you think the community should know about? Let us know about it here, and we’ll try to fit it in SCENE, the newsletter, or the blog!
Check this out!
Have you seen @rightchoiceshearing on TikTok and Instagram? Their description is “two chicks traveling and shearing animals” or “shorn porn stars.” Make sure to take a look!
Did you know we also have a monthly PLY newsletter? Sign up here!
PLY Magazine believes that Black lives matter, as well as LBGTQI+ lives. Those most vulnerable and persecuted in our communities deserve our love and support. Please be good to each other.
Hacking Yarn Tools: How to DIY an Electronic Yarn Meter
photos and words by Carrie Sundra
How much yarn is in this ball? How do I break up a skein into smaller consistent lengths? How can I wind a specific length of yarn off of this cone? Measuring yarn length is a seemingly simple task, until you try to do it, especially if you expect repeatable results. Usually, a ball or skein of yarn will be labeled with yarn length and yarn weight. It stands to reason that you could accurately estimate the length of yarn in a leftover ball by weighing it and calculating length from the original weight/length on the ball. What many people don’t realize is that label markings are very approximate. Weight depends on humidity, so the same skein can weigh different amounts in different locations. Length is also approximate and depends on the amount of tension the yarn is under. Both figures may also be minimum estimates, with the manufacturer/yarn dyer winding off a few extra yards or grams as standard practice.
Another method of measuring yarn length is winding a skein of a certain circumference and counting wraps. This is a pretty typical method used by handspinners – you create a skein with a niddy-noddy or winder, you know the circumference of the skein (typically 1.5–2 yds or meters), and you count the number of loops in the skein. This isn’t a bad method but also depends on tension of the yarn. Also, once the yarn starts wrapping over itself, or depending on the path it takes around a niddy noddy, the circumference will change. It’s still an estimate.
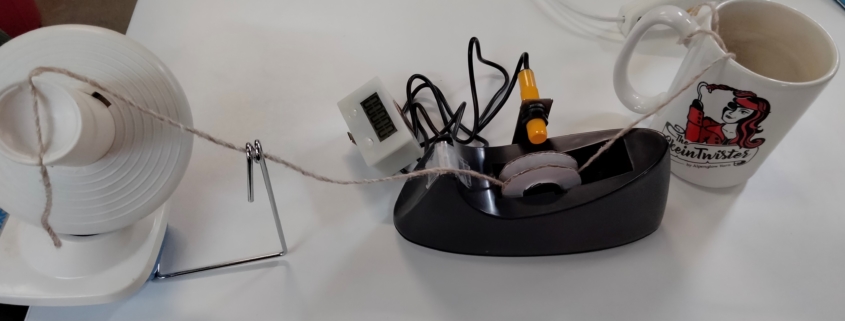
A third way of estimating yarn length is by using the measuring wheel method. In this method, you wrap a piece of yarn once around a wheel and run the entire skein of ball through the wheel, counting the wheel’s rotations. This is similar to the measuring wheels surveyors use, rolling them along the ground to measure distance. The benefit to this method is that the wheel is a fixed diameter, the yarn doesn’t build up on the wheel so the length that the yarn travels is also fixed, and if you wind from a ball to another ball, there’s generally not a lot of tension on your yarn that will stretch it and heavily skew the results (unlike using a skein winder and swift, where there tends to be more tension from the yarn wrapping around the winder and pulling at the swift). It does depend on the yarn dragging the wheel around as it travels, so it does require a certain amount of friction. Very slippery yarns like 100% silk or nylon may lessen the accuracy. Generally, a larger wheel reduces slippage and undergoes fewer rotations so that some errors don’t add up as much. However, for hacking purposes, I thought using a common household item was easier than constructing a custom device, so I tried out a tape dispenser and had surprisingly good results.
The key takeaway is that any talk of accuracy implies that there is some “truth” against which deviations are measured. With yarn length, there is no real “truth” because length changes with tension, so it’s all an estimate!
Building your own electronic yarn meter
Here’s how you can build your own measuring-wheel-style electronic yarn meter. You can also find these instructions on our Hackaday.io page.
Step 1: Gather your tools


You’ll need:
- A weighted tape dispenser with 1-inch core, similar to this one.
- A full roll of tape
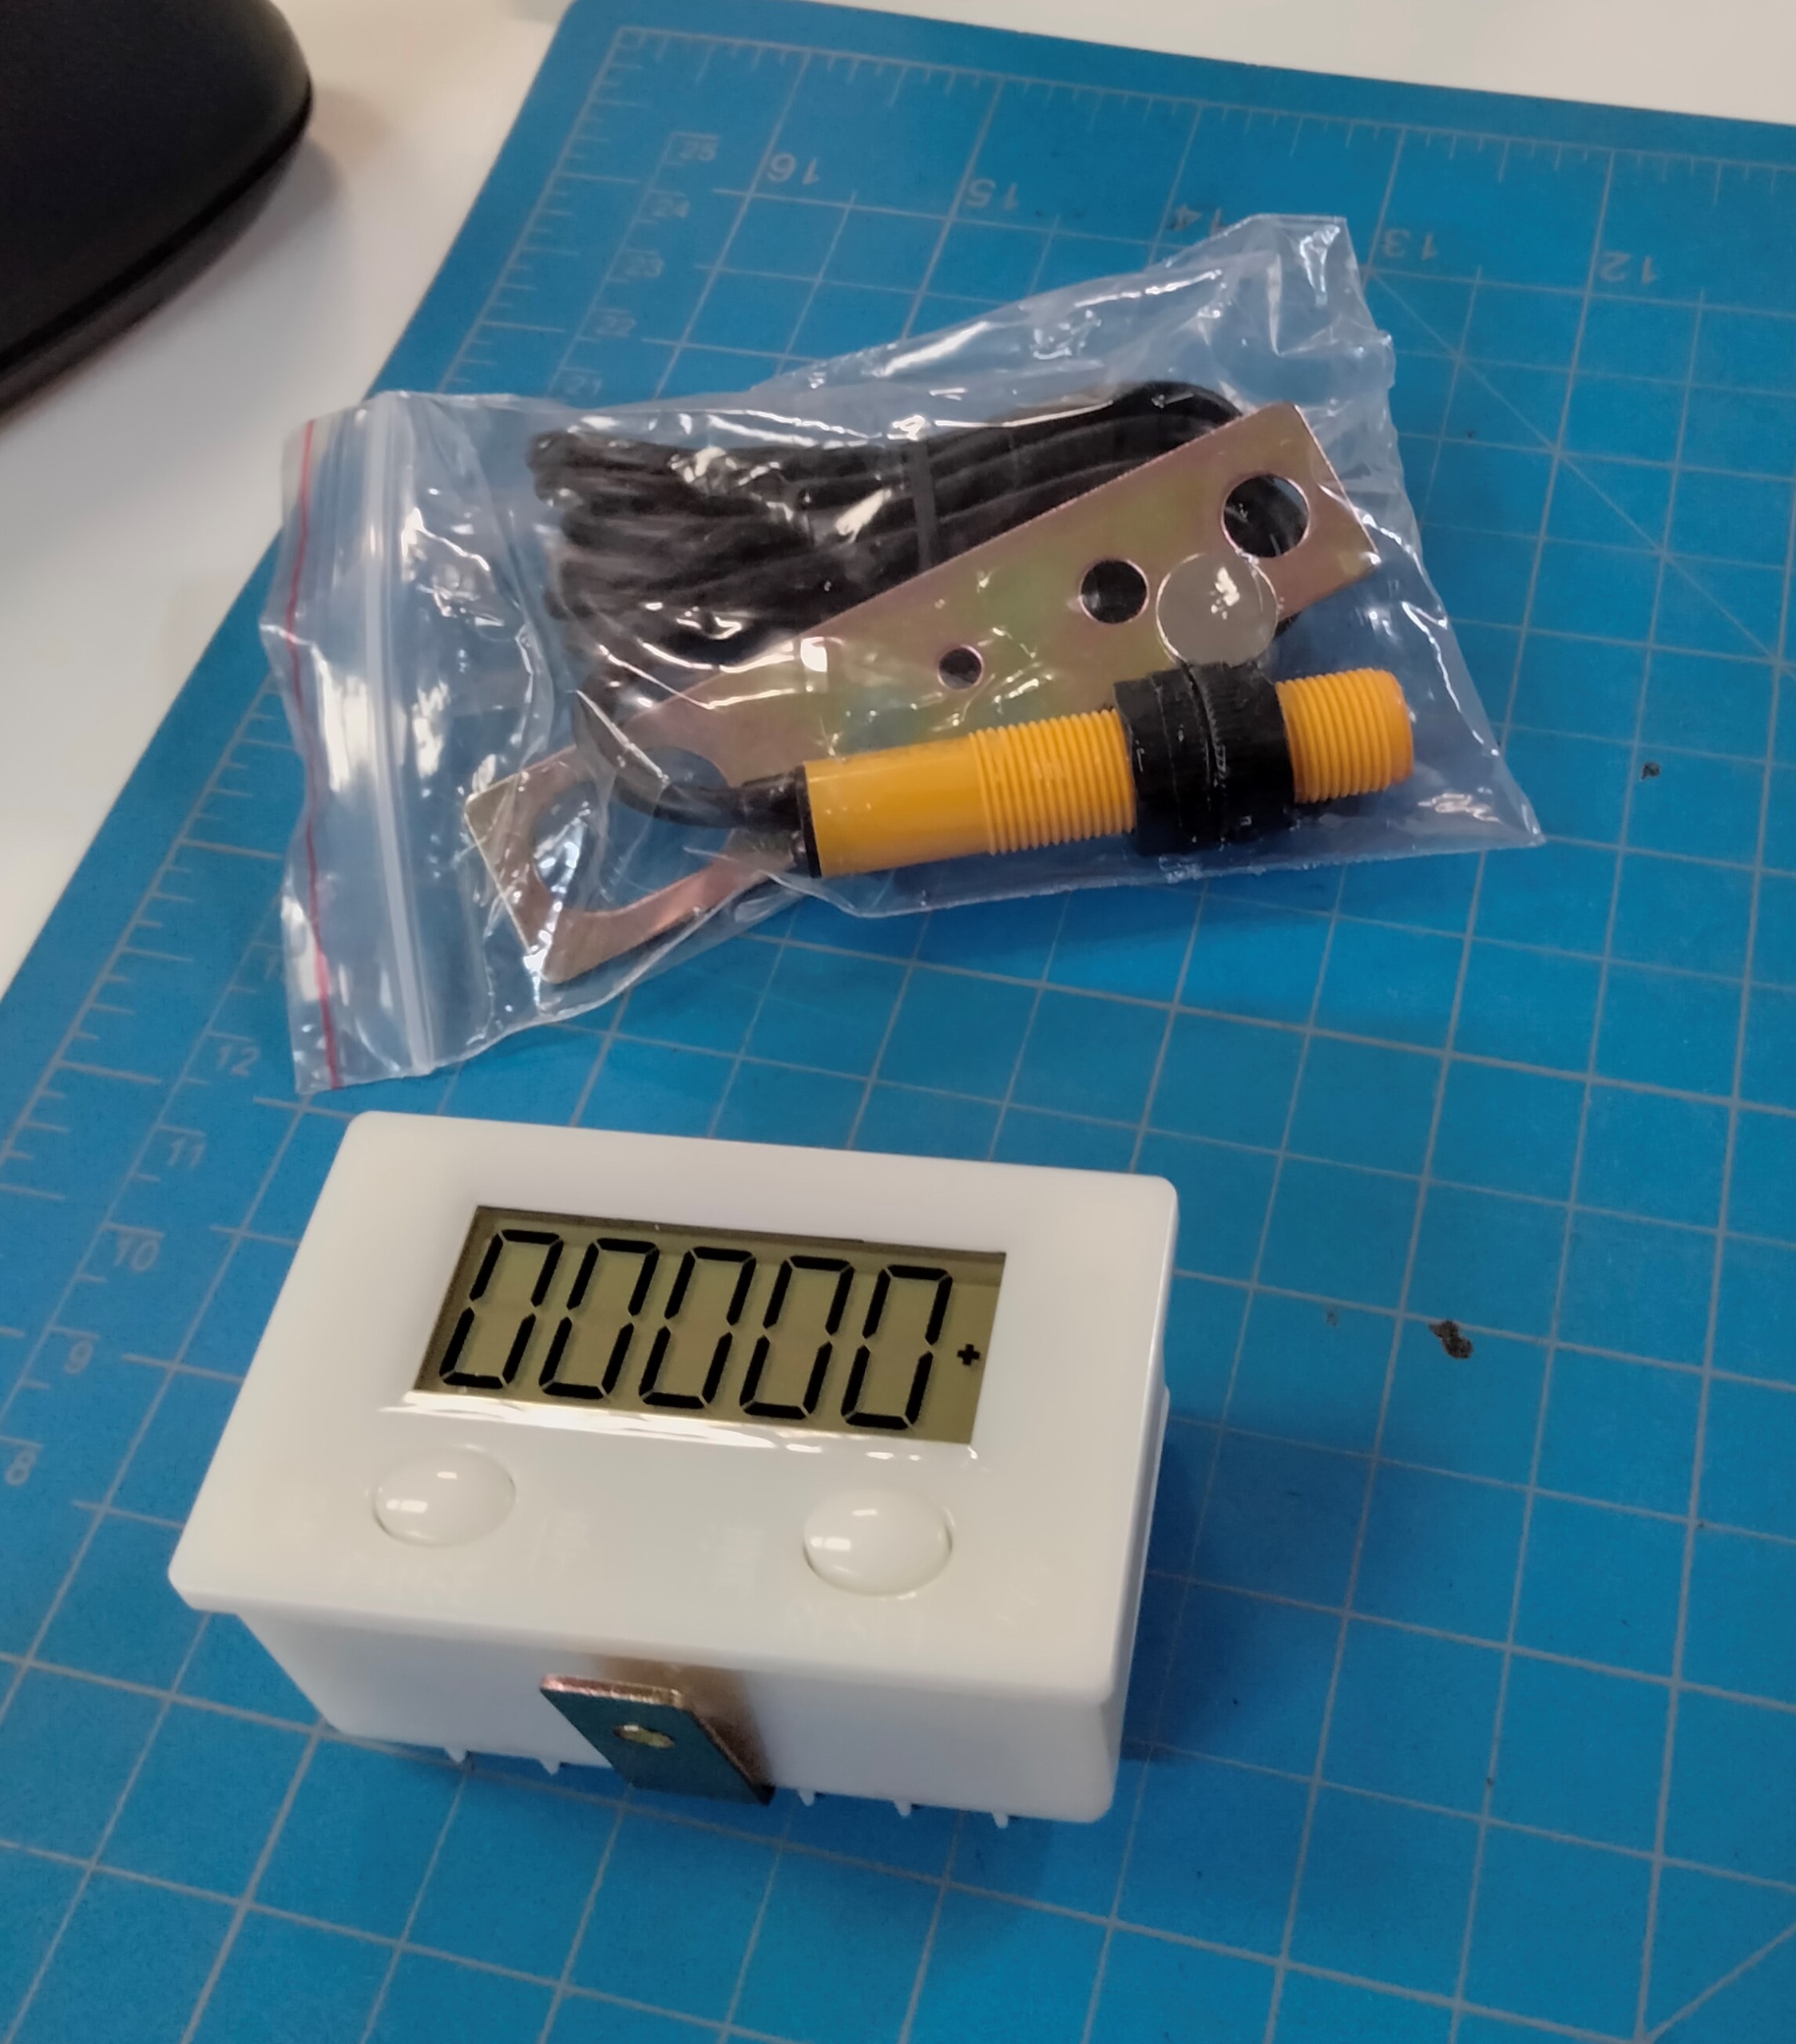
- A digital magnetic counter kit
- Cardboard
- A pen or pencil
- Scissors or an exacto knife
- Phillips/plus-tip screwdriver
- Pliers
- Hot glue
- A hand crank ball winder, like this one.
- A ball of yarn
- A smooth container or yarn bowl for containing yarn as it unwinds
Step 2: Cut your yarn guides
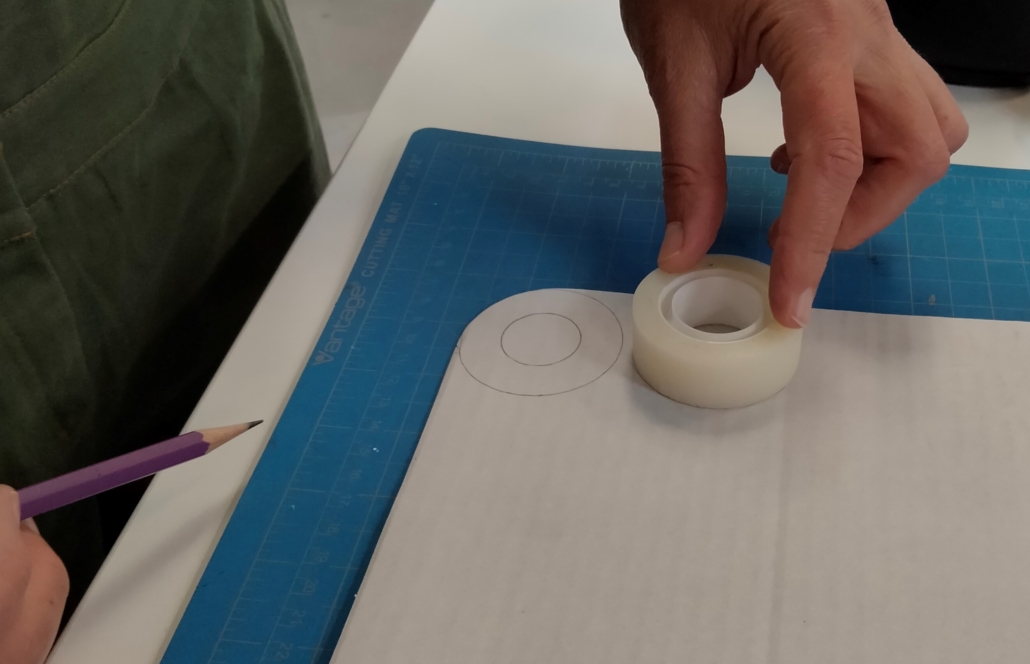
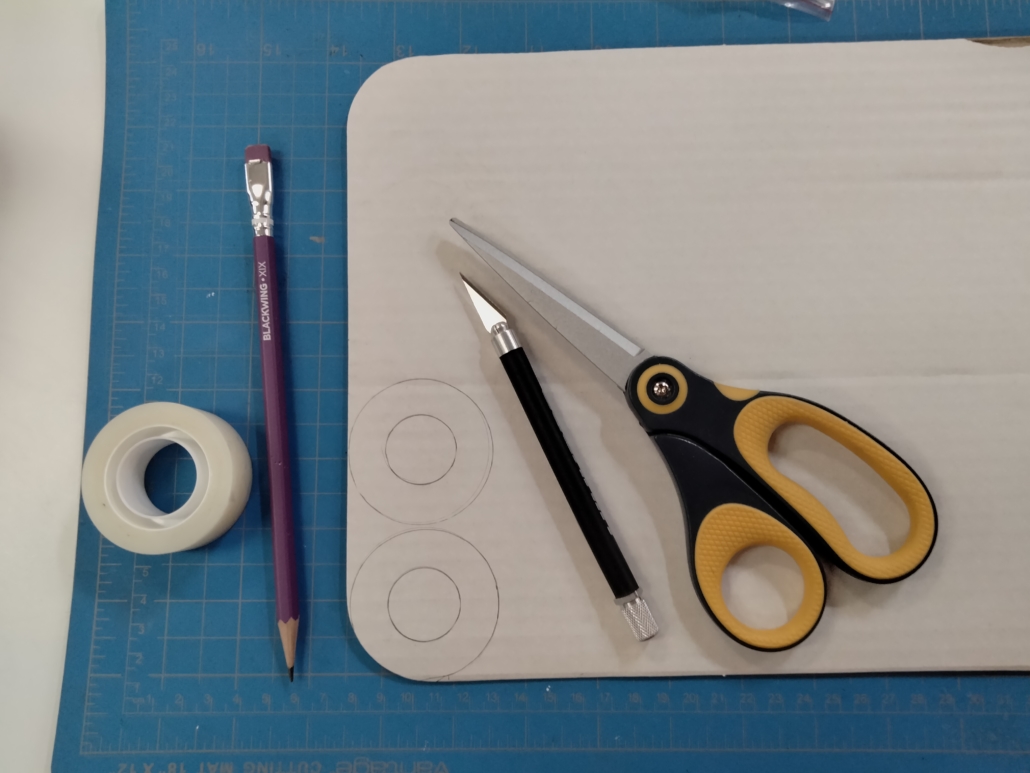
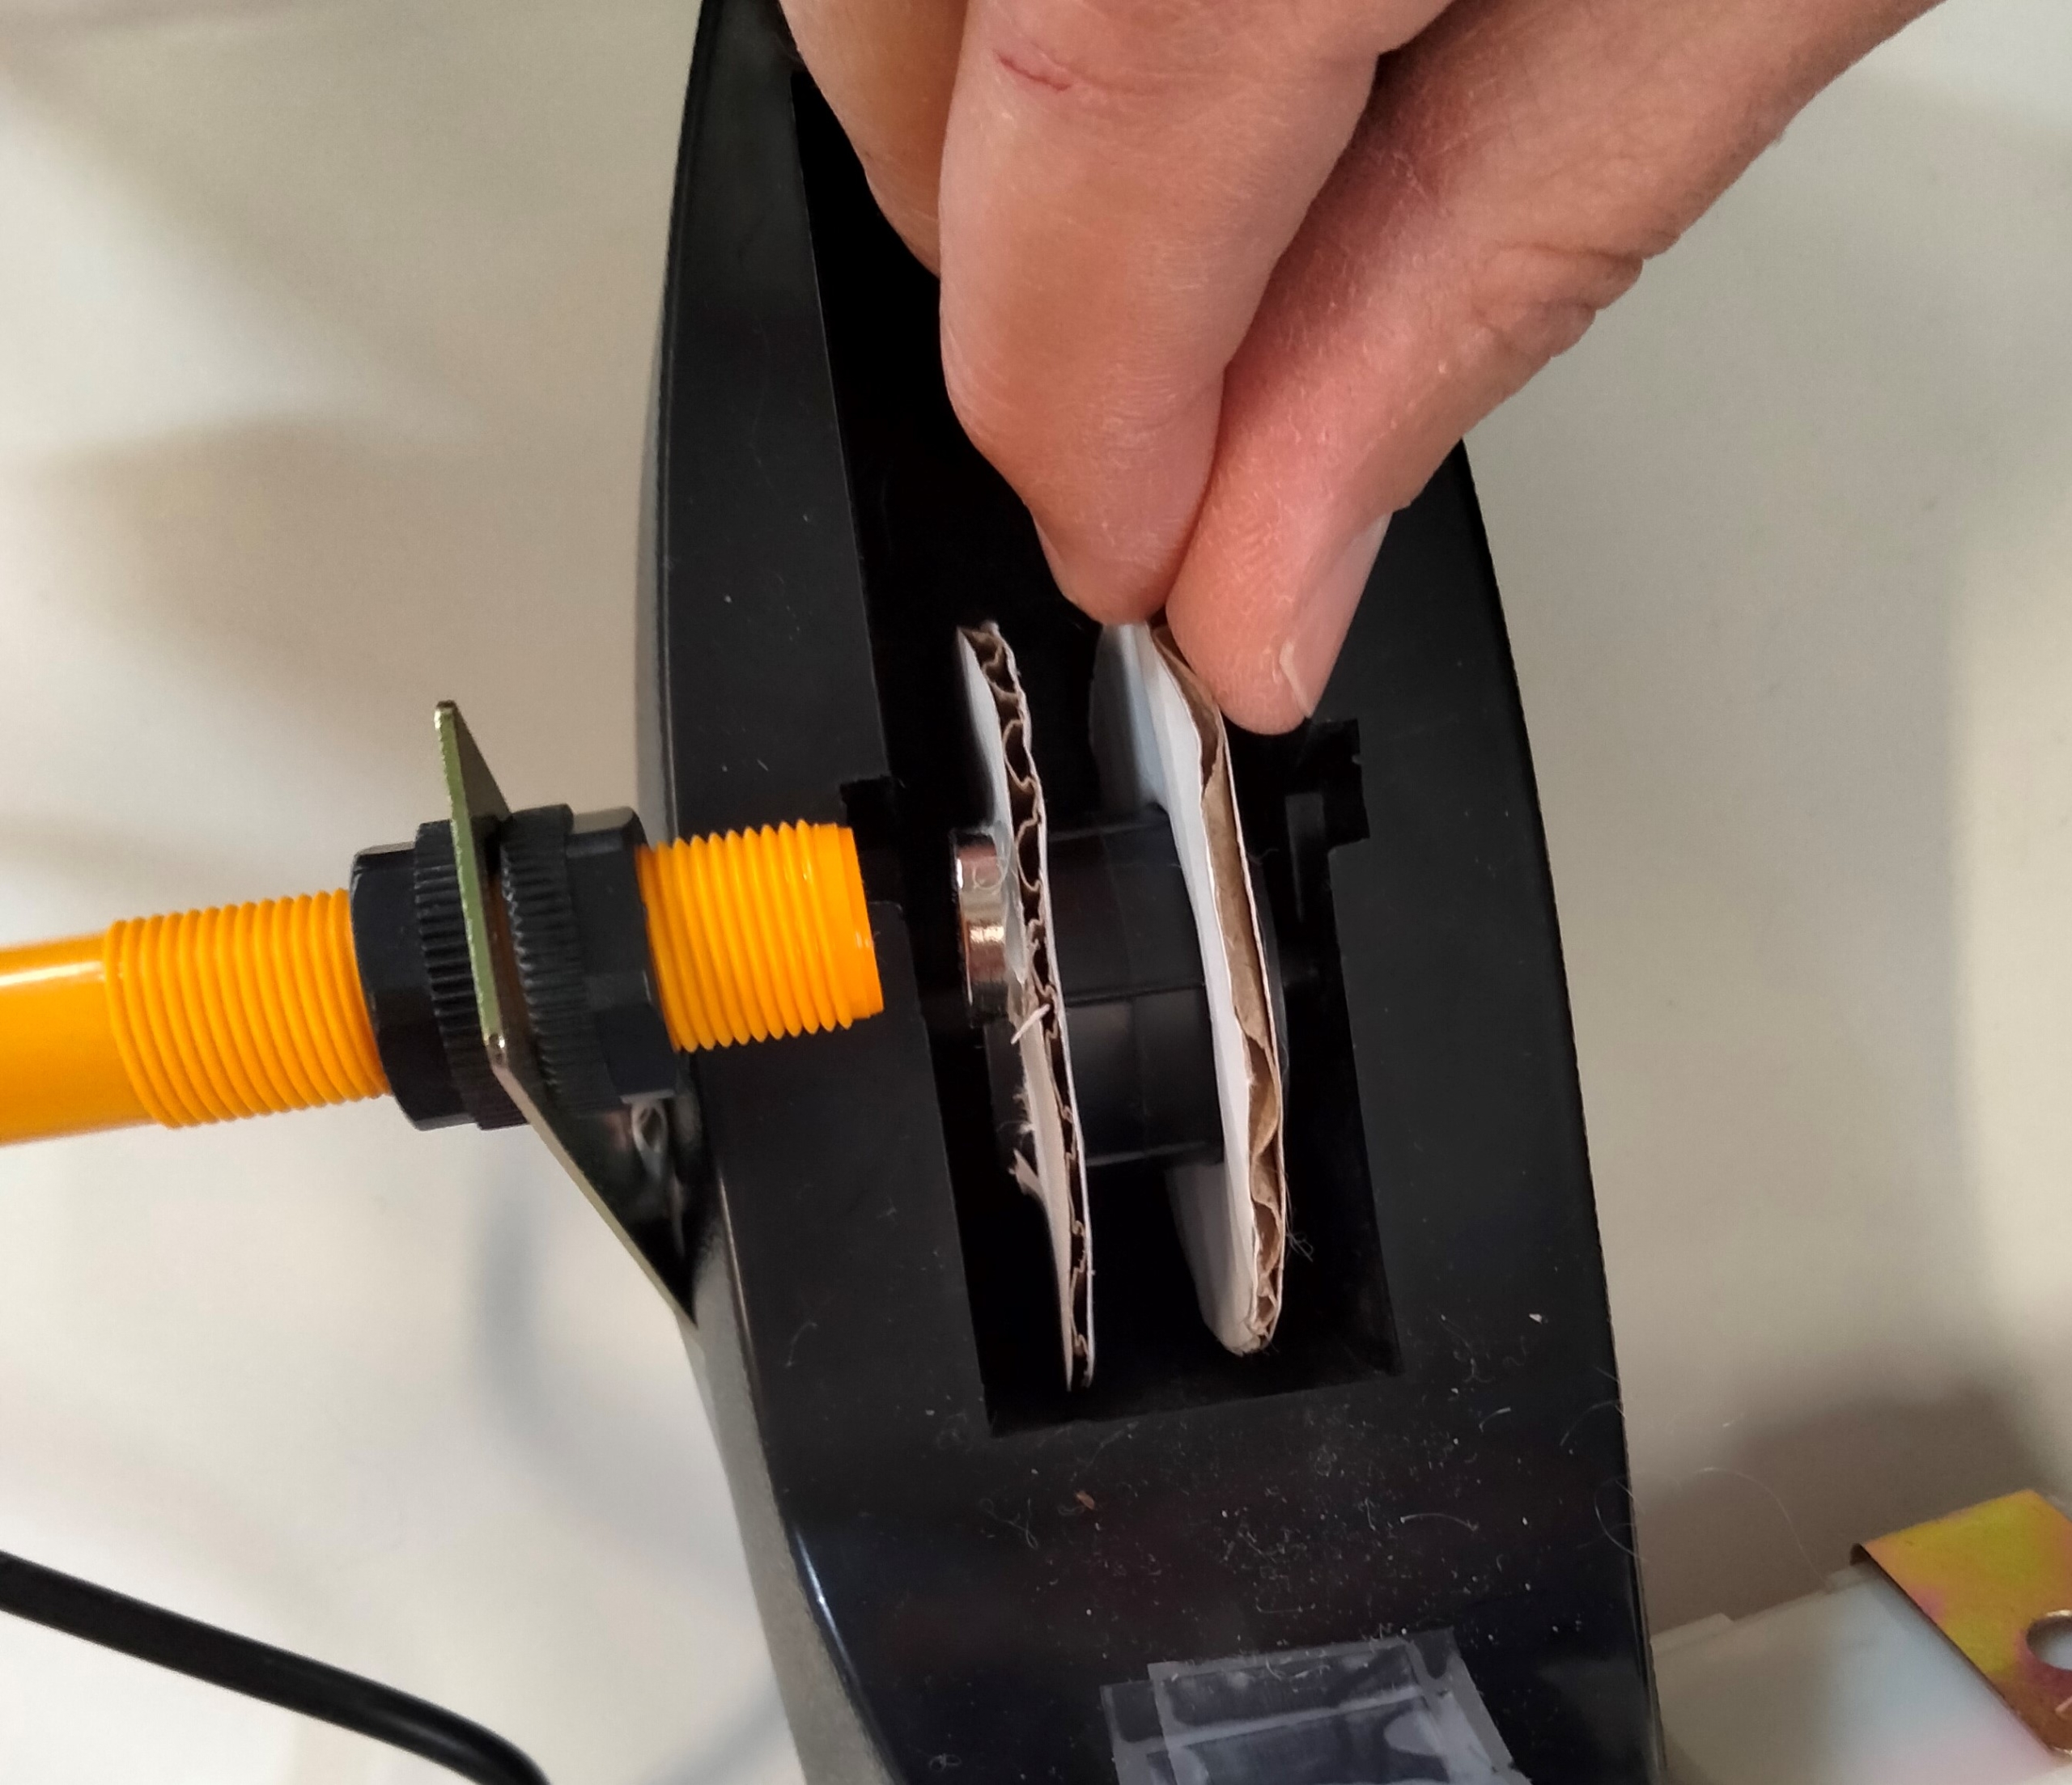
Take the roll of tape and trace the inside and outside of the roll. Make two donuts. Cut them out with scissors or an exacto knife.
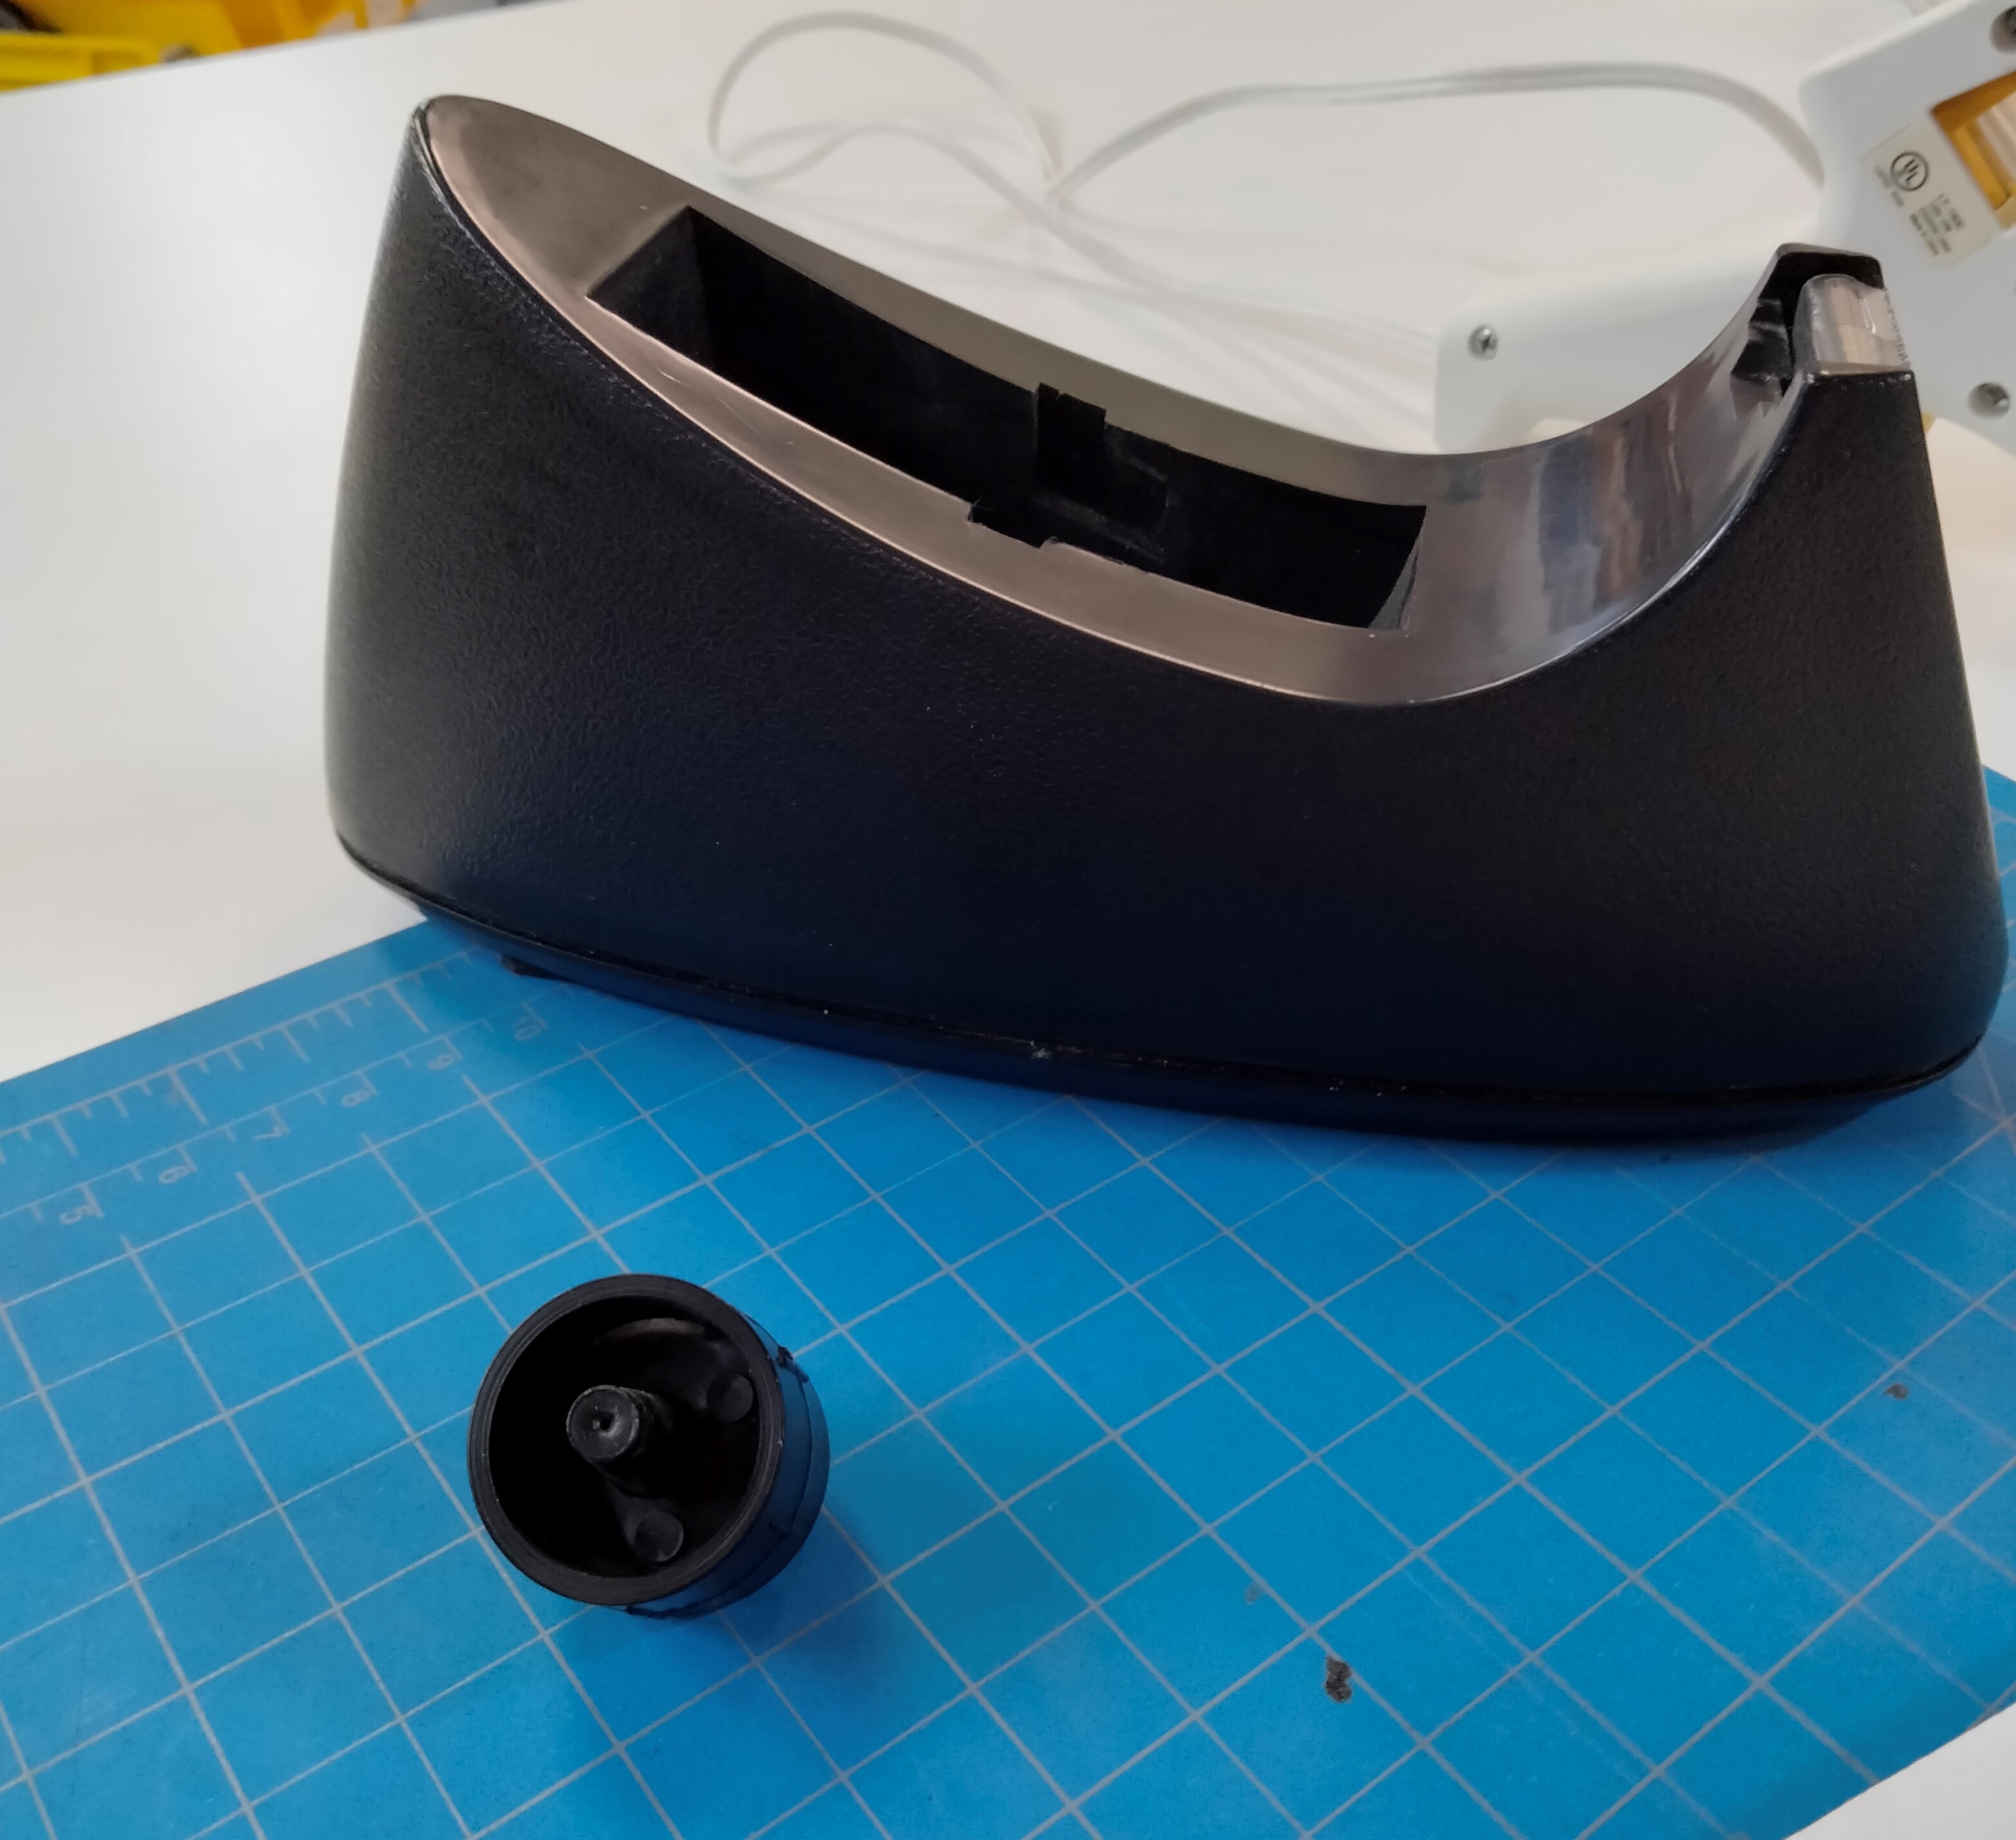
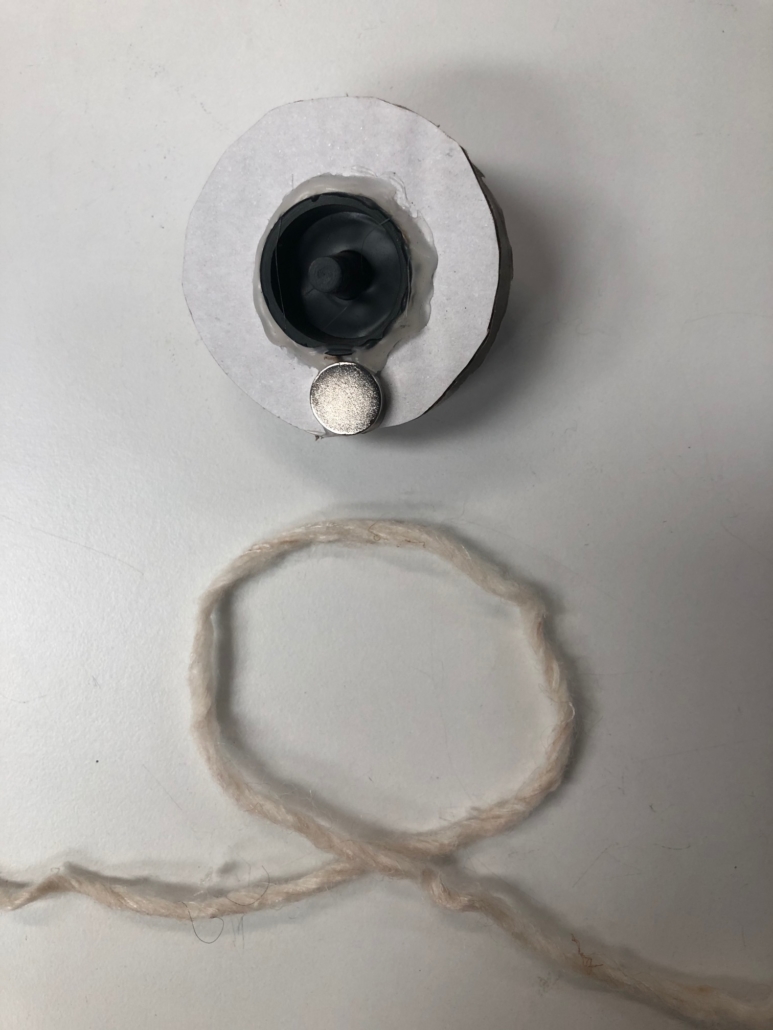
Step 3: Attach the yarn guides & magnet
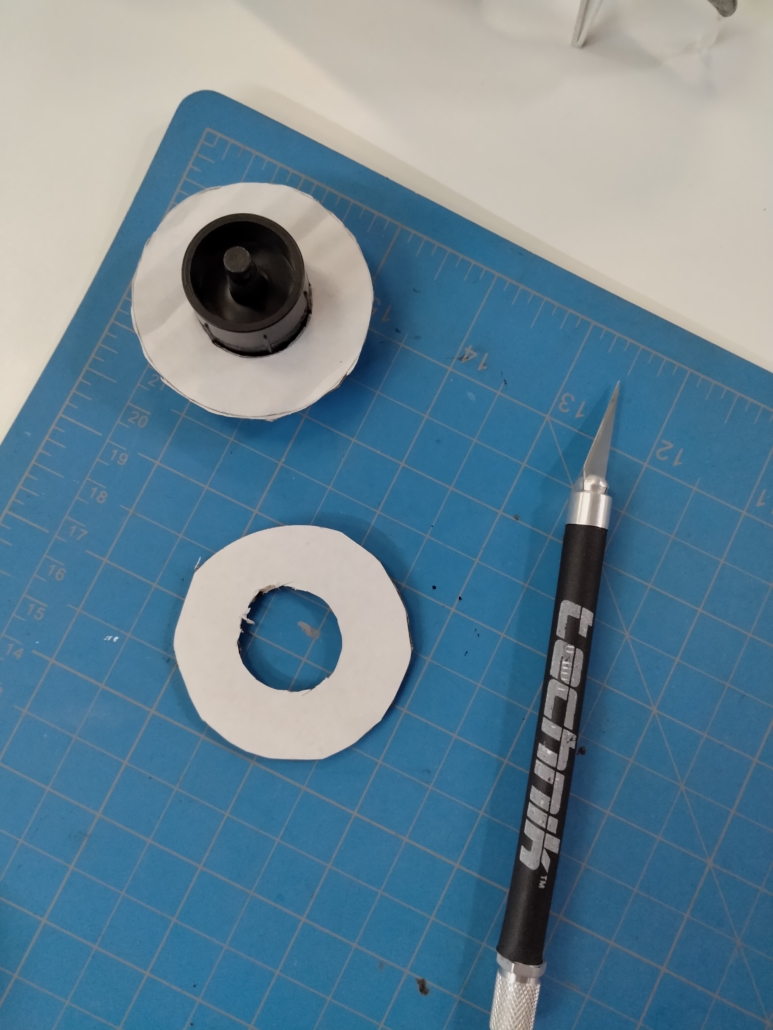
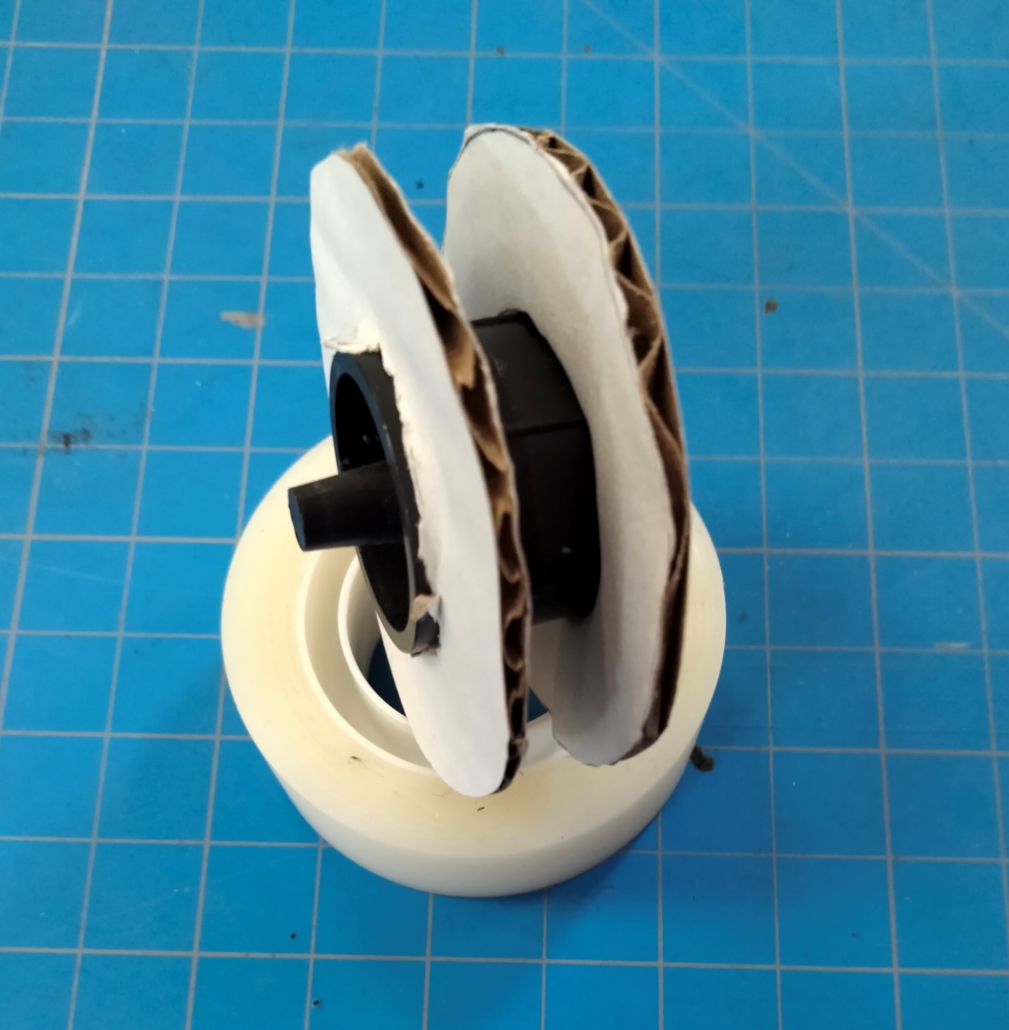

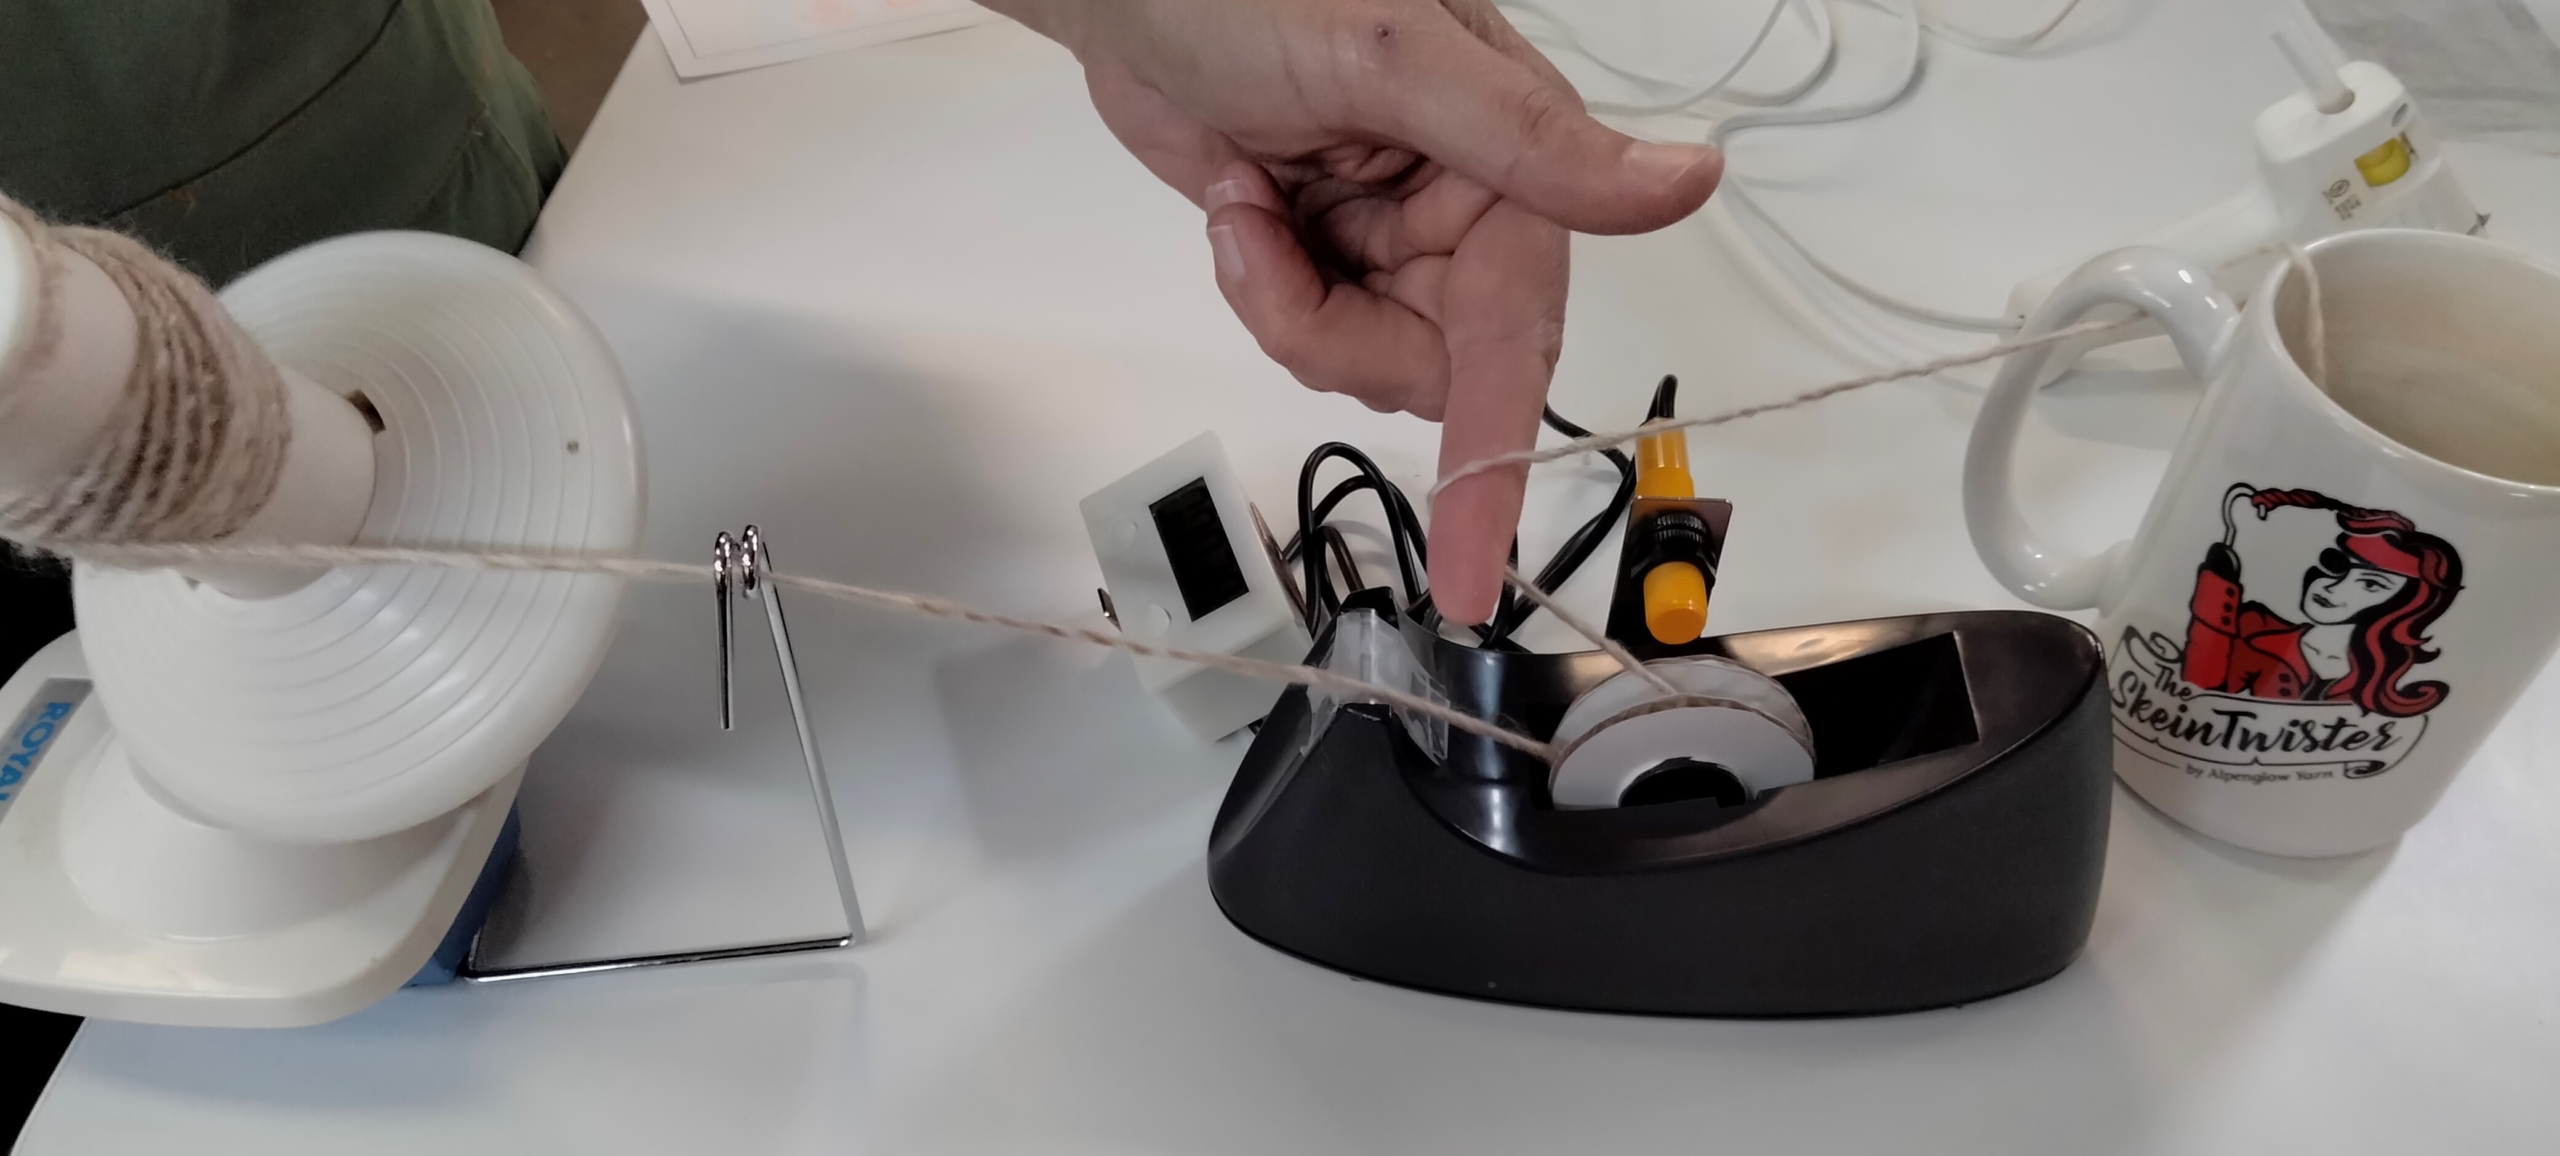
Take your yarn guides and push them onto either end of the core of your tape dispenser. They may stay put as-is, but ours loosened and flopped after winding a few balls, so we recommend hot-gluing them in place. Also hot-glue the magnet to the outside of one of the yarn guides. Note: We have an older-style tape dispenser with a round core. If yours has a triangular core, that’s okay too.
Step 4: Prepare the rotation counter


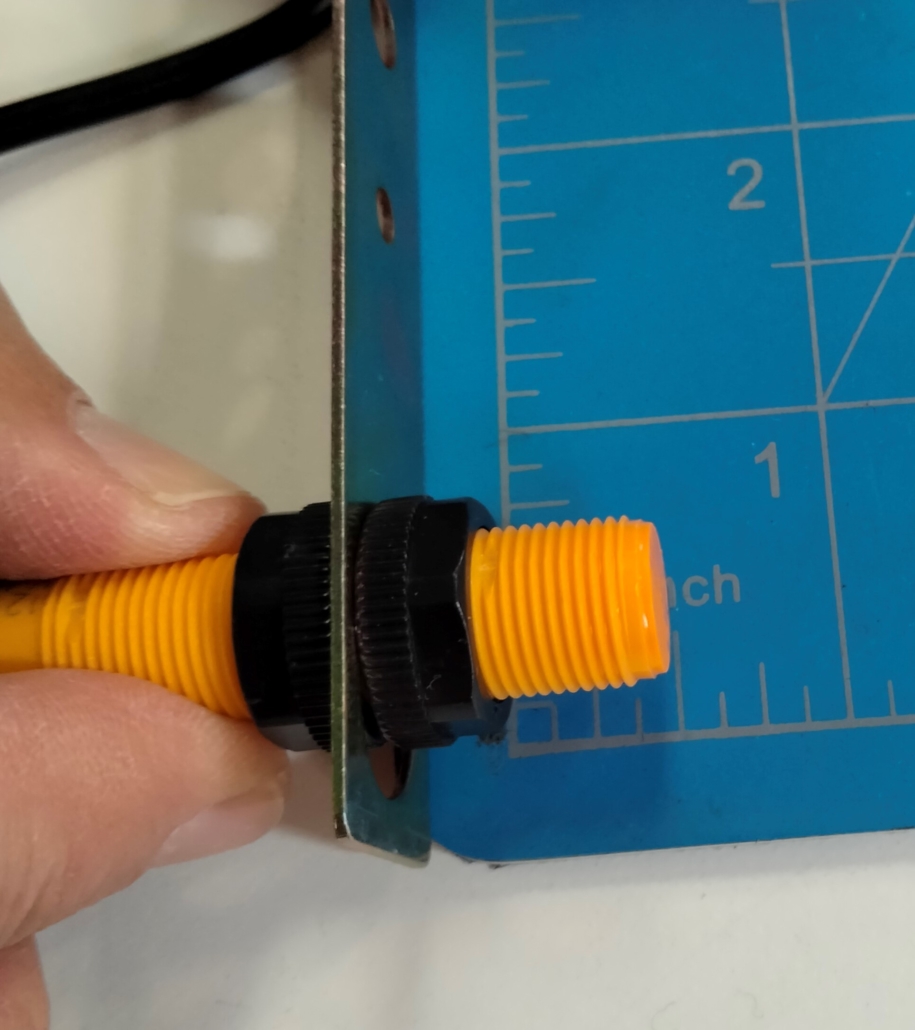
Unscrew one of the nuts on the rotation counter, push the rotation counter through the large oblong hole on the mounting bracket that comes with the kit. Adjust both nuts so there’s about 3/4 inch (19 mm) from the end of the tip of the counter to the mounting bracket. Using pliers, bend the other end of the bracket into an “L”, about midway through the bottom hole on the bracket. (Note: Read through the next step as well; the amount of L or where you bend the bracket may need to be different for your particular tape dispenser.) The tip of the L should be on the same side as the tip of the rotation counter.
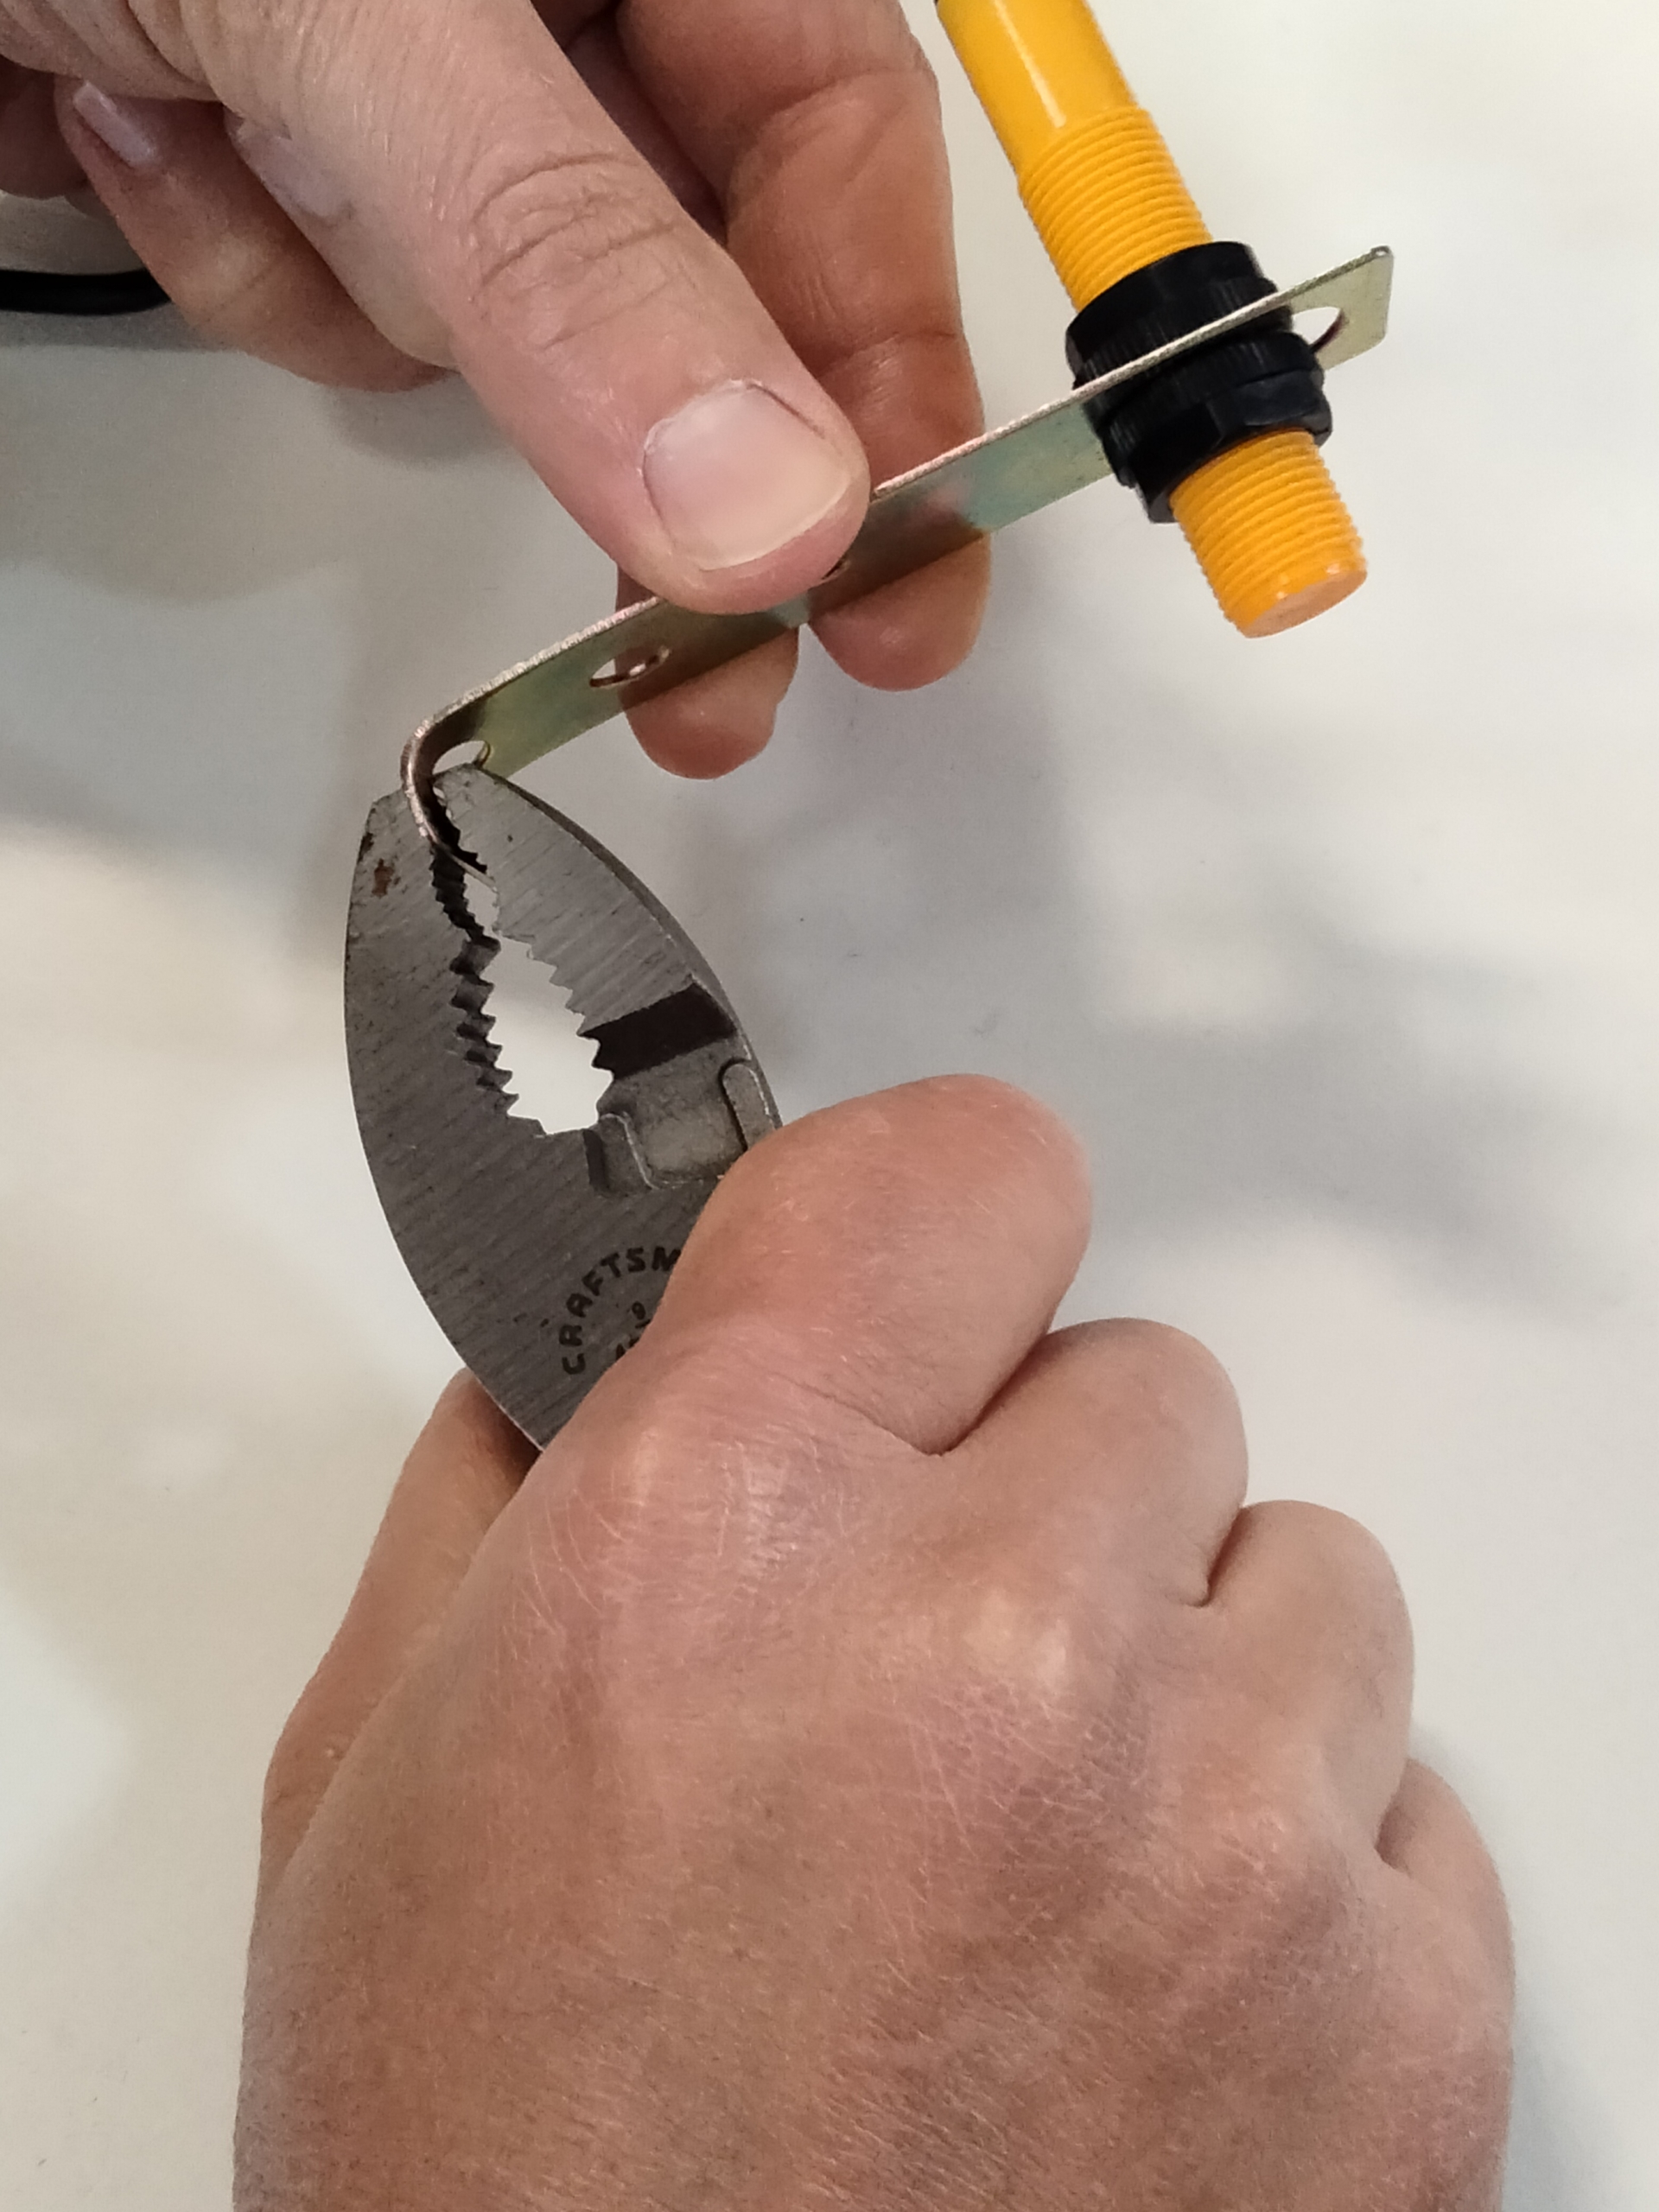
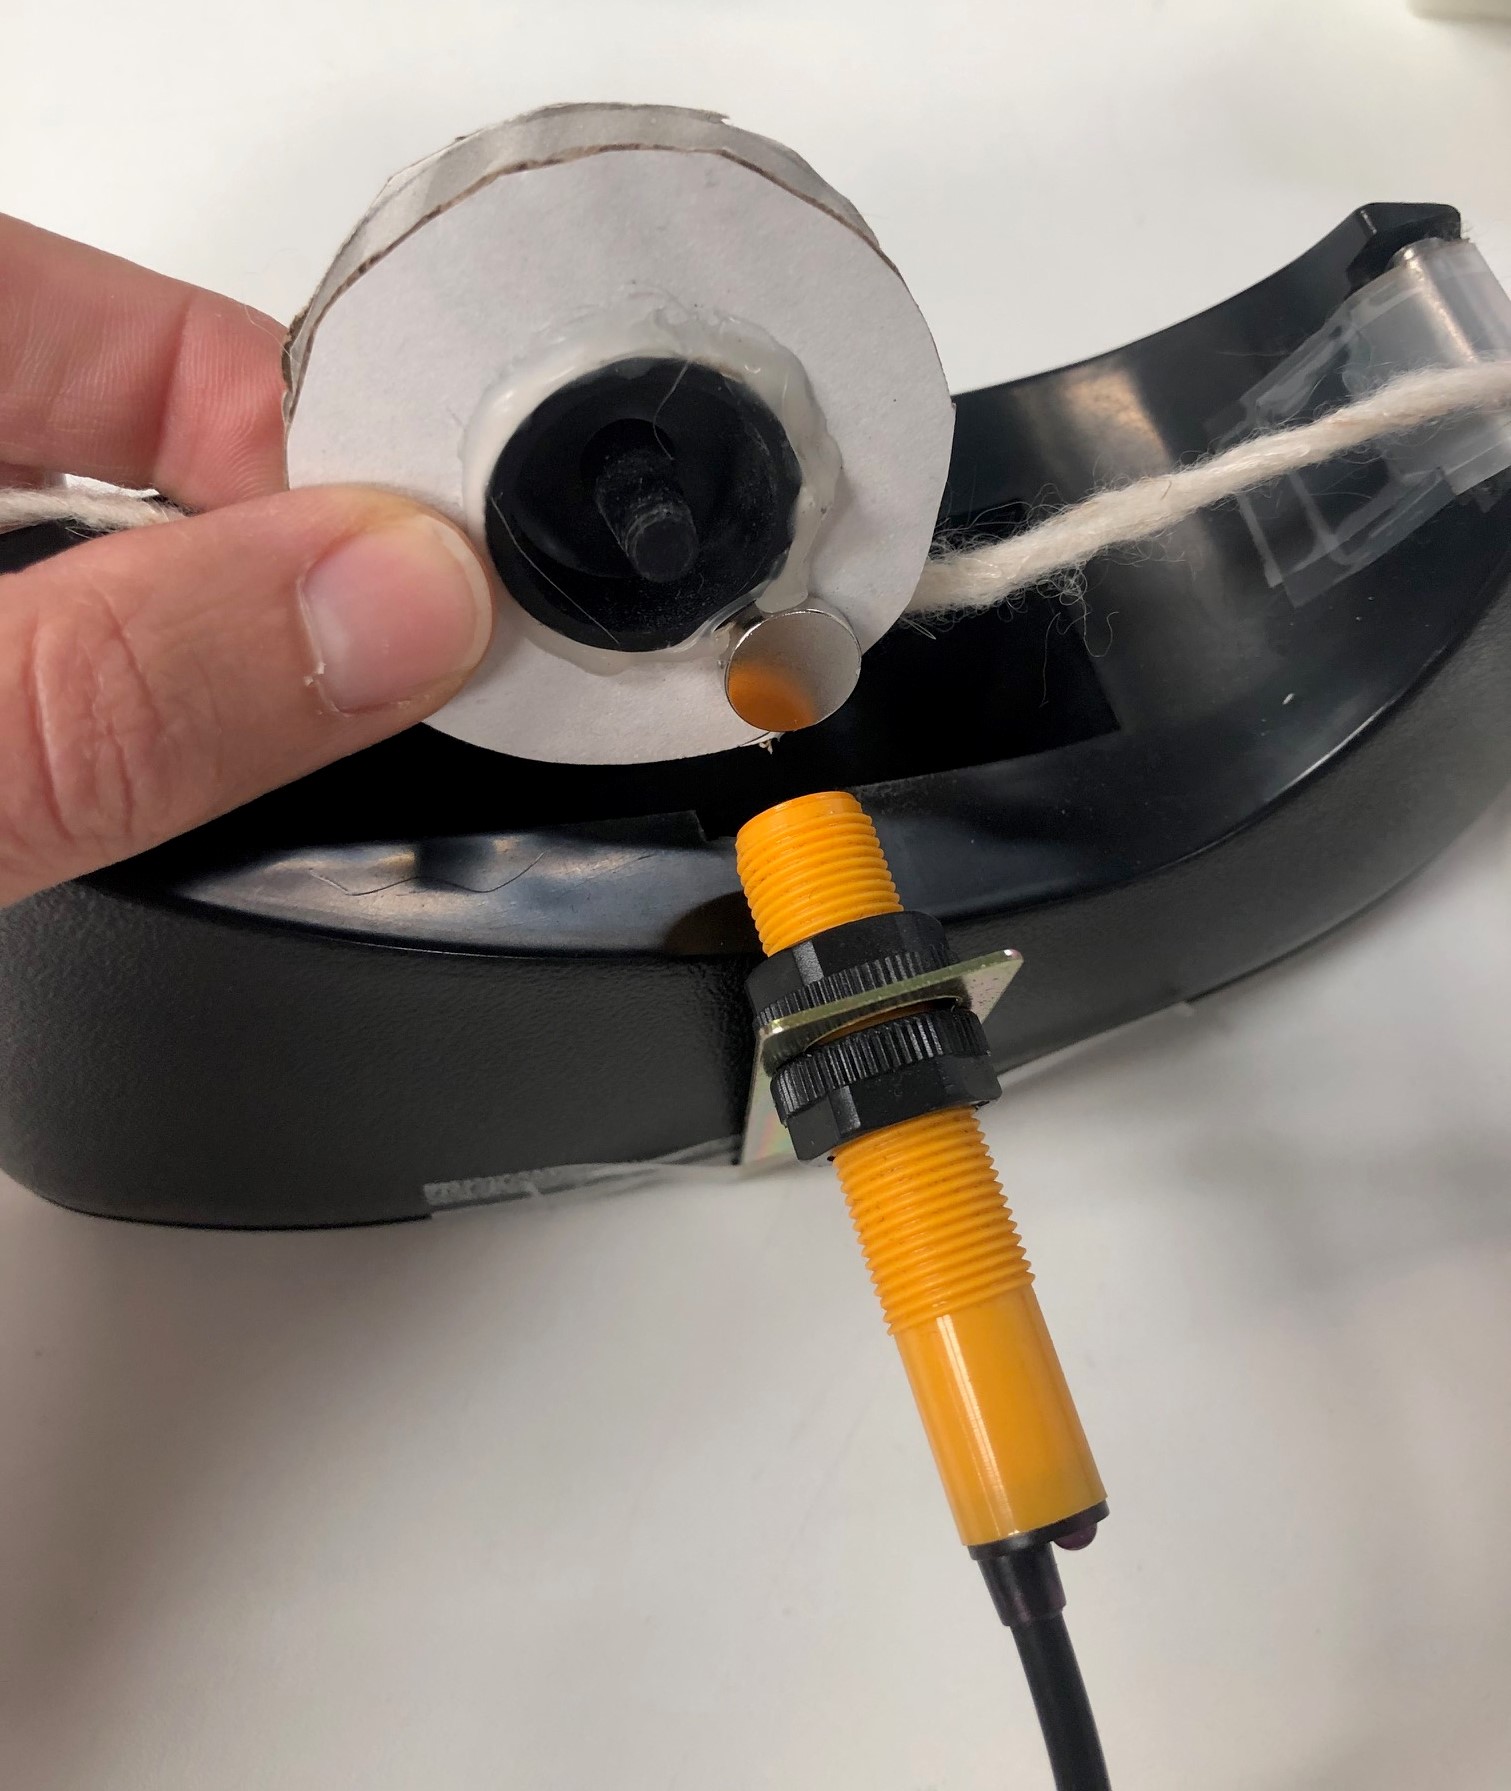
Step 5: Assemble the rotation counter and magnet
Place the tape dispenser core with yarn guides back into the tape dispenser. Rotate the core so the magnet is at the top; you’ll need to hold it there with one hand. With your other hand, hold up the rotation counter bracket on the side of your tape dispenser. The magnet and the rotation counter tip should be directly opposite each other, with approximately a 1/8-inch (3-mm) gap between them. If the gap is different, adjust the nuts on the rotation counter. If the rotation counter is more than 1/8 inch above or below the magnet, adjust the place where you’ve bent the bracket.
Step 6: Tape the bracket to the dispenser
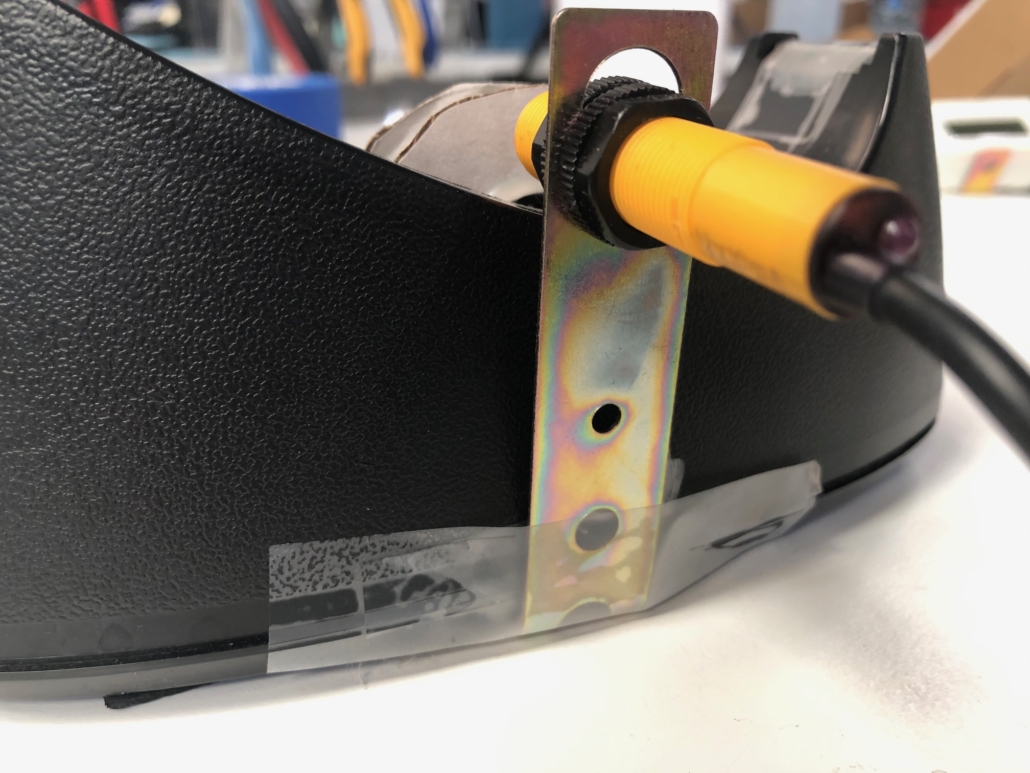

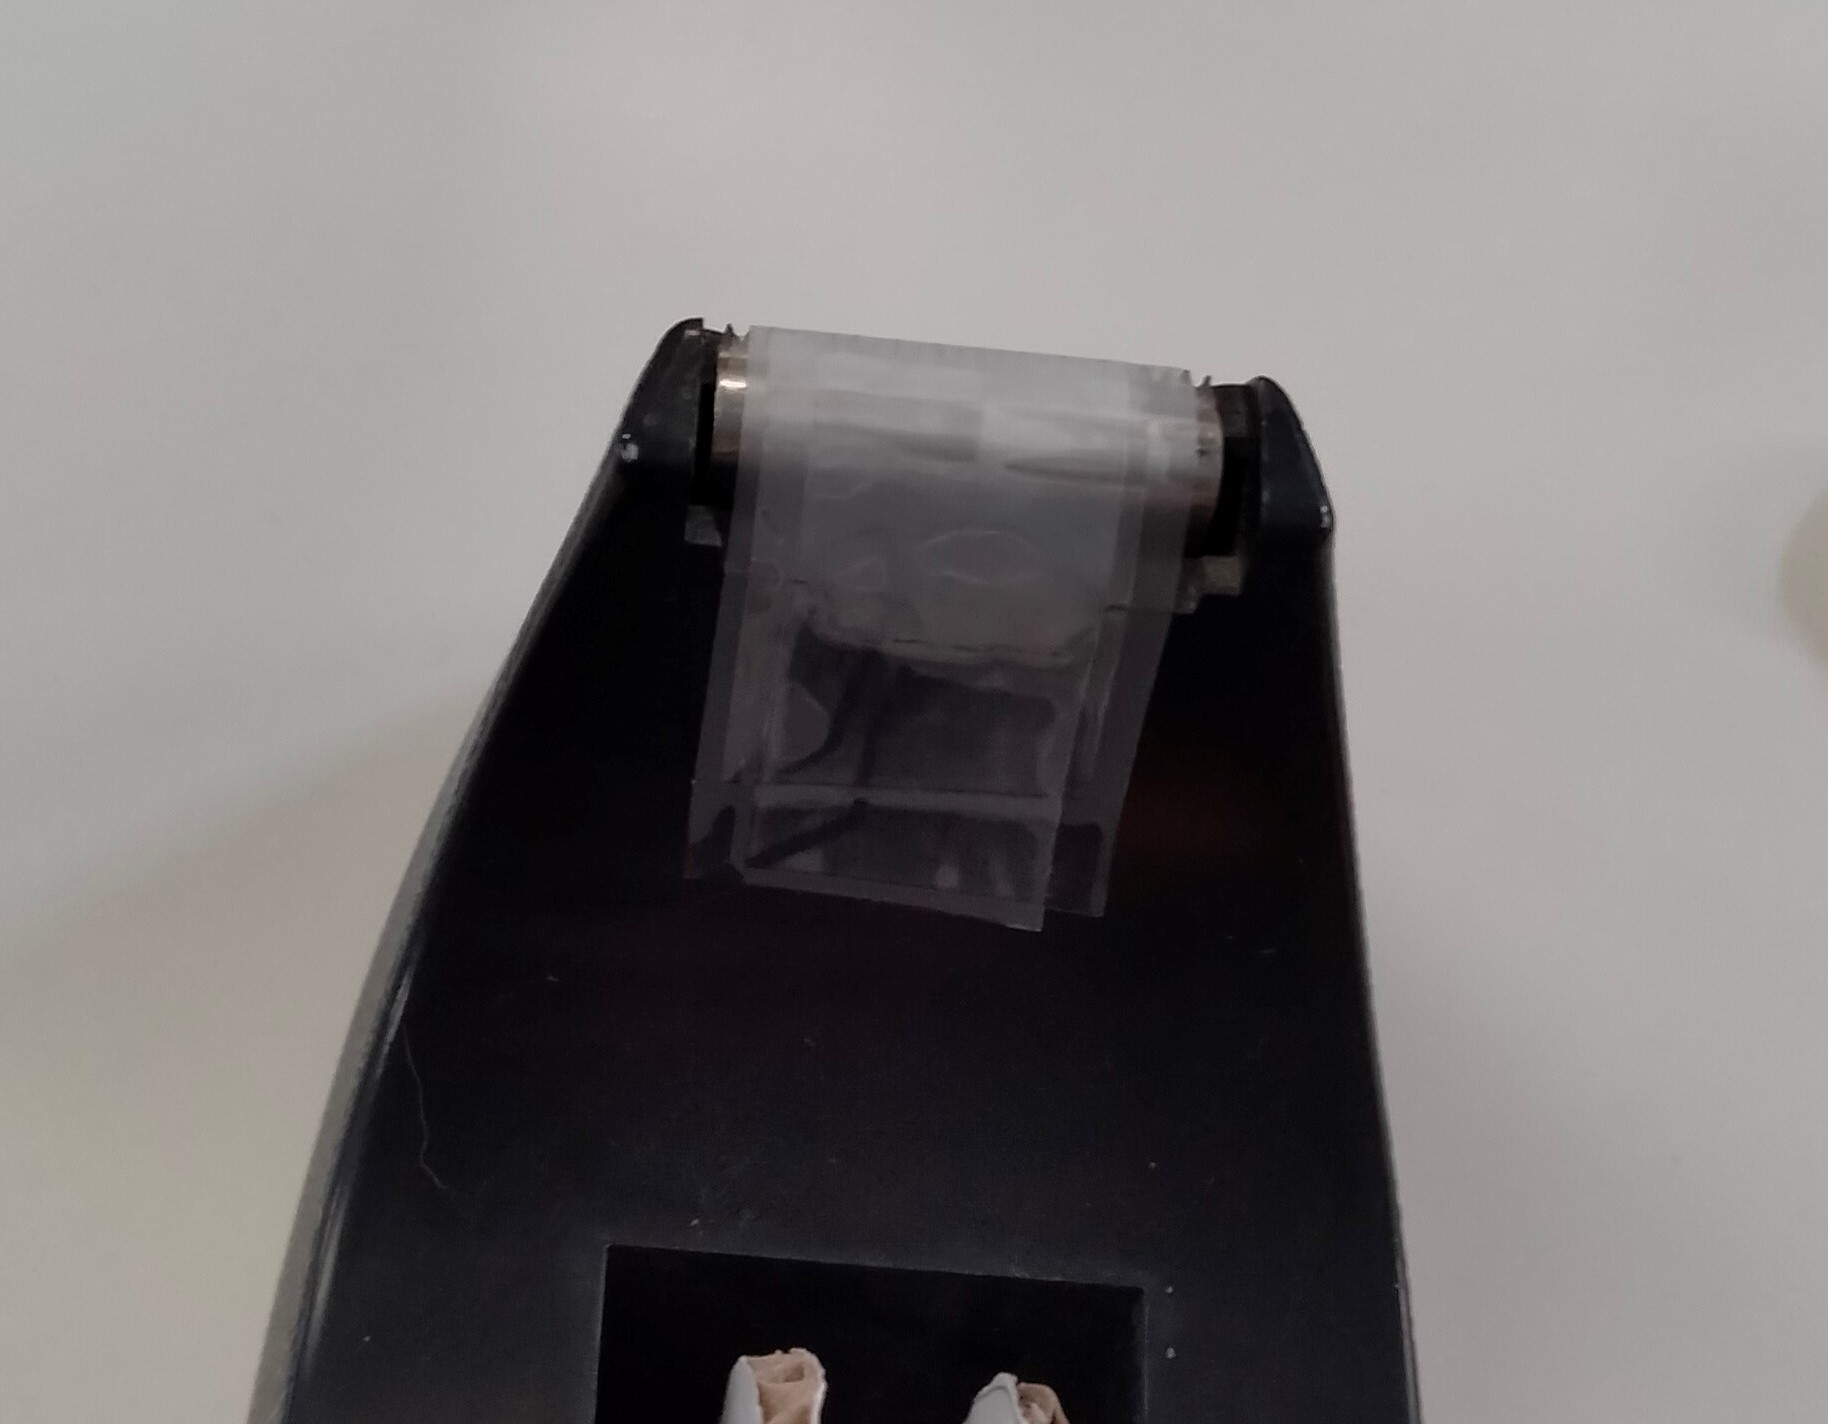
Use a few pieces of tape to attach the bracket to the dispenser. The bracket should be as close to vertical as possible. Our tape dispenser had slanted sides, so we folded up a piece of tape and stuck it between the bracket and tape dispenser to hold it in a vertical position. This helps with consistent spacing between the magnet and counter, which helps with consistent counting! At this time, also use a few pieces of tape to tape over the serrated edge of your tape dispenser. We don’t want it roughing up your yarn!
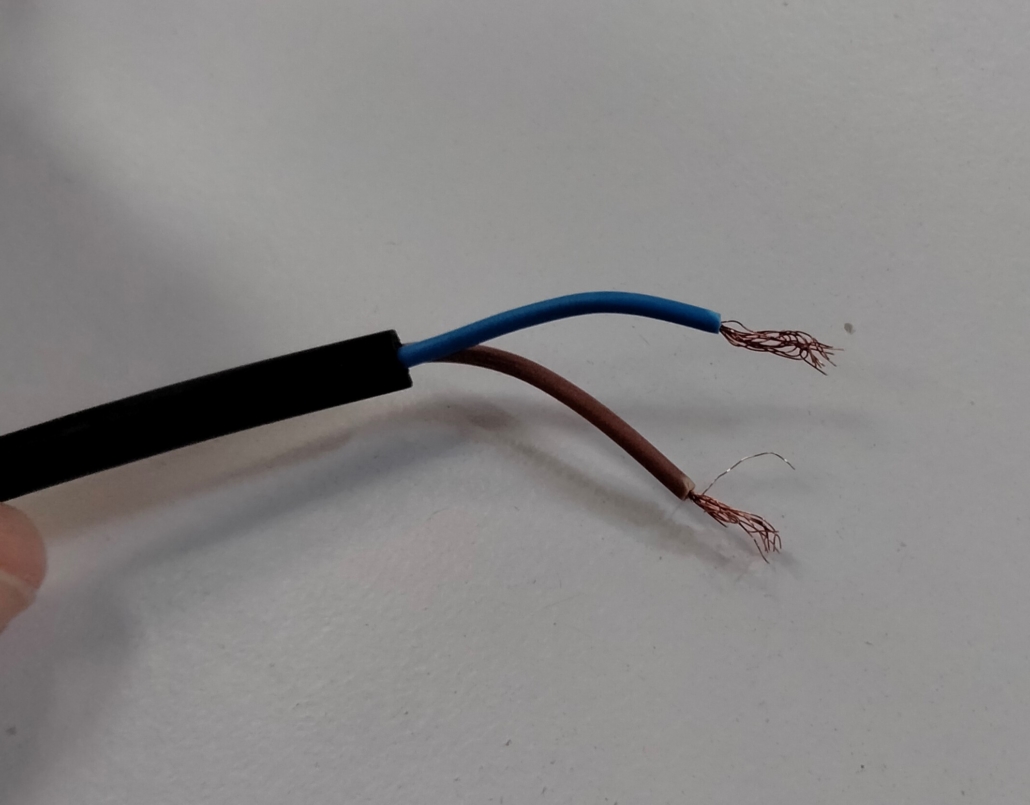
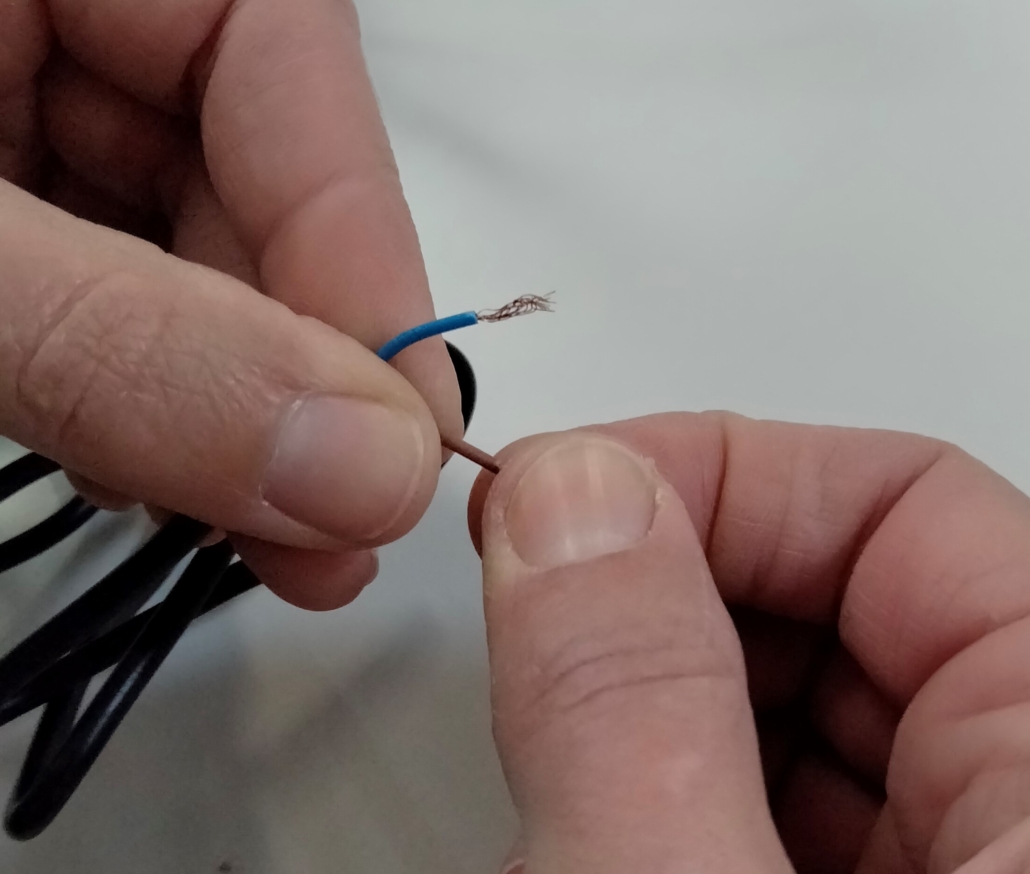
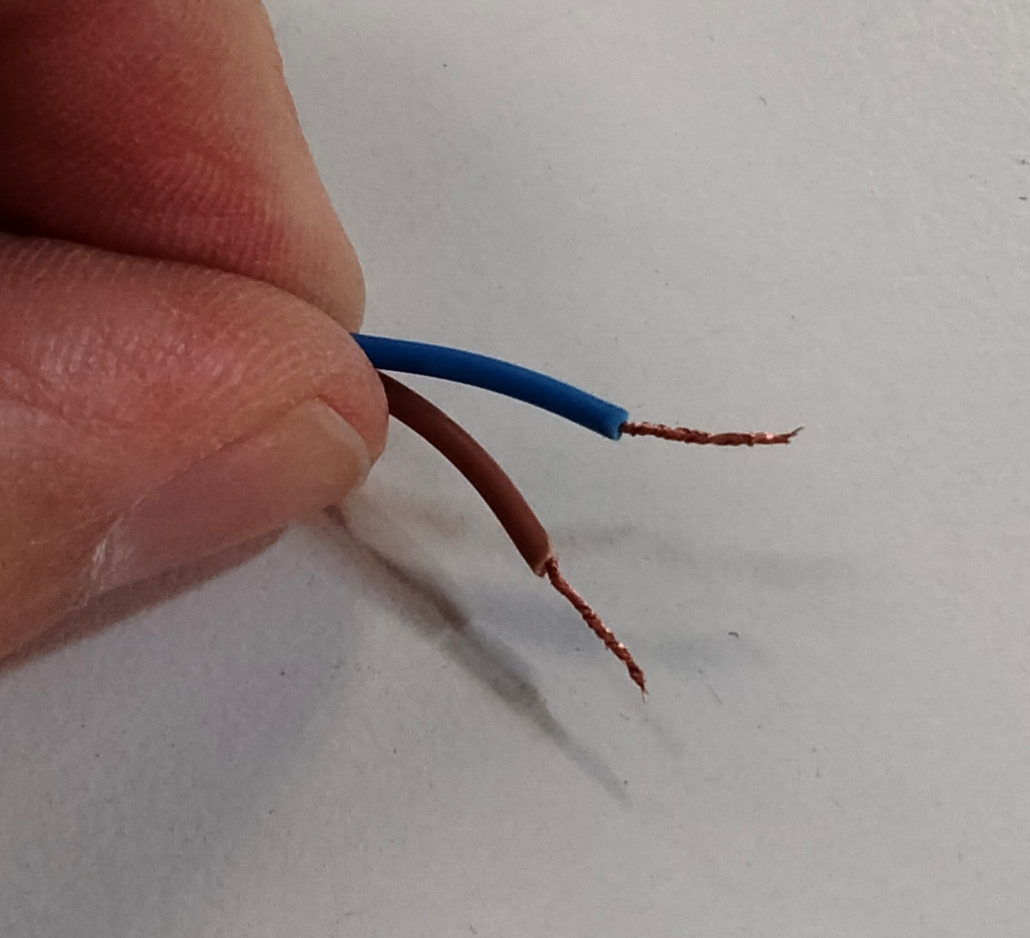
Step 7: Attach the rotation counter to the display

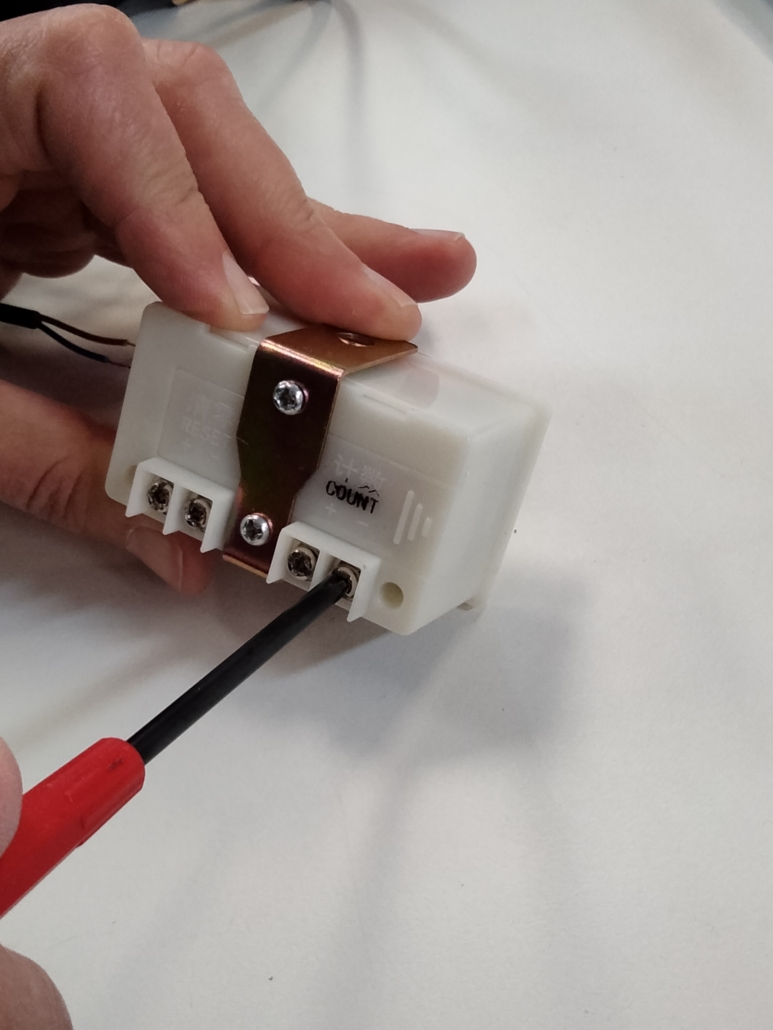
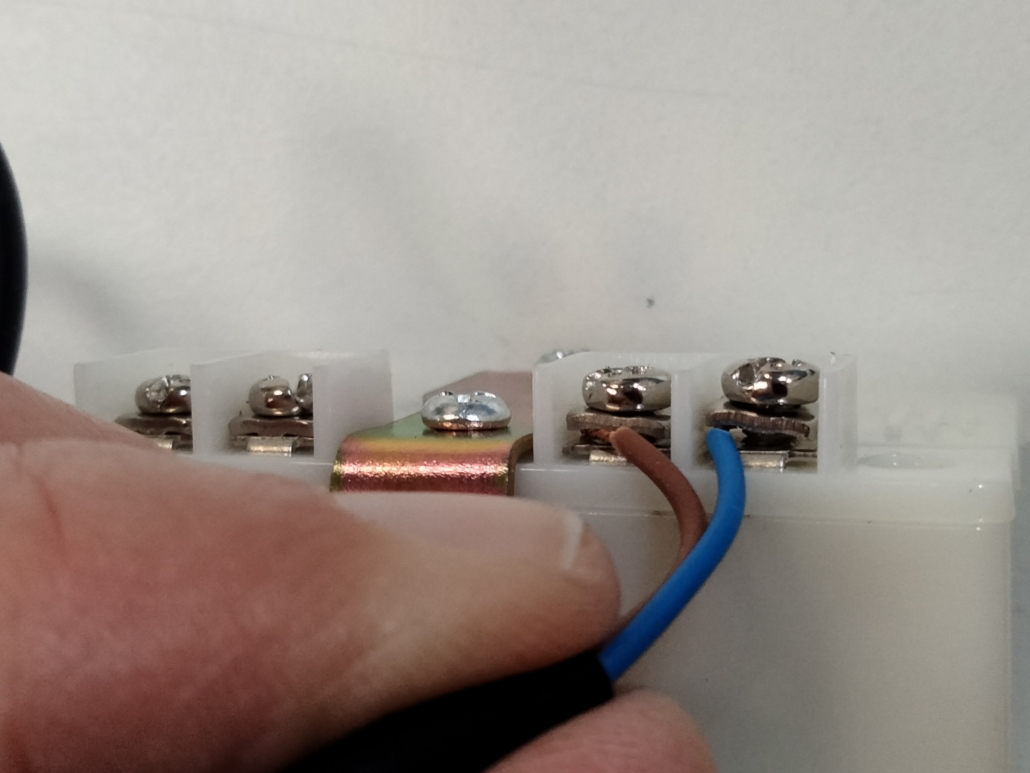
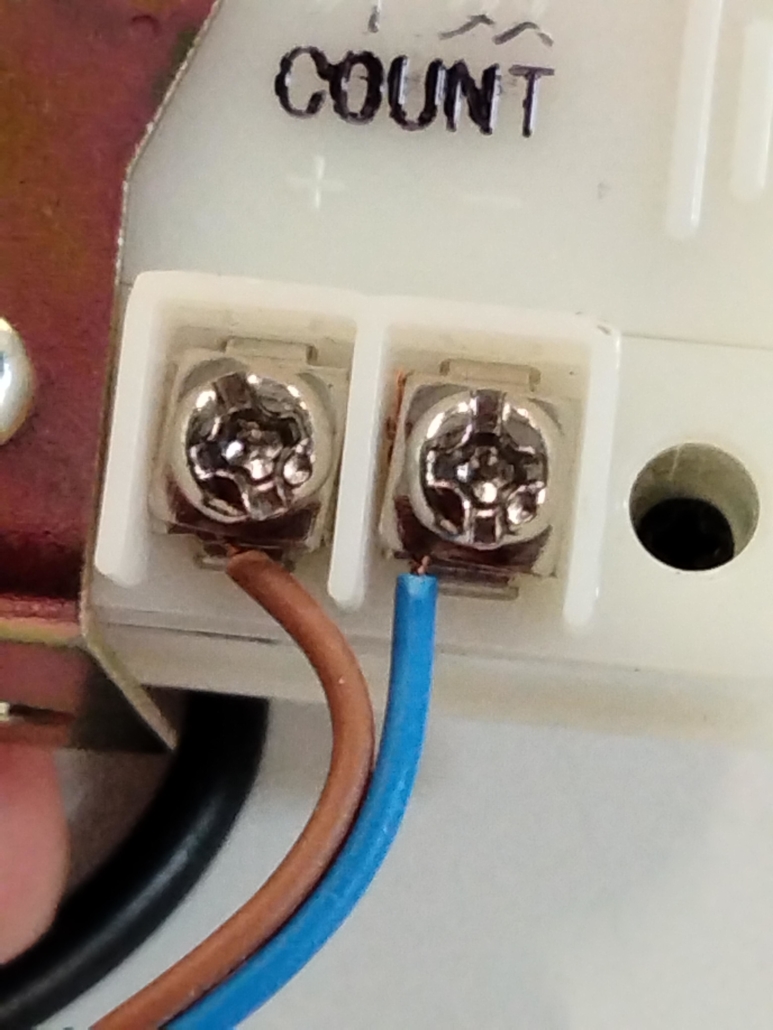

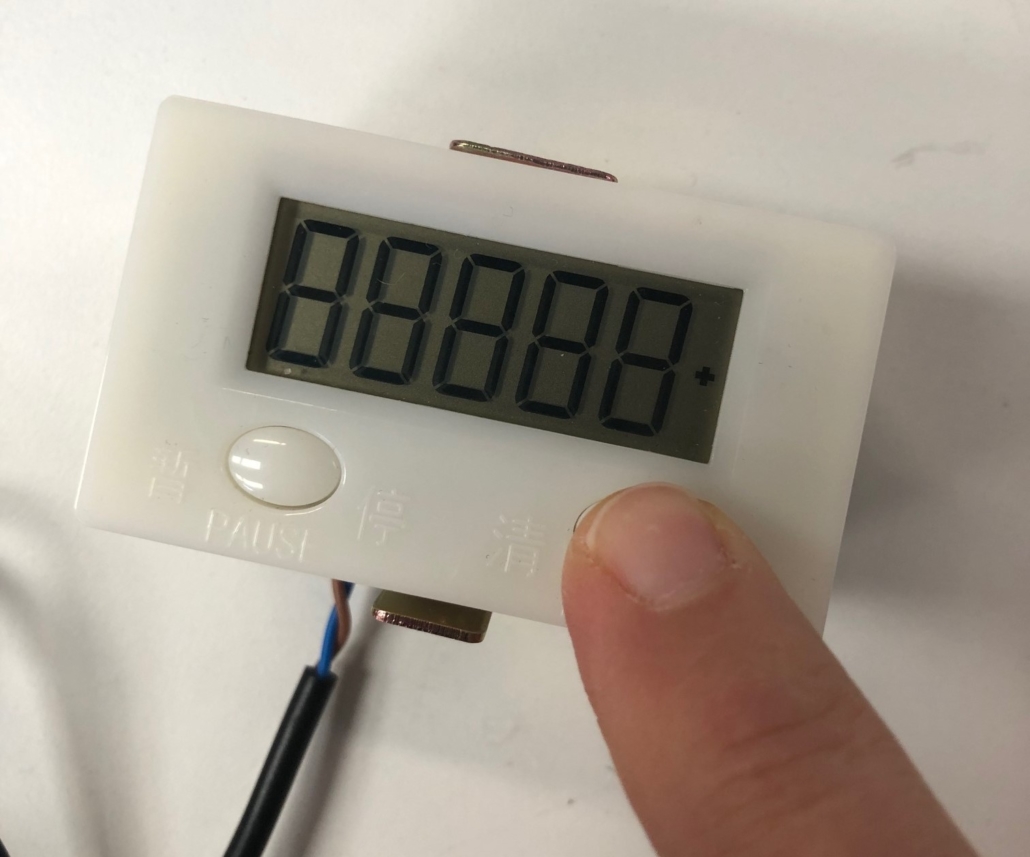
The rotation counter should already have stripped wires, meaning some copper strands are exposed from the insulation, but the strands might be a little frayed. Using your fingers, twist each of the wire ends together so they’re nice and tidy. The LCD should by default have a battery installed and be displaying all zeros in black. If the display is completely blank, unscrew the bracket and back compartment, insert a new battery, and screw it back together. With the Phillips screwdriver, unscrew each “COUNTER” terminal on the LCD display a few rotations so they’re loose but still screwed in a little. The word “COUNTER” is embossed in the white plastic and may be difficult to see; we’ve used a marker to make it black in the photo. Insert the wires between the two plates in each terminal. It doesn’t matter which wire is on the left or right. Screw the terminals back down tightly so the wires are firmly sandwiched between the plates. Set the LCD next to the tape dispenser.
Step 8: Test your counter
Manually rotate the tape dispenser core around a few times, passing the magnet by the tip of the rotation counter. With each pass, the display on the LCD should count up! Note that there’s no way for it to tell direction – it will count up by one no matter which way you turn the core. Press the Reset button to zero the count. We don’t use the pause button; note that if you press it, the counter will no longer count up.
Step 9: Set up your winding
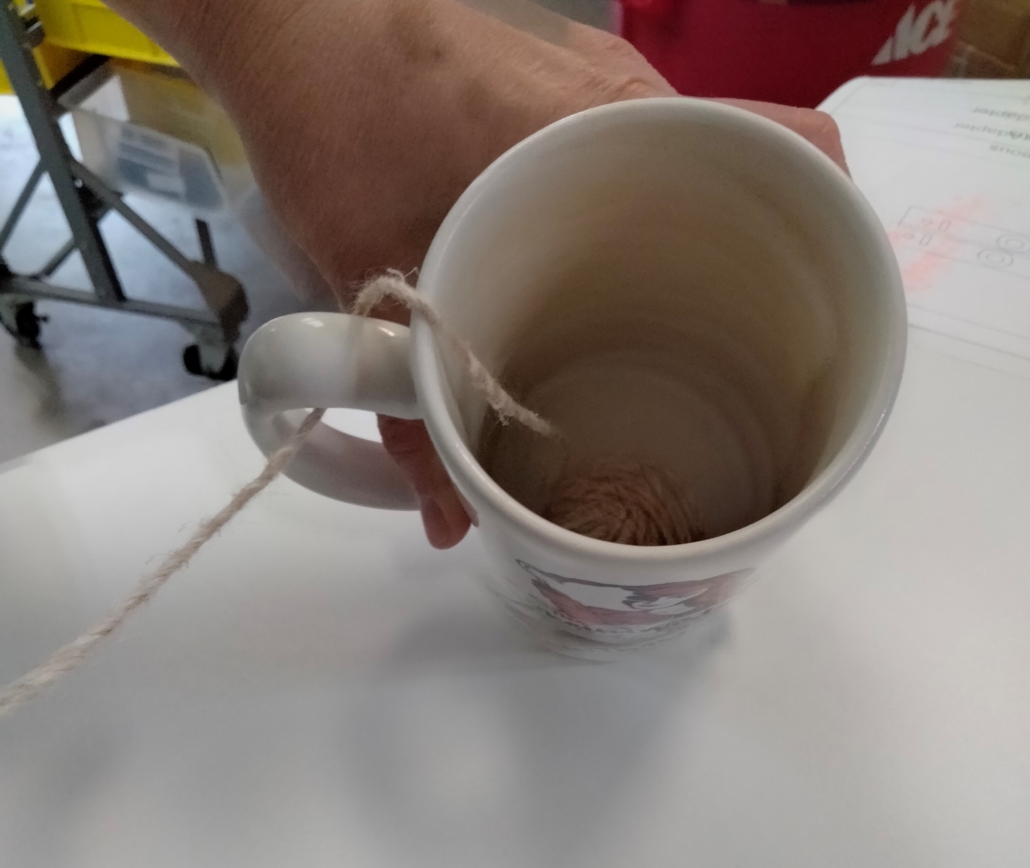

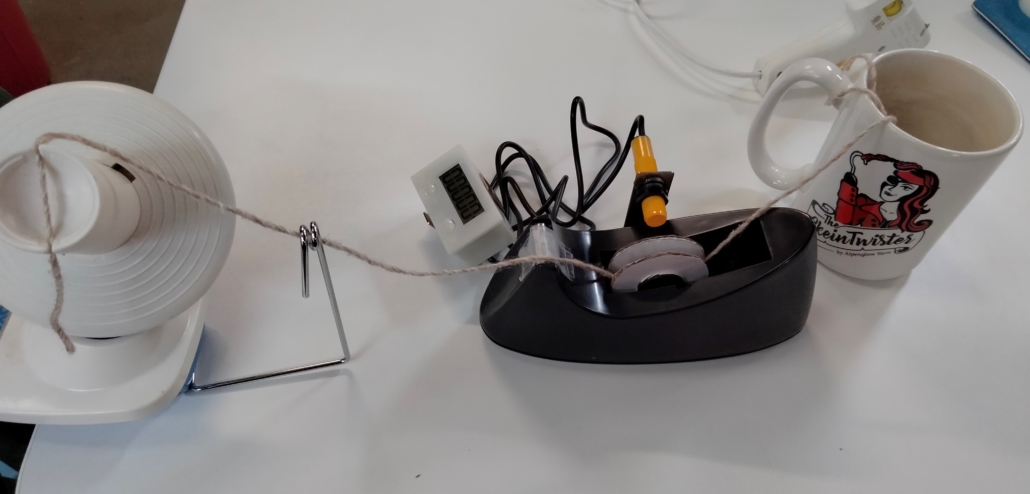
Yay, you’re ready to test it out with some yarn! Clamp your ball winder to a surface, like you would for winding any ball of yarn. Set the tape dispenser in front of the yarn guide so the taped-over serrated edge is opposite your yarn guide. Place the LCD someplace you can see it while winding. Place the yarn container (or yarn bowl) in back of the tape dispenser so all 3 parts are in a line. Take the core out of your tape dispenser. Take an end of your yarn from the ball (if you have an inside vs outside choice, we tend to prefer inside. If the inside is trapped, outside is totally fine), and loop it around the core once, leaving about a one-foot (30-cm) tail. Direction of the loop doesn’t matter. Place the core back inside the tape dispenser, making sure the yarn is within the two yarn guides. Run the end of the yarn through your ball winder’s yarn guide, and attach it to your winder core.
Step 10: Wind and count!
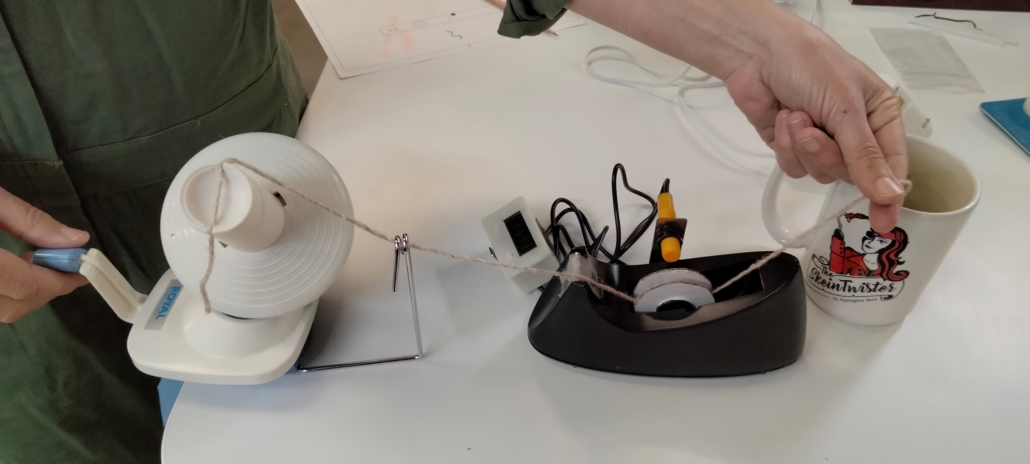
Make sure your yarn is between the yarn guides in the tape dispenser. Zero the count on the LCD display. You will need to guide the yarn properly with your non-winding hand so the core doesn’t jump out of the tape dispenser. Take a loop of yarn from the ball side, and bring it toward you and above the ball winder. Between this and the pull from the ball winder, you should be able to keep a little bit of tension on the tape dispenser core, pulling it toward you, which keeps it seated. We found that pulling the yarn all the way to you and holding it directly above the ball winder was comfortable and worked well. Start winding away! You’ll get approximately 8 rotation counts per crank of the ball winder. Keep winding slow and steady so the core doesn’t jump and so you don’t get going so fast you miss counts. This didn’t happen to us but could theoretically happen. Keep cranking at about 1 to 1.5 cranks per second. When your run out of yarn, since the core is weighted, it will stop. It won’t freespin and add extraneous counts. Check out our video of this step:
Step 11: Do the math!
Now on your LCD, you have a display of number of tape core rotations undergone while winding this ball of yarn. Now let’s turn that into a measurement of length! Tape cores are generally a standard 1 inch (25.4 mm) in diameter in the U.S. We need the circumference to figure out how much yarn goes around with each rotation. Easy-peasy – circumference is just diameter x pi. So 1 inch x 3.14 = 3.14 inches (7.98 cm) of yarn per rotation. There are 36 inches per yard (or 100 cm per meter). So multiply your number of rotations by 3.14 and then divide by 36 to get yards. Or multiply rotations by 7.98 and then divide by 100 to get meters.
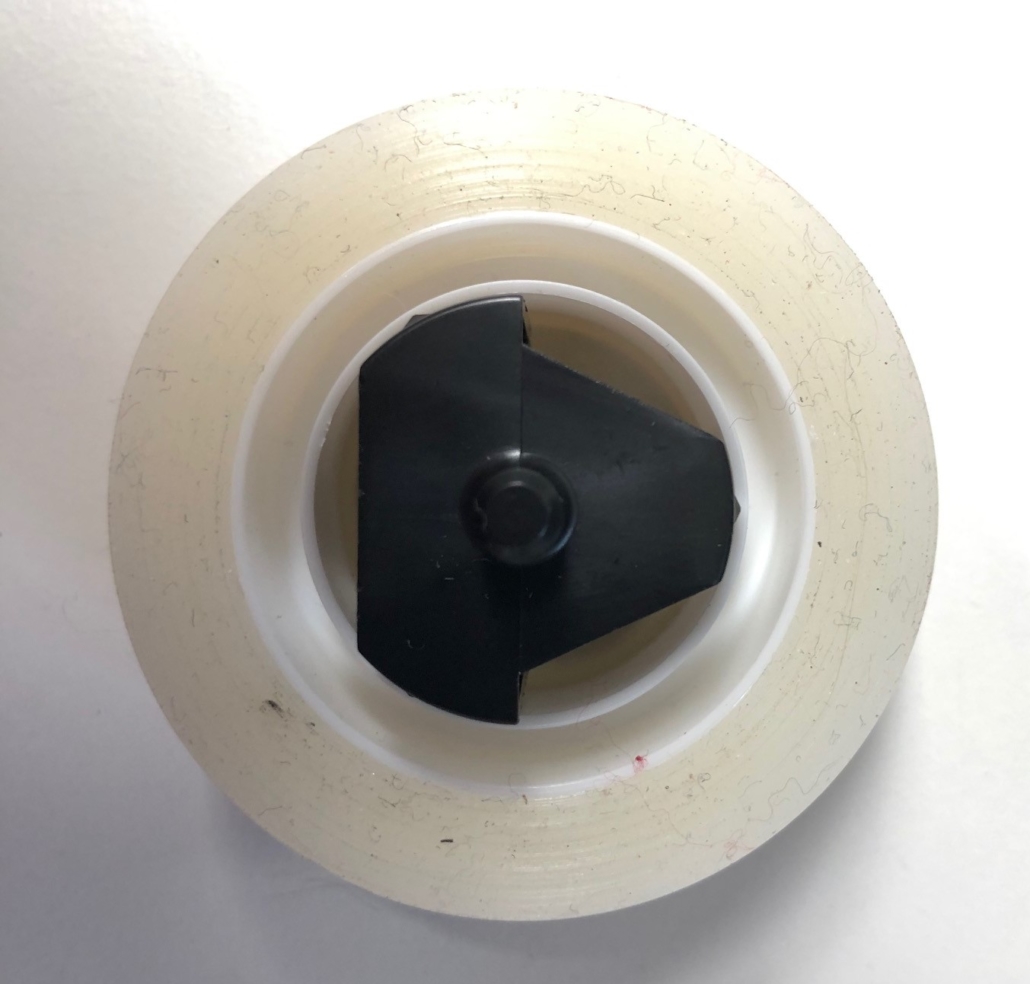

But what if you have a triangular-shaped core? You can take a piece of yarn, wrap it around the core, mark the beginning and end of the wrap, then unwrap it and measure the distance between beginning and end. This is your equivalent circumference. Multiply it by the number of rotations to get total length. If you measured in inches, divide by 36 to get yards, or if you measured in cm, divide by 100 to get meters. Our triangular core’s equivalent circumference was about 3 inches.
We’ve already talked about how it’s difficult to speak of “accuracy” and measuring yarn length because there are so many variables and conditions. There will be a little bit of yarn consumed in the measuring wheel setup that won’t be accounted for, and the last bit that comes off the counter at the end may not cause the core to rotate. This won’t add up to be more than 1 yd. We’ve talked about yarn tension, and consistent length measurement will depend on consistent yarn tension throughout the winding, regardless of how much the ball is flopping around. We also mentioned fiber content and slipperiness; stickier yarn like non-superwash wool won’t slip on the core while 100% silk or nylon might. Speaking of the core, if it’s a little bigger or smaller than the standard 1-inch diameter, that could account for some error, and you may want to plug in the actual diameter of the core into the calculations above. Your speed and whether you have to start and stop to fix snags may also introduce some error.
Even with all of these variables, we can get an idea of measurement repeatability by winding the same ball over and over again. We found that if you’re an experienced yarn handler who is able to quickly and automatically adjust your fingers to keep consistent tension while winding, you can achieve very repeatable results, within 3–5% over multiple windings of the same ball. If you’re not as experienced with yarn management, then it’s closer to 10%. So if you want to be conservative in your length estimation, estimate that the minimum length of yarn in your ball is 10% less than your calculation. Happy yarn length estimating!
Carrie Sundra is an engineer with a serious yarn addiction, who decided to leave a life of electronics and high-tech spy planes for hand-dyeing and knitting. Alpenglow Yarn started in 2009 with 3 words: Glowing Natural Color. Her most well-known products, the SkeinMinder and SkeinTwister, add automation to winding and twisting operations, make the process more efficient, and help scale up production. You can find out more at alpenglowyarn.com.
Did you know we also have a monthly PLY newsletter? Sign up here!
PLY Magazine believes that Black lives matter, as well as LBGTQI+ lives. Those most vulnerable and persecuted in our communities deserve our love and support. Please be good to each other.

South Iceland Woolweek
photos and information from Maja Siska
Introducting the first ever South Iceland Woolweek – a mostly local and very authentic affair.
With immunisations progressing nicely here in Iceland and borders open to people who are fully vaccinated or recovered, we have decided to hold our first South Iceland Woolweek this Oct. 3rd through 9th, 2021.
We are a large group of local wool women: spinners, knitters, felters, and dyers as well as Uppspuni mini mill and the 30-year-old Thingborg wool coop. The idea came over a cup of coffee: a celebration of Icelandic wool, sheep, and wool processing traditions and crafts. The aim was always to include as many locals as possible: sheep farmers as well as the many local knitters and crafters. And of course to invite anyone who loves wool.
The wool week will start on Sunday, Oct. 3rd with an annual event no sheep farmer in the area wants to miss: the coloured sheep show. This is a unique breeding show organized by local farmers who decided we need to pay more attention to preserving the many colours in the Icelandic sheep. This breeding show uses the normal breeding standard for 50% of its judging and the other 50% are judged on colour: rarity and beauty, as well as wool quality.
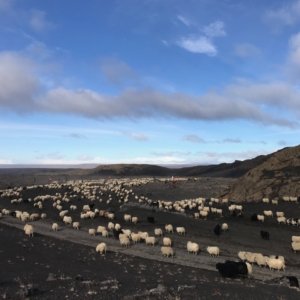
In the past 10 years or so, this event has grown from some 20 people coming together to well over 100 people. But it is still the same authentic experience and a lot of fun: homemade cakes (the price for entering a sheep in the competition!) and coffee in the horse stable of a local farm and a judging ring in the riding hall next door. The prize money is a cheap trophy but much more important is the joy and pride to have bred the best colour of its group and to have won it over your neighbour! And as a result the number of coloured sheep and the variety of colours has increased a lot in this area in the past 10 years!
This event is typical for the atmosphere we hope to create during wool week: a truly local affair, only this year you are all invited to join us!
Also on the program are the following events:
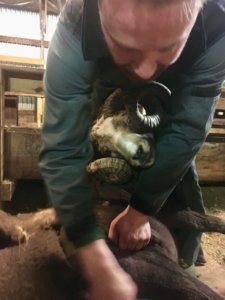
Monday Oct. 4th: open house and open sheep stable at the mini mill Uppspuni – demonstration of sheep shearing and mill machinery
Tuesday Oct 5th & Wednesday Oct 6th: wool women around the South of Iceland open up their workshops and mini galleries
Tuesday Oct 5th through Friday Oct. 8th: classes and workshops, teacher´s list on www.ullarvikan.is – detailed schedule of workshops soon to follow
Saturday Oct. 9th: Maker´s market in Thingborg and the spinning competition Ull í fat.
The events for our Woolweek are in a rural area (mostly Selfoss – Hella) and there is no public transport. You can rent a car and do some sightseeing as well as Woolweek activities. The south sports many of the most famous attractions in Iceland, like the Golden Circle and Geysir, the Black Beach, Blue Lagoon and of course the latest volcanic eruption.
There will also be a guided group tour with our local and very experienced guide Petra and a program that combines sightseeing and Woolweek. Petra can also help you organize your self-drive trip: www.klettahlid.is.
Do not hesitate to contact her about travel arrangements or me with anything concerning South Iceland Woolweek: www.skinnhufa.is
I hope to see you in October!
Did you know we also have a monthly PLY newsletter? Sign up here!
PLY Magazine believes that Black lives matter, as well as LBGTQI+ lives. Those most vulnerable and persecuted in our communities deserve our love and support. Please be good to each other.


Leave a Reply
Want to join the discussion?Feel free to contribute!